Iframe Block

Giới thiệu

IFrame Block cho phép nhúng trang web hoặc nội dung bên ngoài vào trang hiện tại. Người dùng có thể dễ dàng tích hợp ứng dụng bên ngoài vào trang bằng cách cấu hình URL hoặc chèn trực tiếp mã HTML. Khi sử dụng trang HTML, người dùng có thể tùy biến nội dung linh hoạt để đáp ứng nhu cầu hiển thị cụ thể. Cách tiếp cận này đặc biệt phù hợp với các kịch bản cần hiển thị tùy chỉnh, có thể tải tài nguyên bên ngoài mà không cần chuyển trang, nâng cao trải nghiệm người dùng và hiệu quả tương tác trang.

Cài đặt

Plugin tích hợp sẵn, không cần cài đặt.

Thêm block

20240408220259

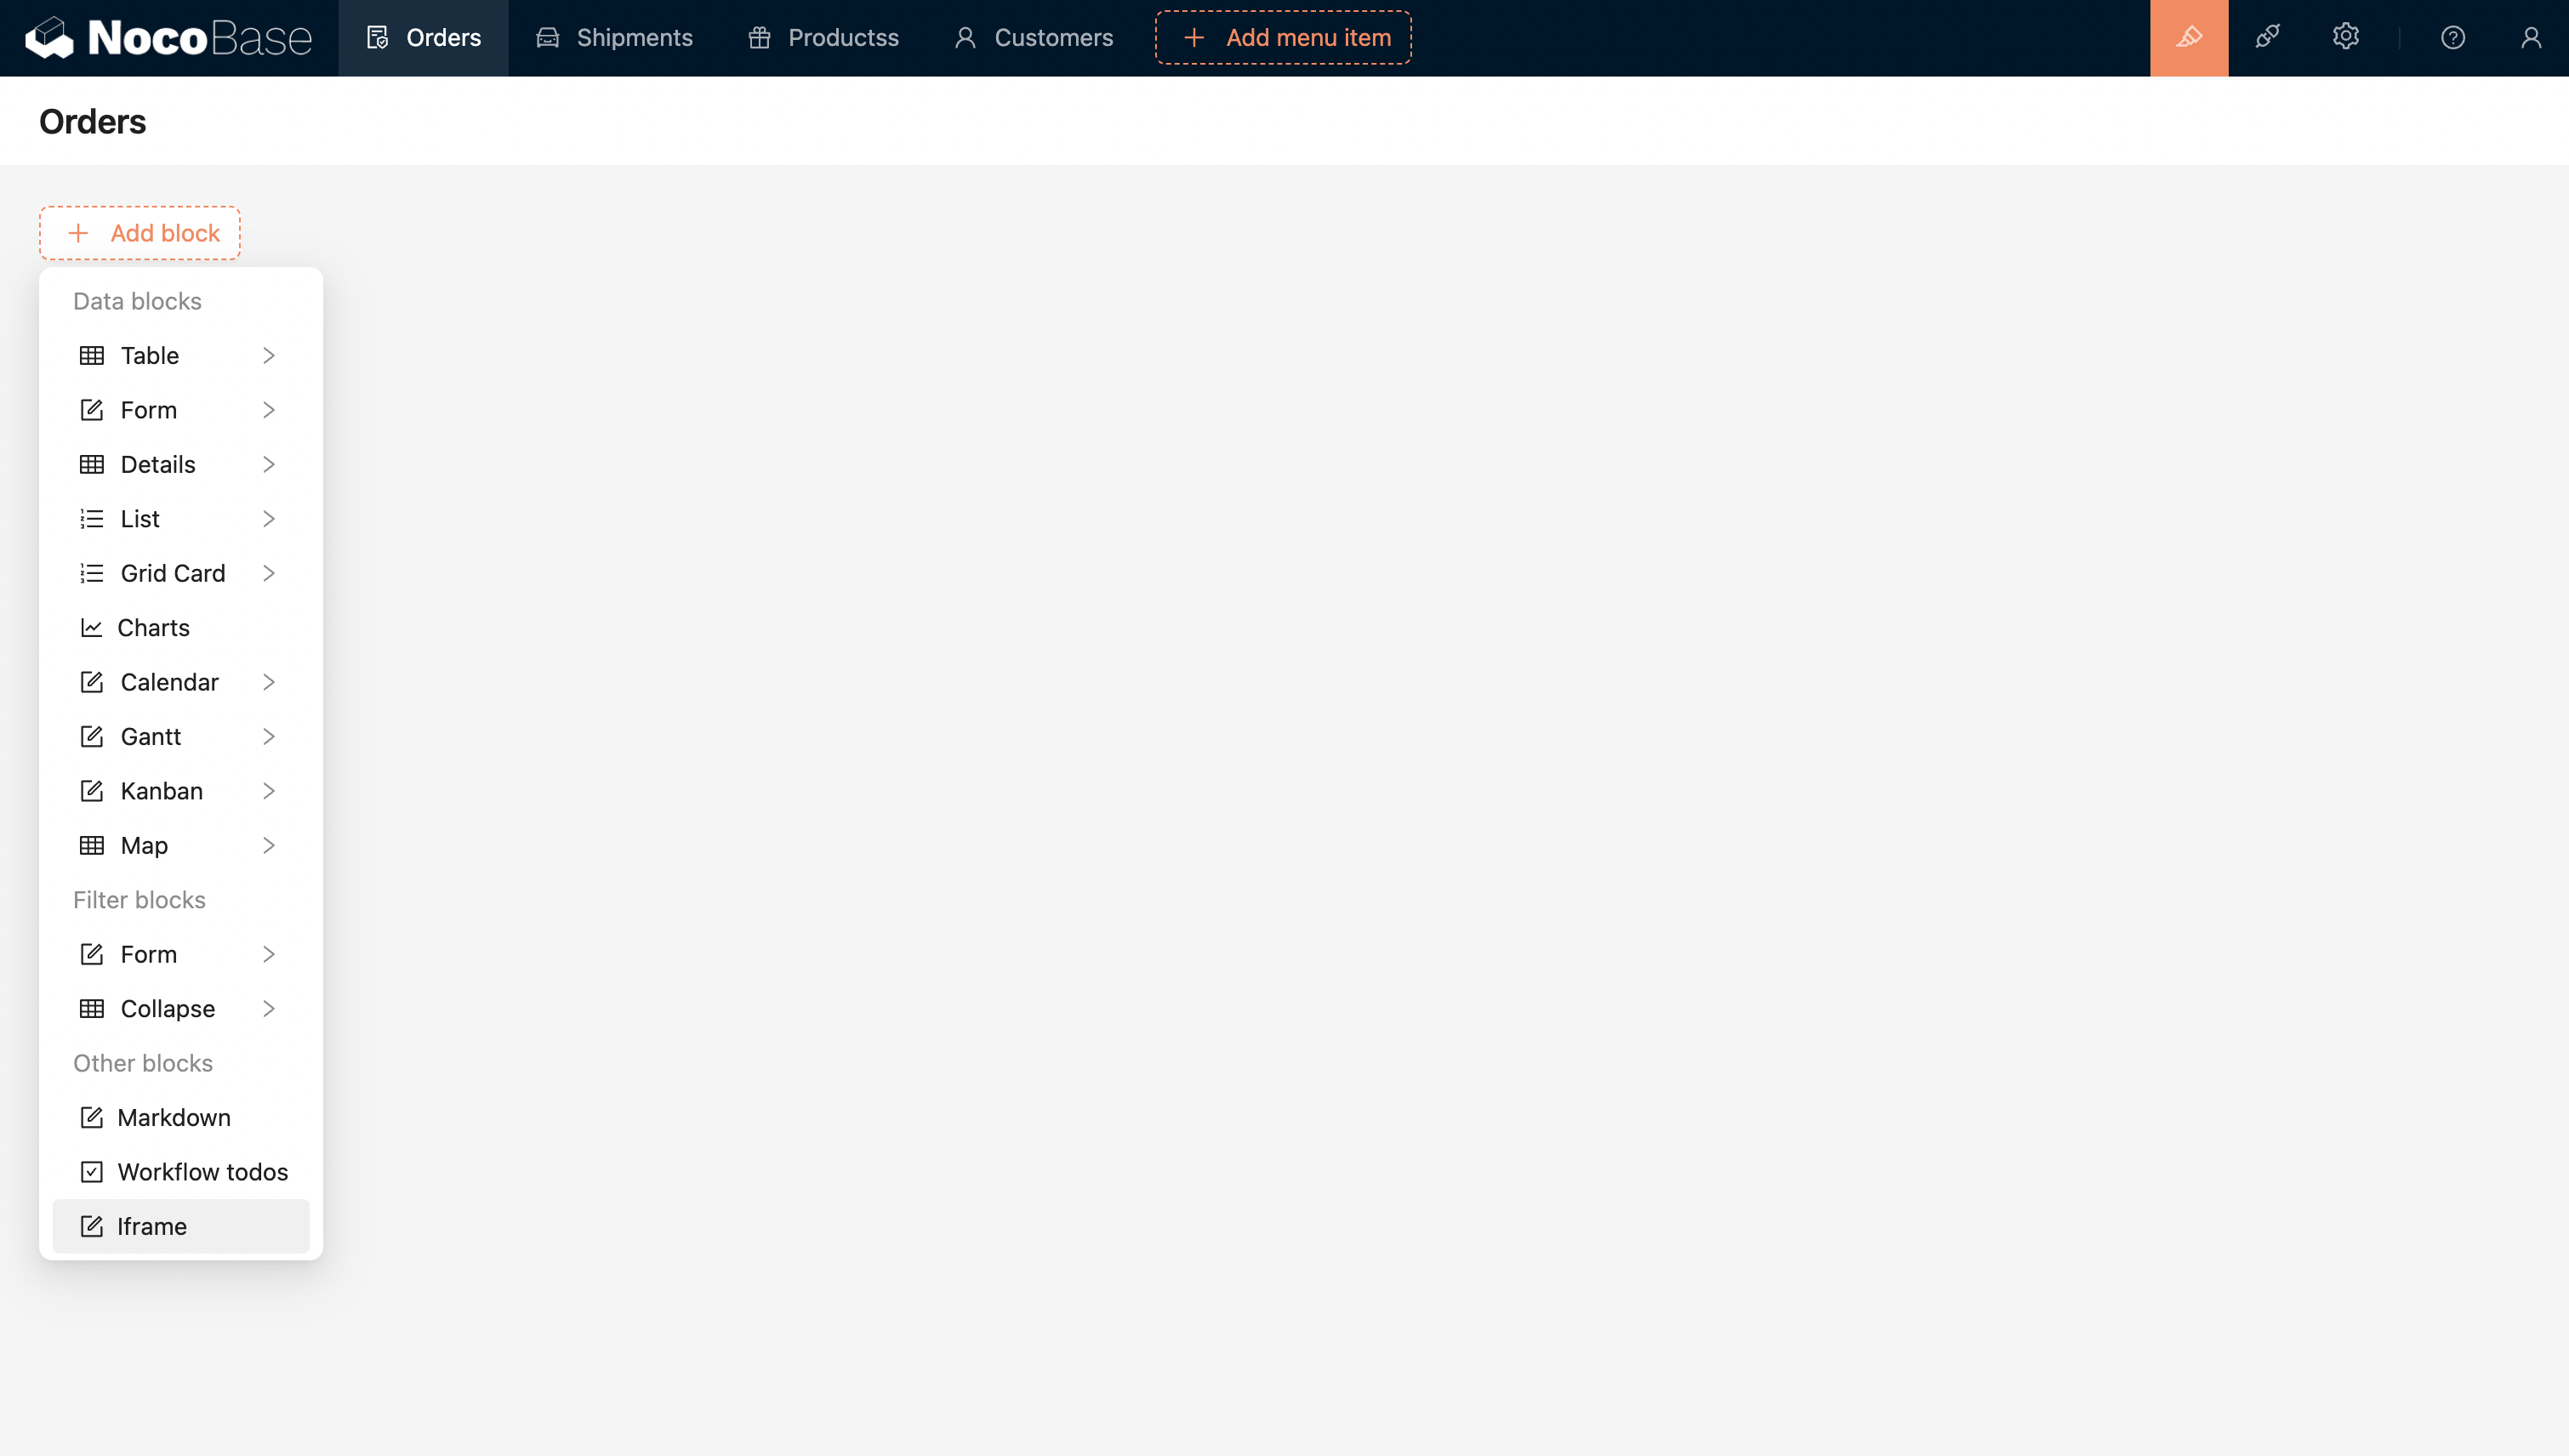
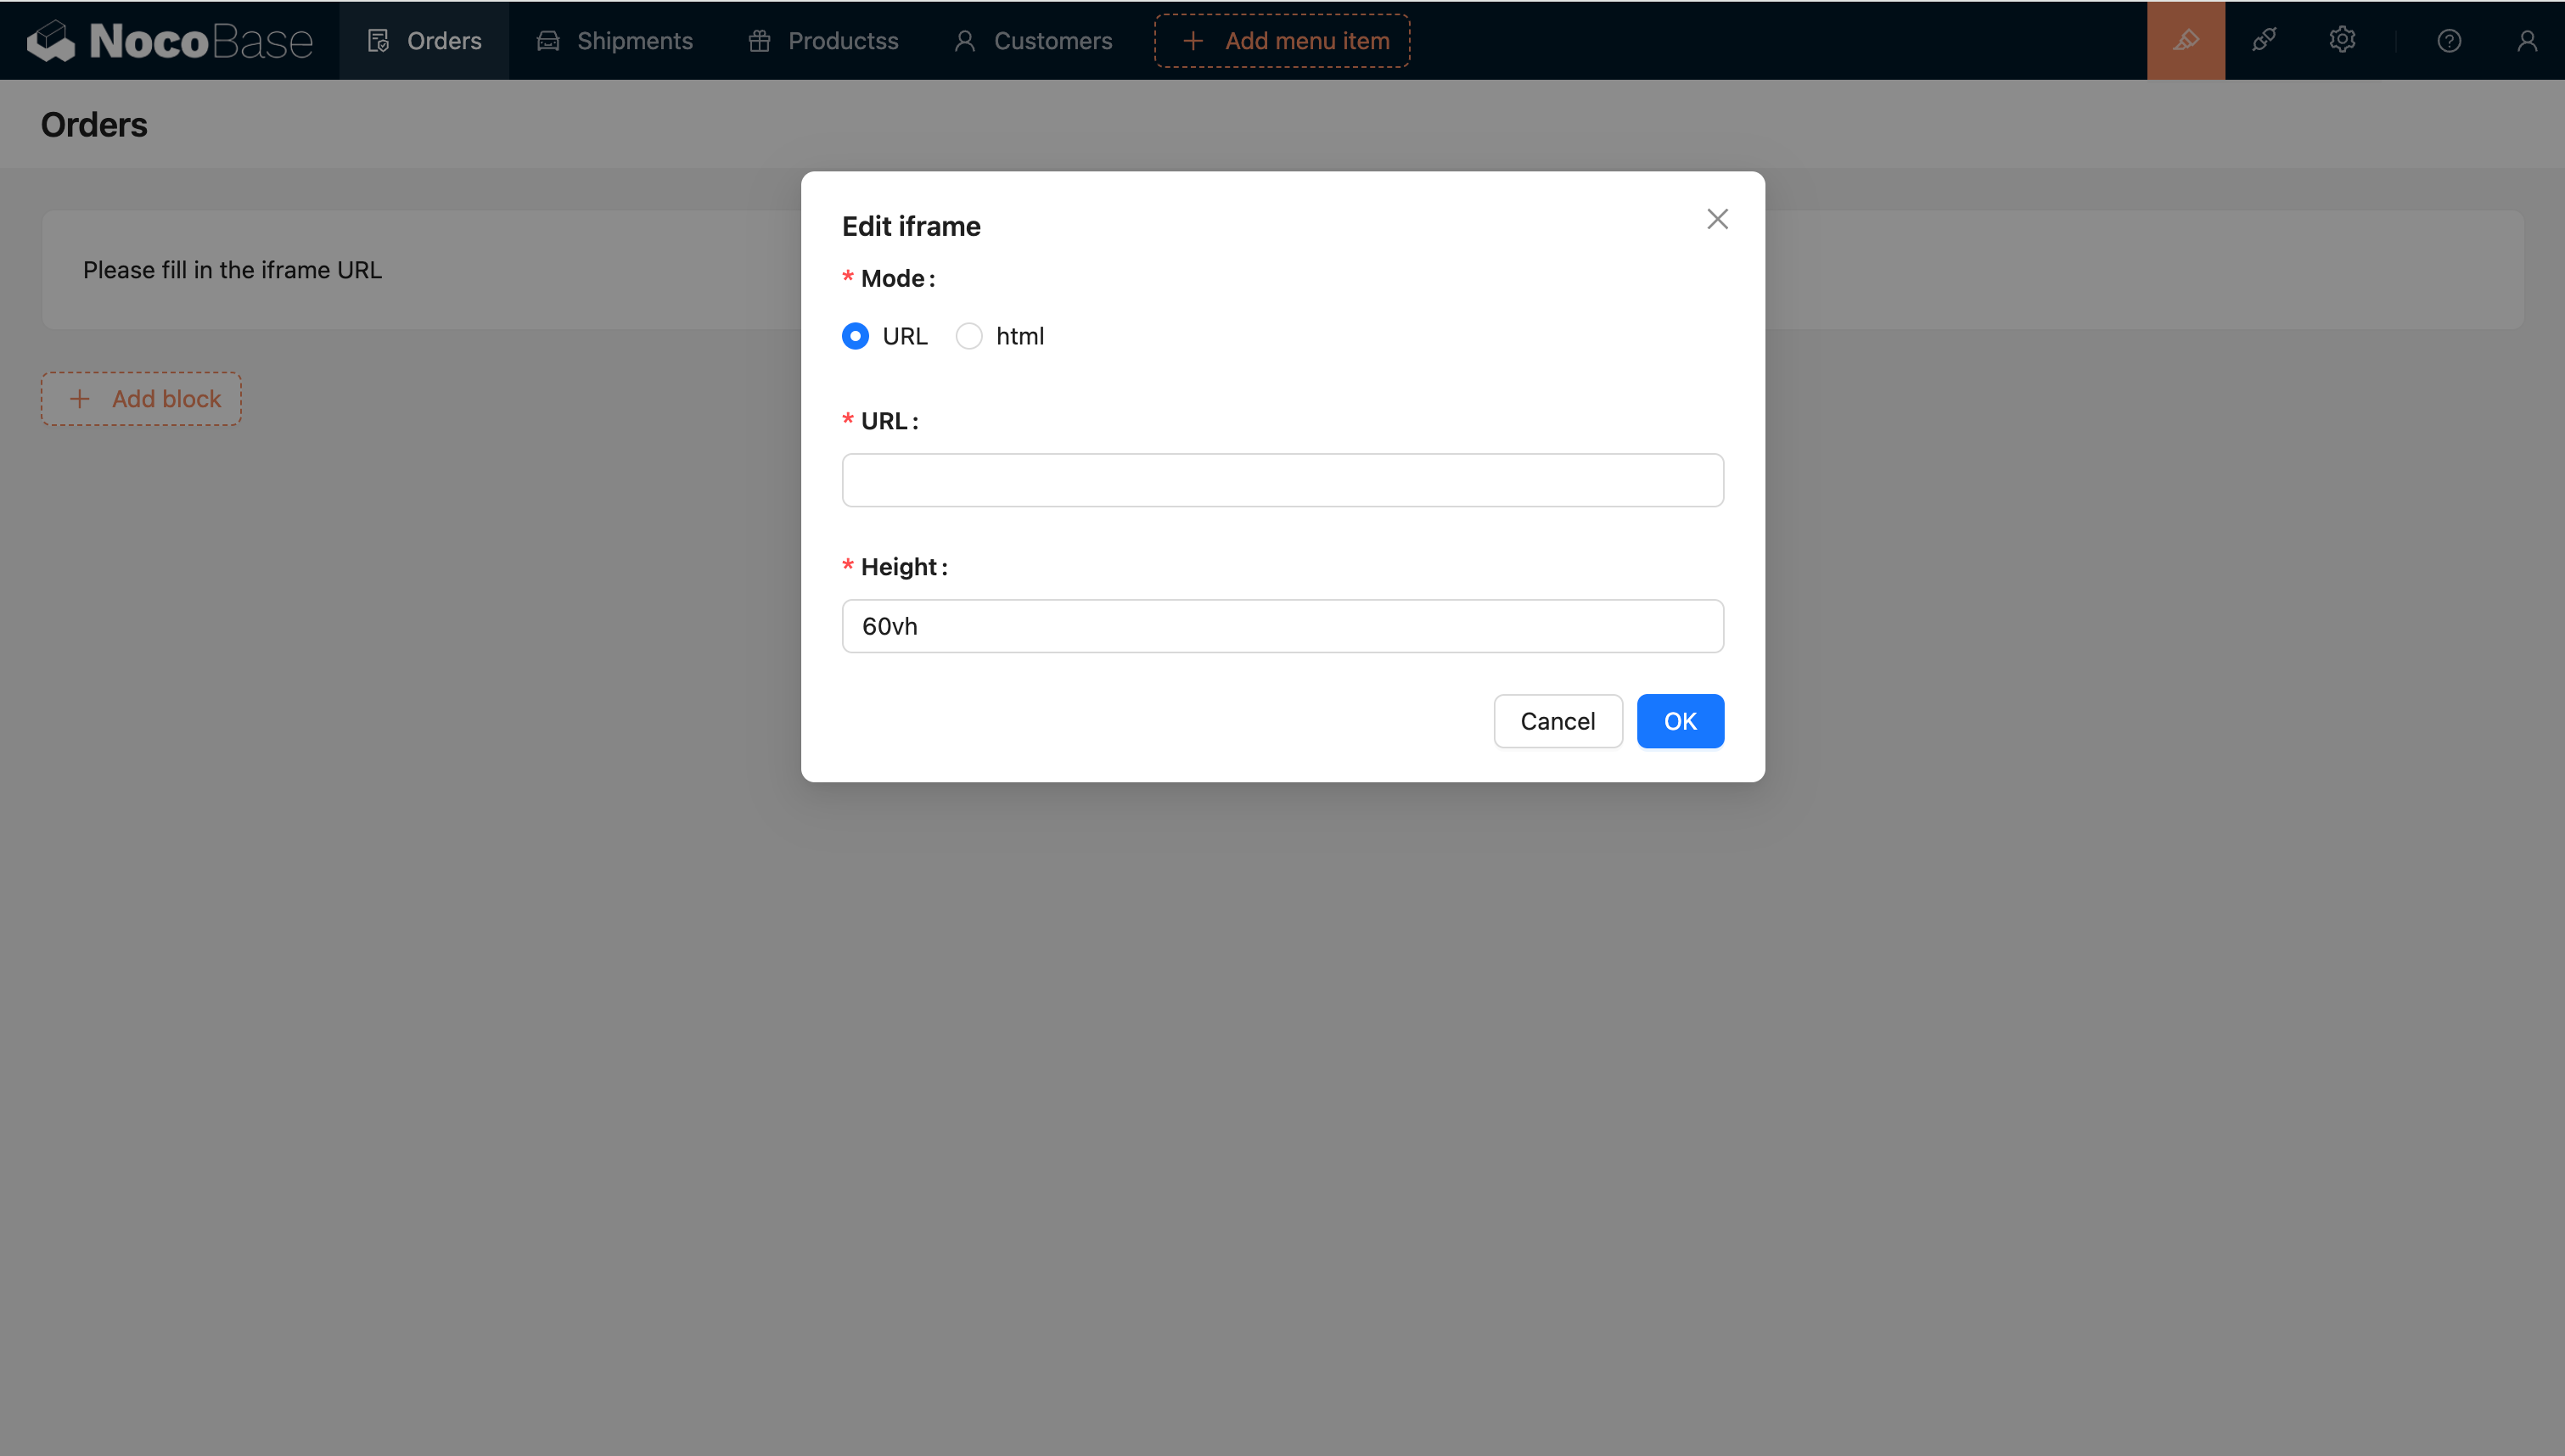
Cấu hình URL hoặc HTML để nhúng trực tiếp ứng dụng bên ngoài.

20240408220322

Template engine

Template chuỗi

Template engine mặc định

Handlebars

20240811205239

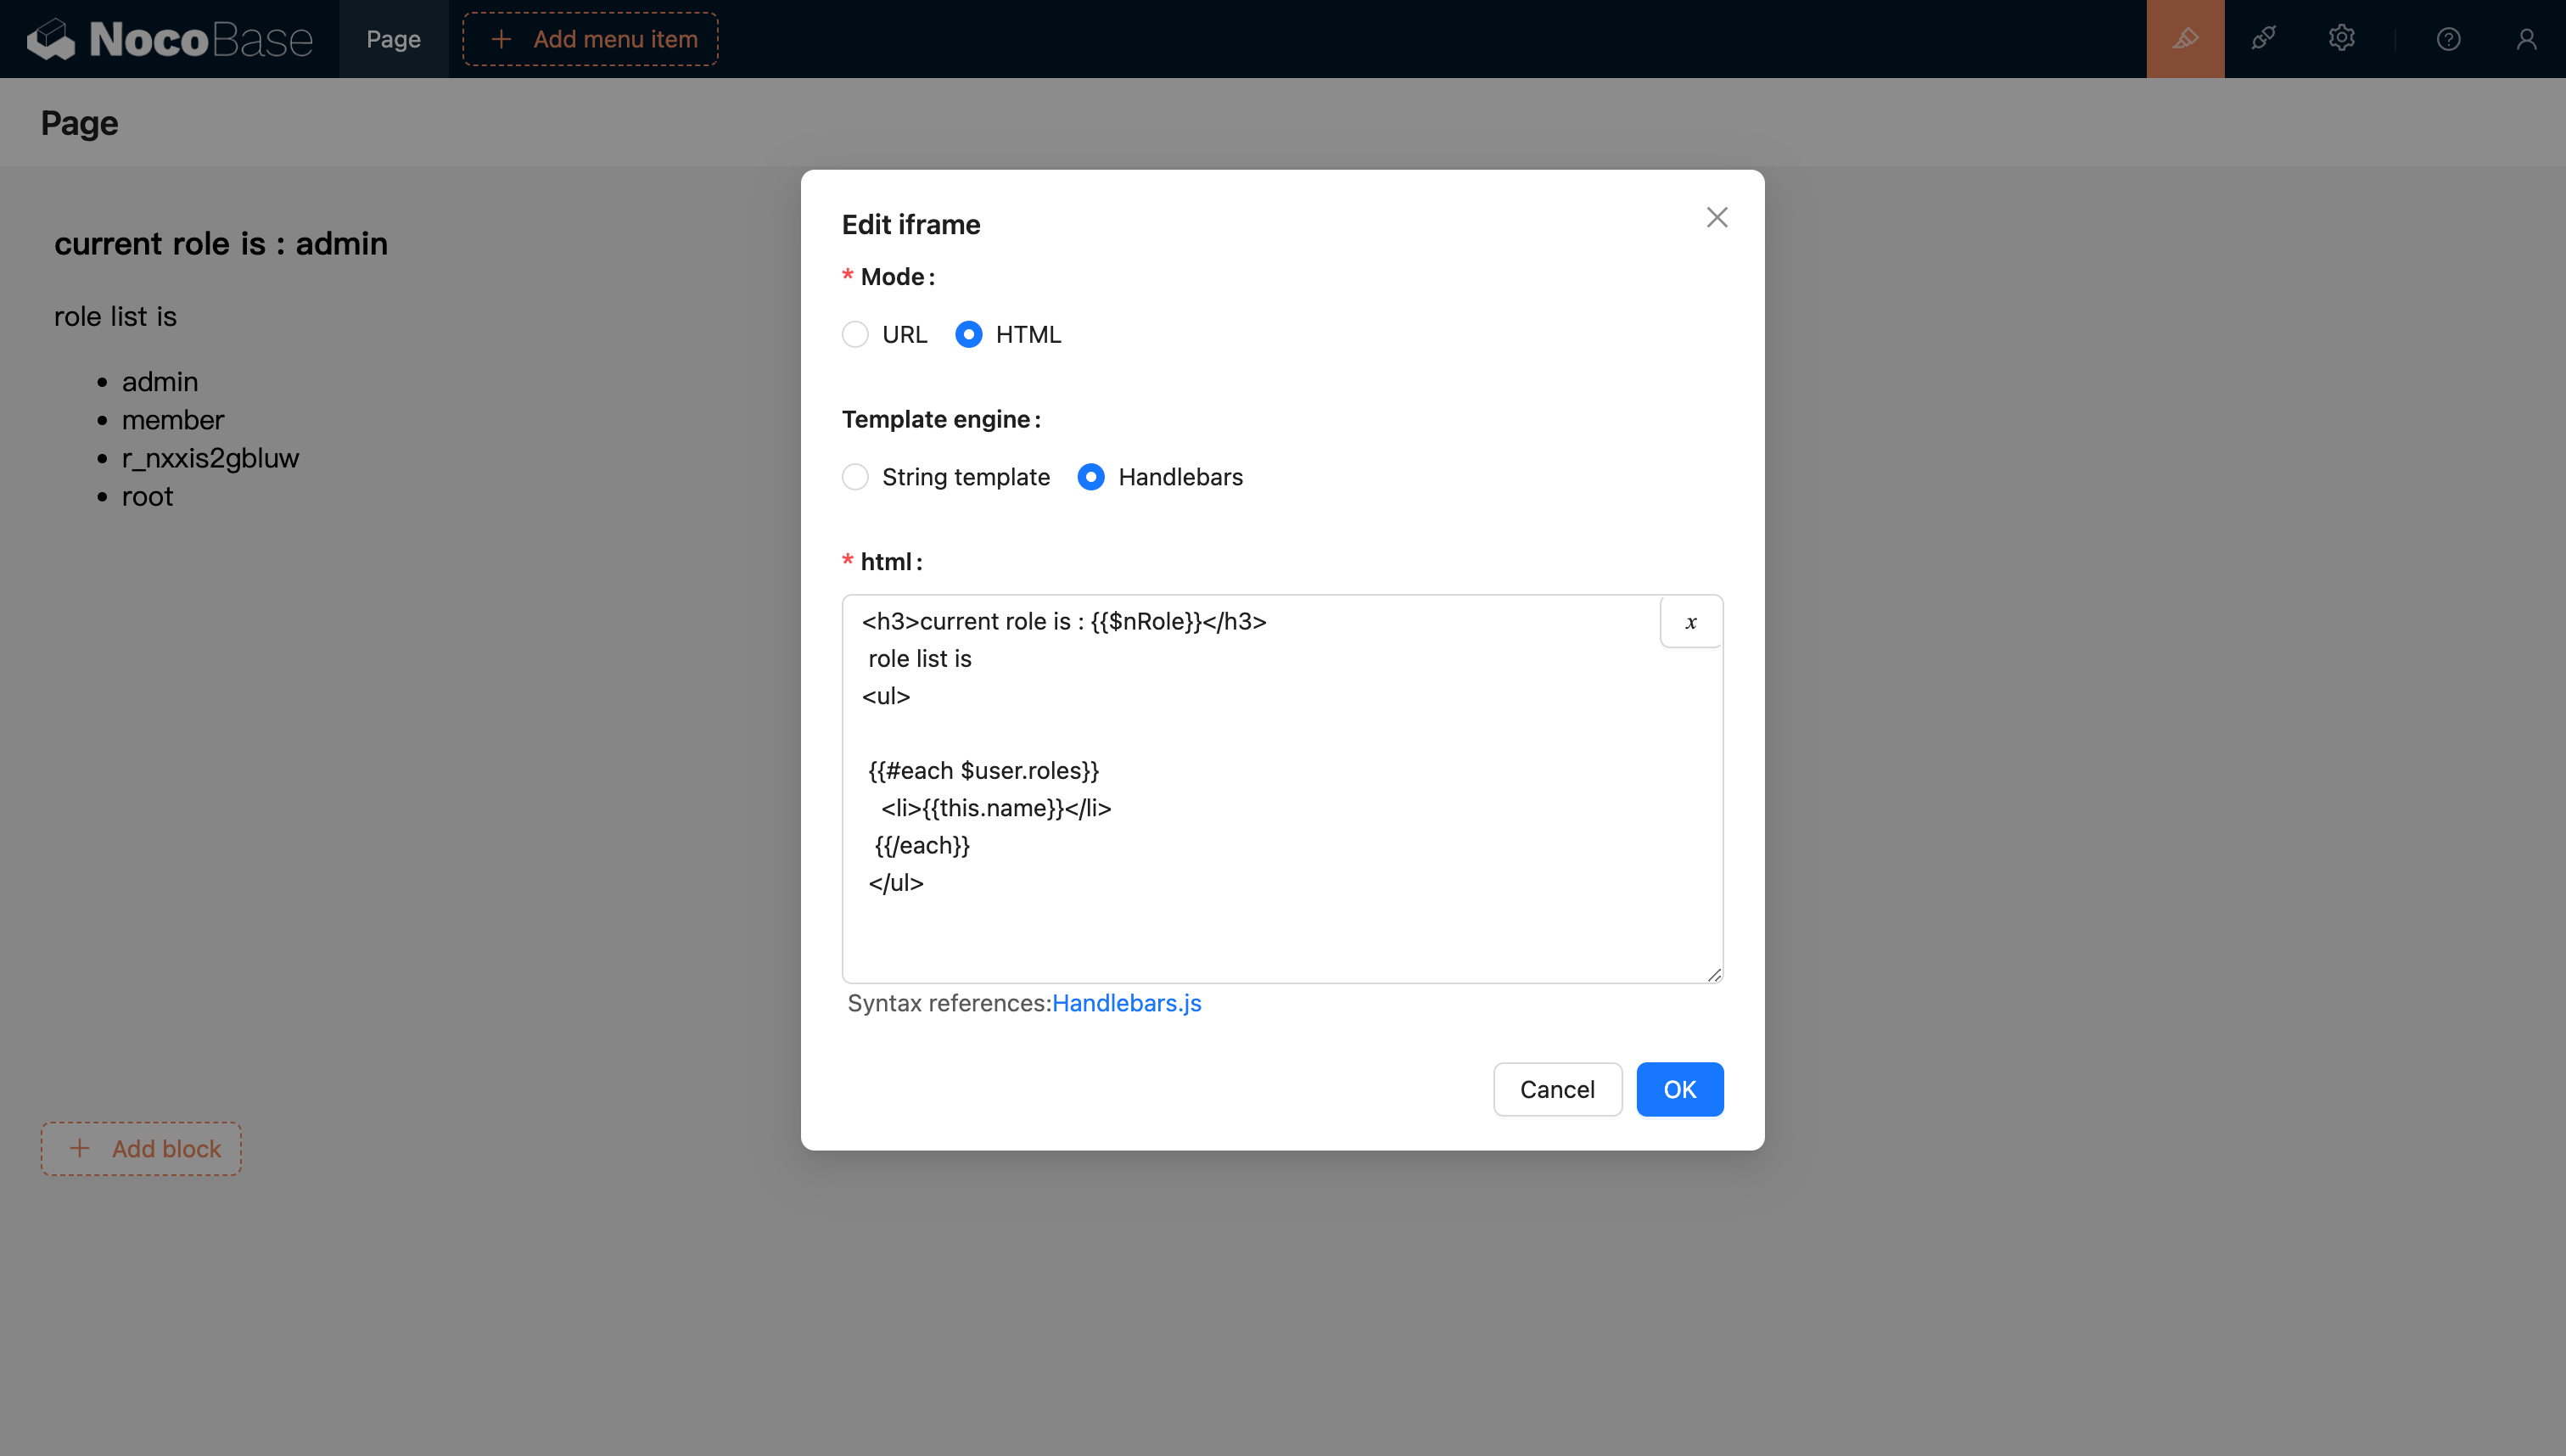
Để biết thêm nội dung, tham khảo tài liệu template engine Handlebars
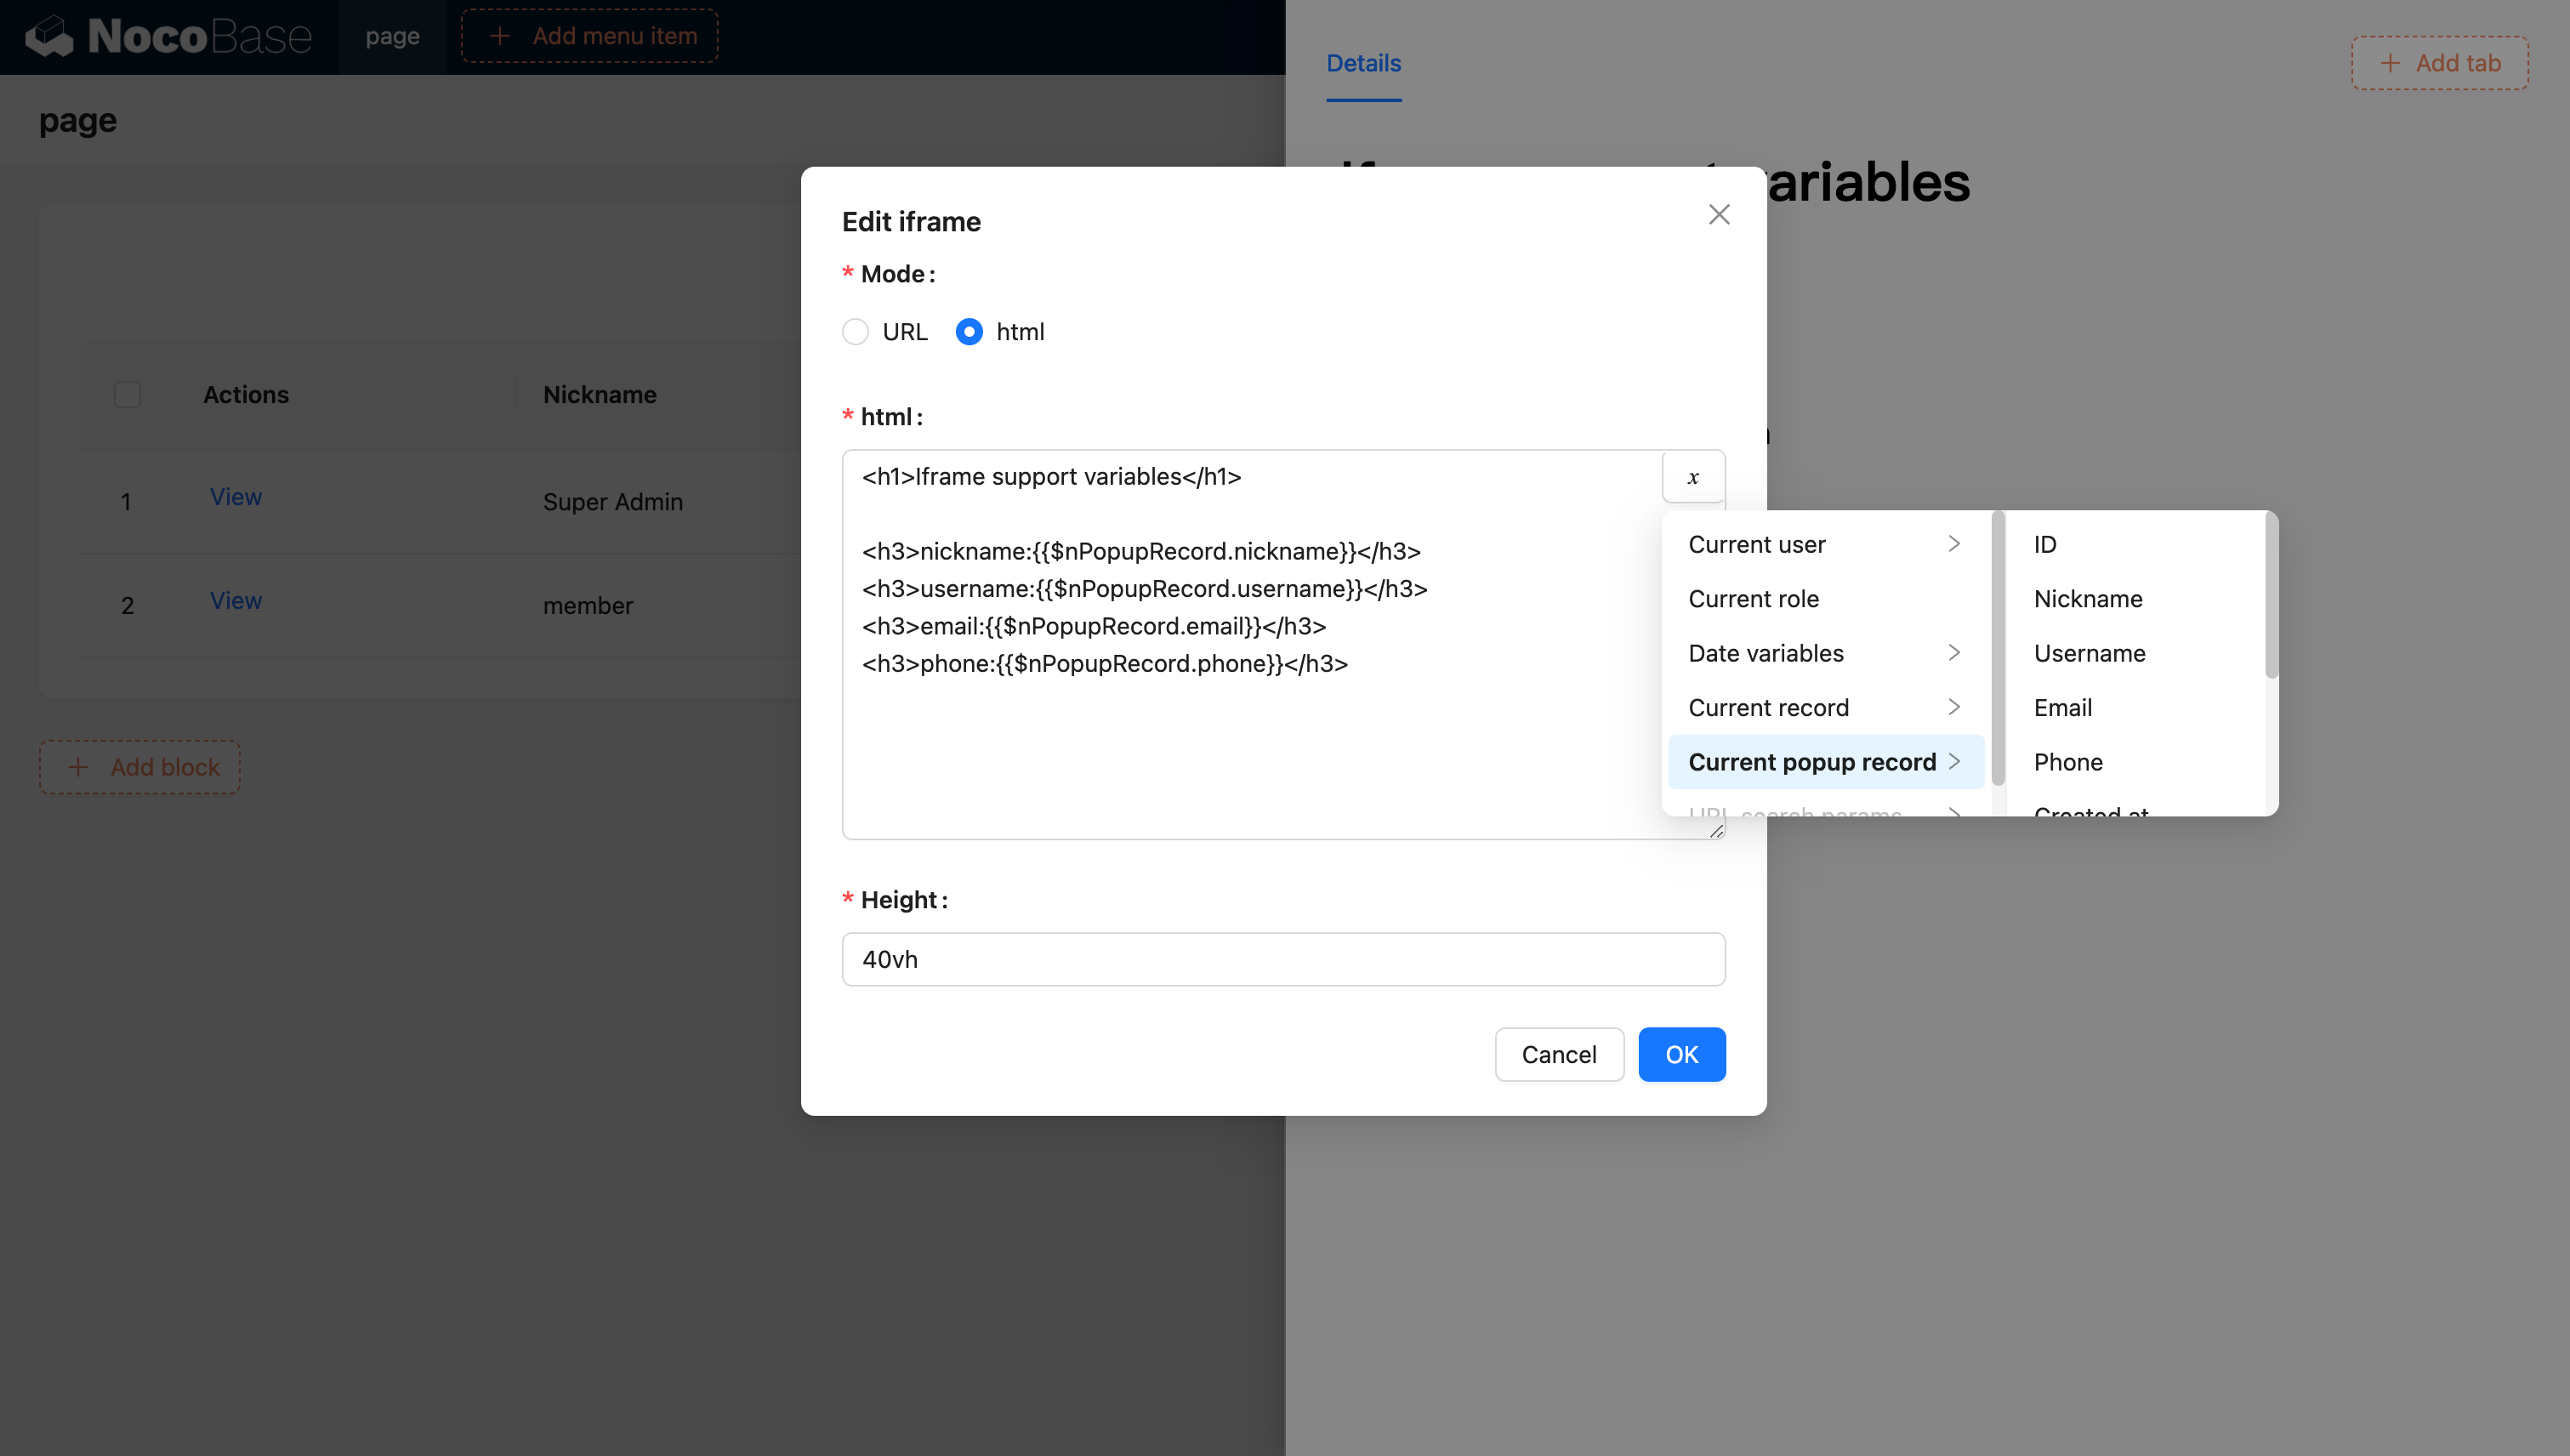
Truyền biến vào

HTML hỗ trợ phân tích biến

Hỗ trợ chọn biến từ context của block hiện tại trong variable selector

20240603120321

20240603120629

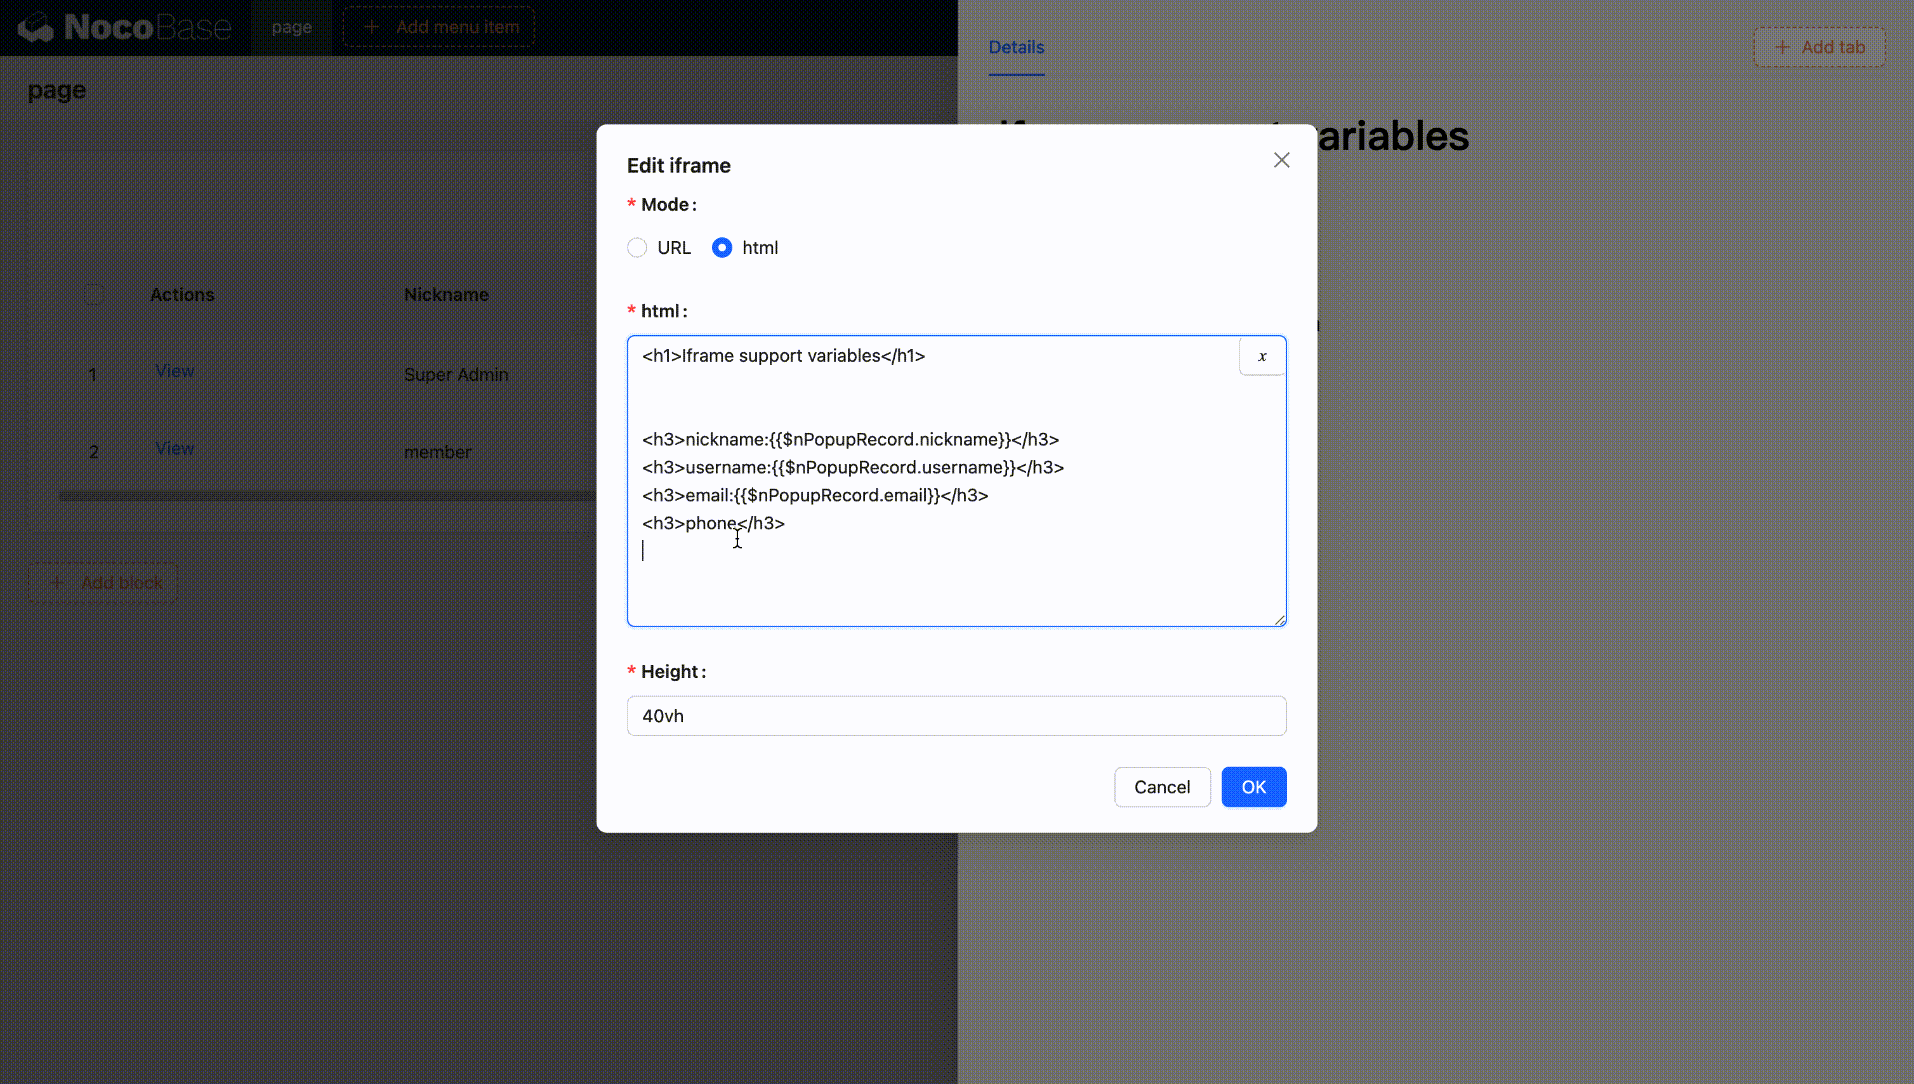
Hỗ trợ inject biến vào ứng dụng và sử dụng thông qua viết code

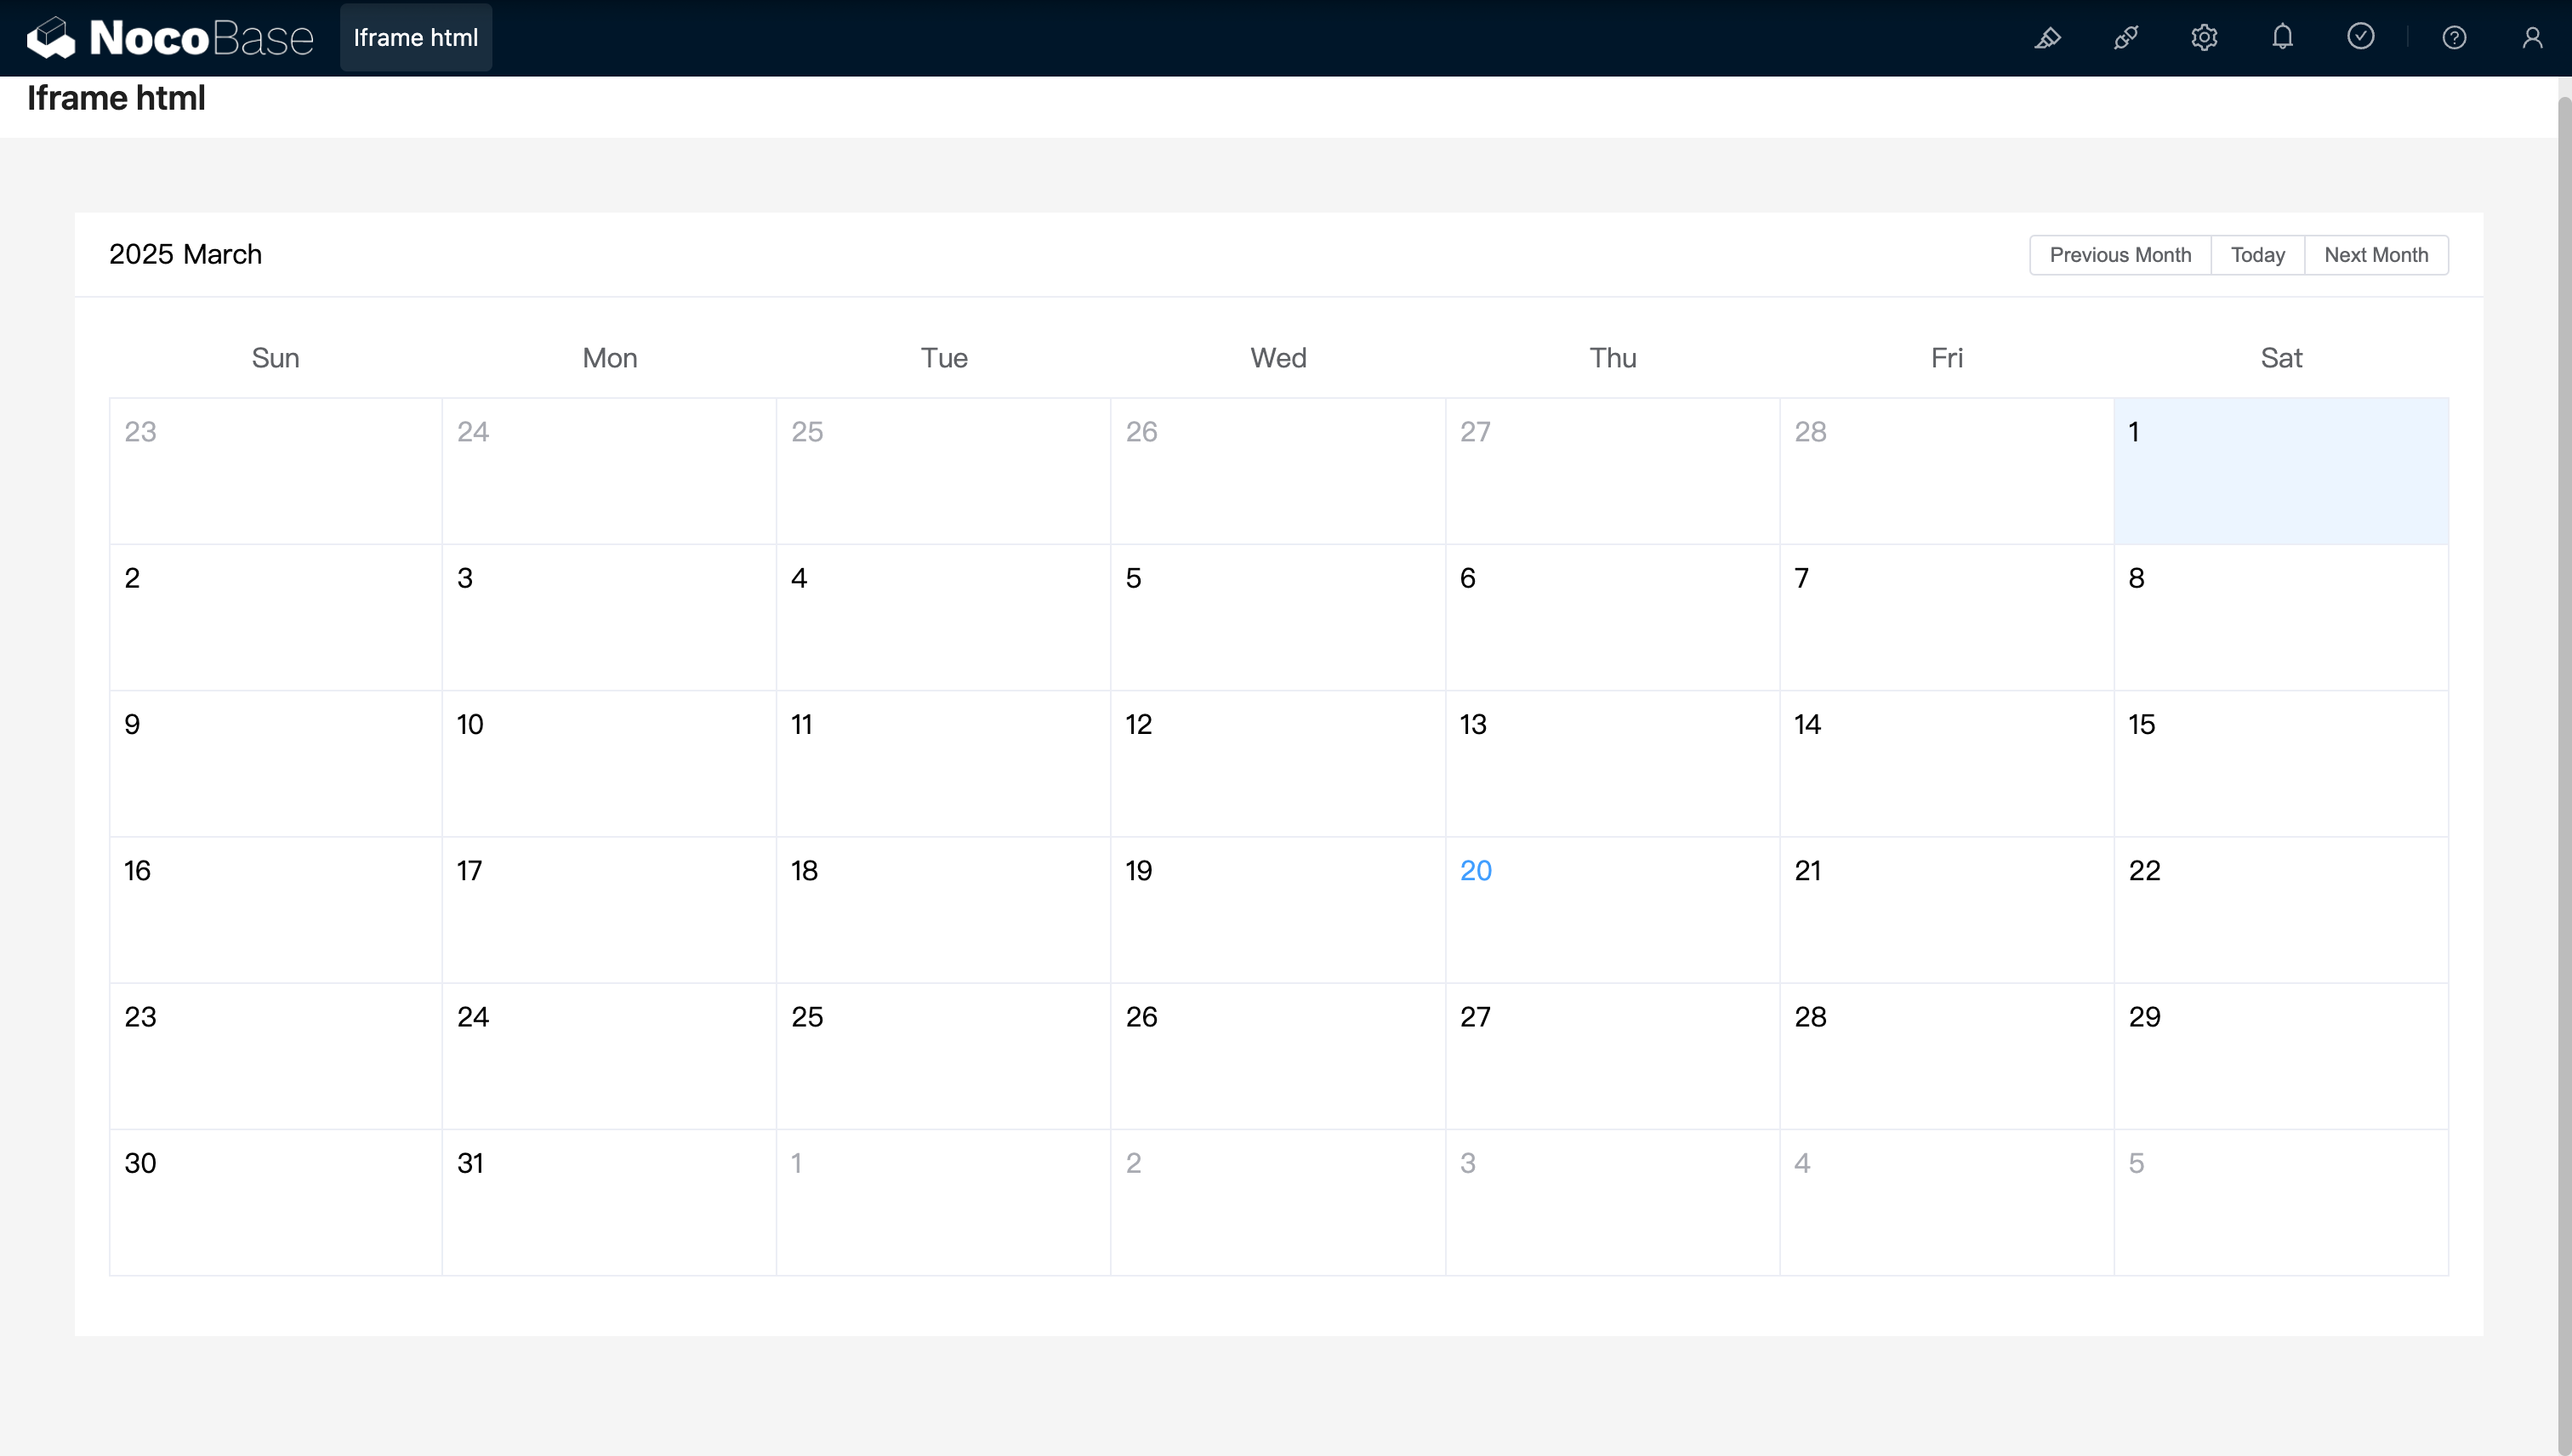
Bạn cũng có thể inject biến tùy chỉnh vào ứng dụng thông qua code và sử dụng chúng trong HTML. Ví dụ, sử dụng Vue 3 và Element Plus để tạo ứng dụng calendar động:

<!doctype html>
<html lang="vi">
  <head>
    <meta charset="UTF-8" />
    <meta name="viewport" content="width=device-width, initial-scale=1.0" />
    <title>Vue3 CDN Example</title>
    <script src="https://cdn.bootcdn.net/ajax/libs/vue/3.5.9/vue.global.prod.js"></script>
    <script src="https://unpkg.com/element-plus"></script>
    <script src="https://unpkg.com/element-plus/dist/locale/zh-cn"></script>
    <link
      rel="stylesheet"
      href="https://unpkg.com/element-plus/dist/index.css"
    />
  </head>
  <body>
    <div id="app">
      <el-container>
        <el-main>
          <el-calendar v-model="month">
            <div class="header-container">
              <div class="action-group">
                <span class="month-display">{{ month }}</span>
                <el-button-group>
                  <el-button
                    type="primary"
                    :loading="loading"
                    @click="changeMonth(-1)"
                    >Last month</el-button
                  >
                  <el-button
                    type="primary"
                    :loading="loading"
                    @click="changeMonth(1)"
                    >Next month</el-button
                  >
                </el-button-group>
              </div>
            </div>
          </el-calendar>
        </el-main>
      </el-container>
    </div>
    <script>
      const { createApp, ref, provide } = Vue;
      const app = createApp({
        setup() {
          const month = ref(new Date().toISOString().slice(0, 7));
          const loading = ref(false);

          const changeMonth = (offset) => {
            const date = new Date(month.value + '-01');
            date.setMonth(date.getMonth() + offset);
            month.value = date.toISOString().slice(0, 7);
          };
          provide('month', month);
          provide('changeMonth', changeMonth);
          return { month, loading, changeMonth };
        },
      });
      app.use(ElementPlus);
      app.mount('#app');
    </script>
  </body>
</html>

20250320163250

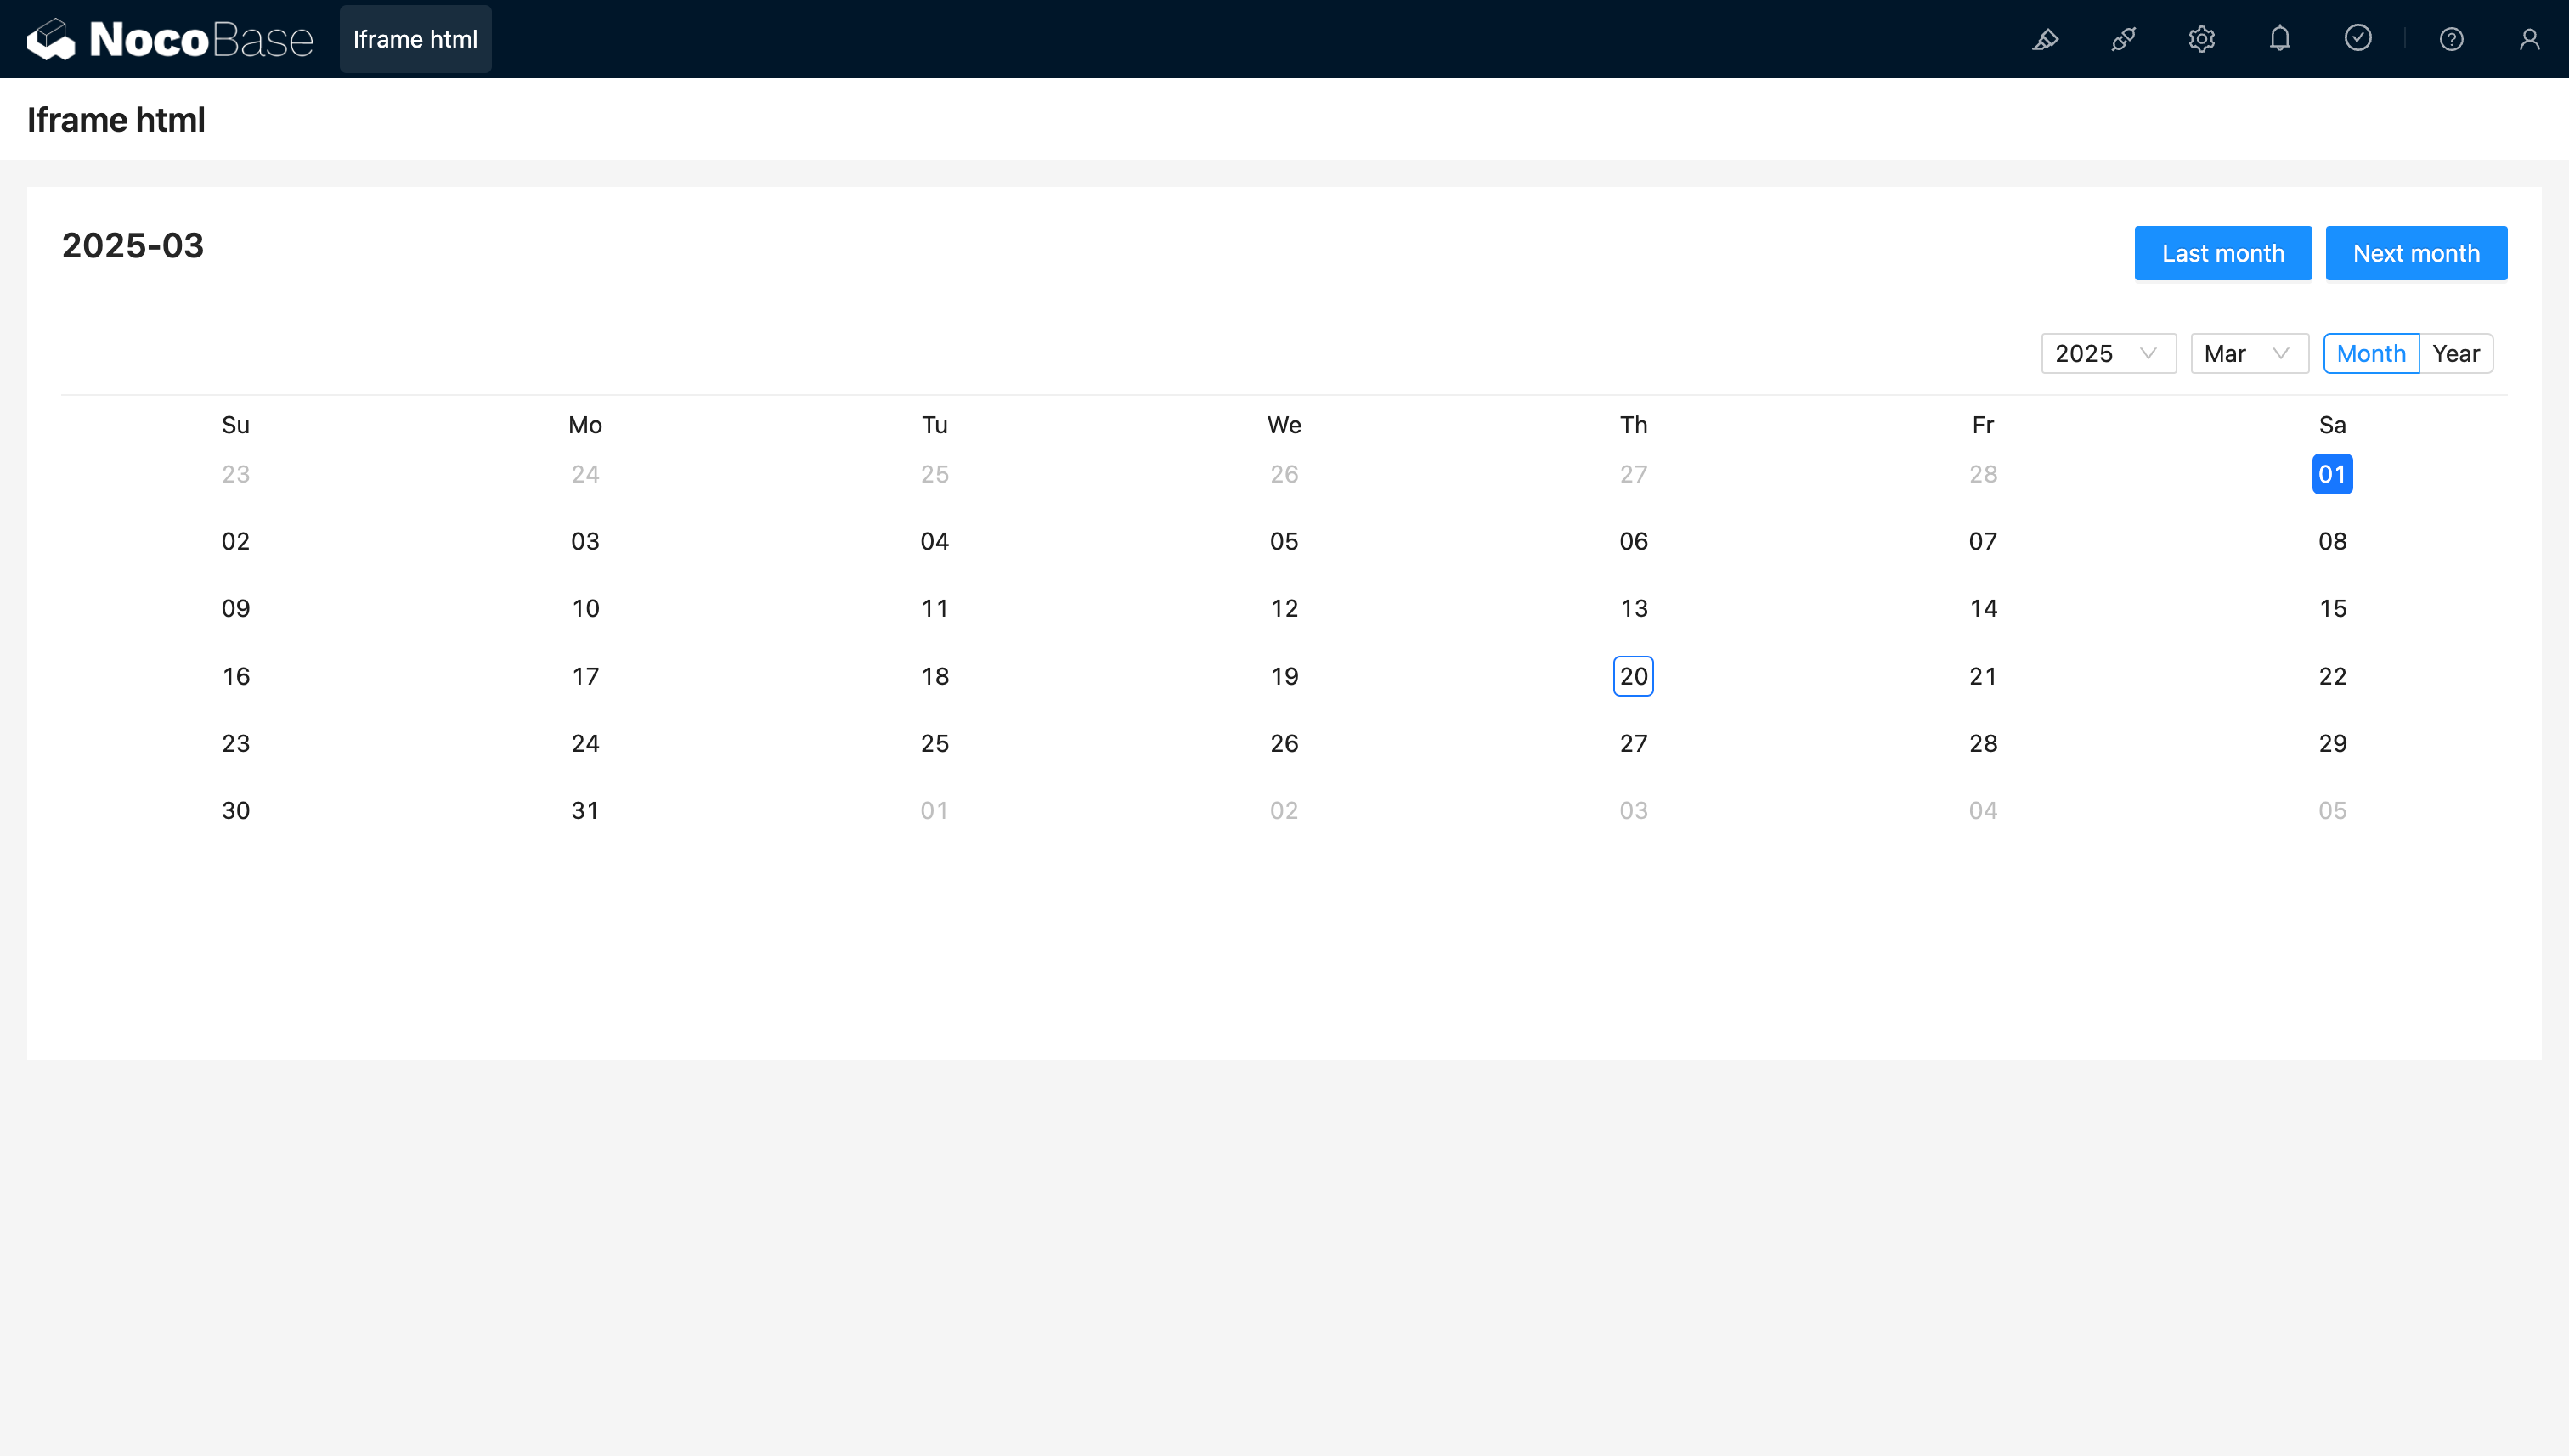
Ví dụ: Component calendar đơn giản tạo bằng React và Ant Design (antd), kết hợp với dayjs để xử lý ngày tháng
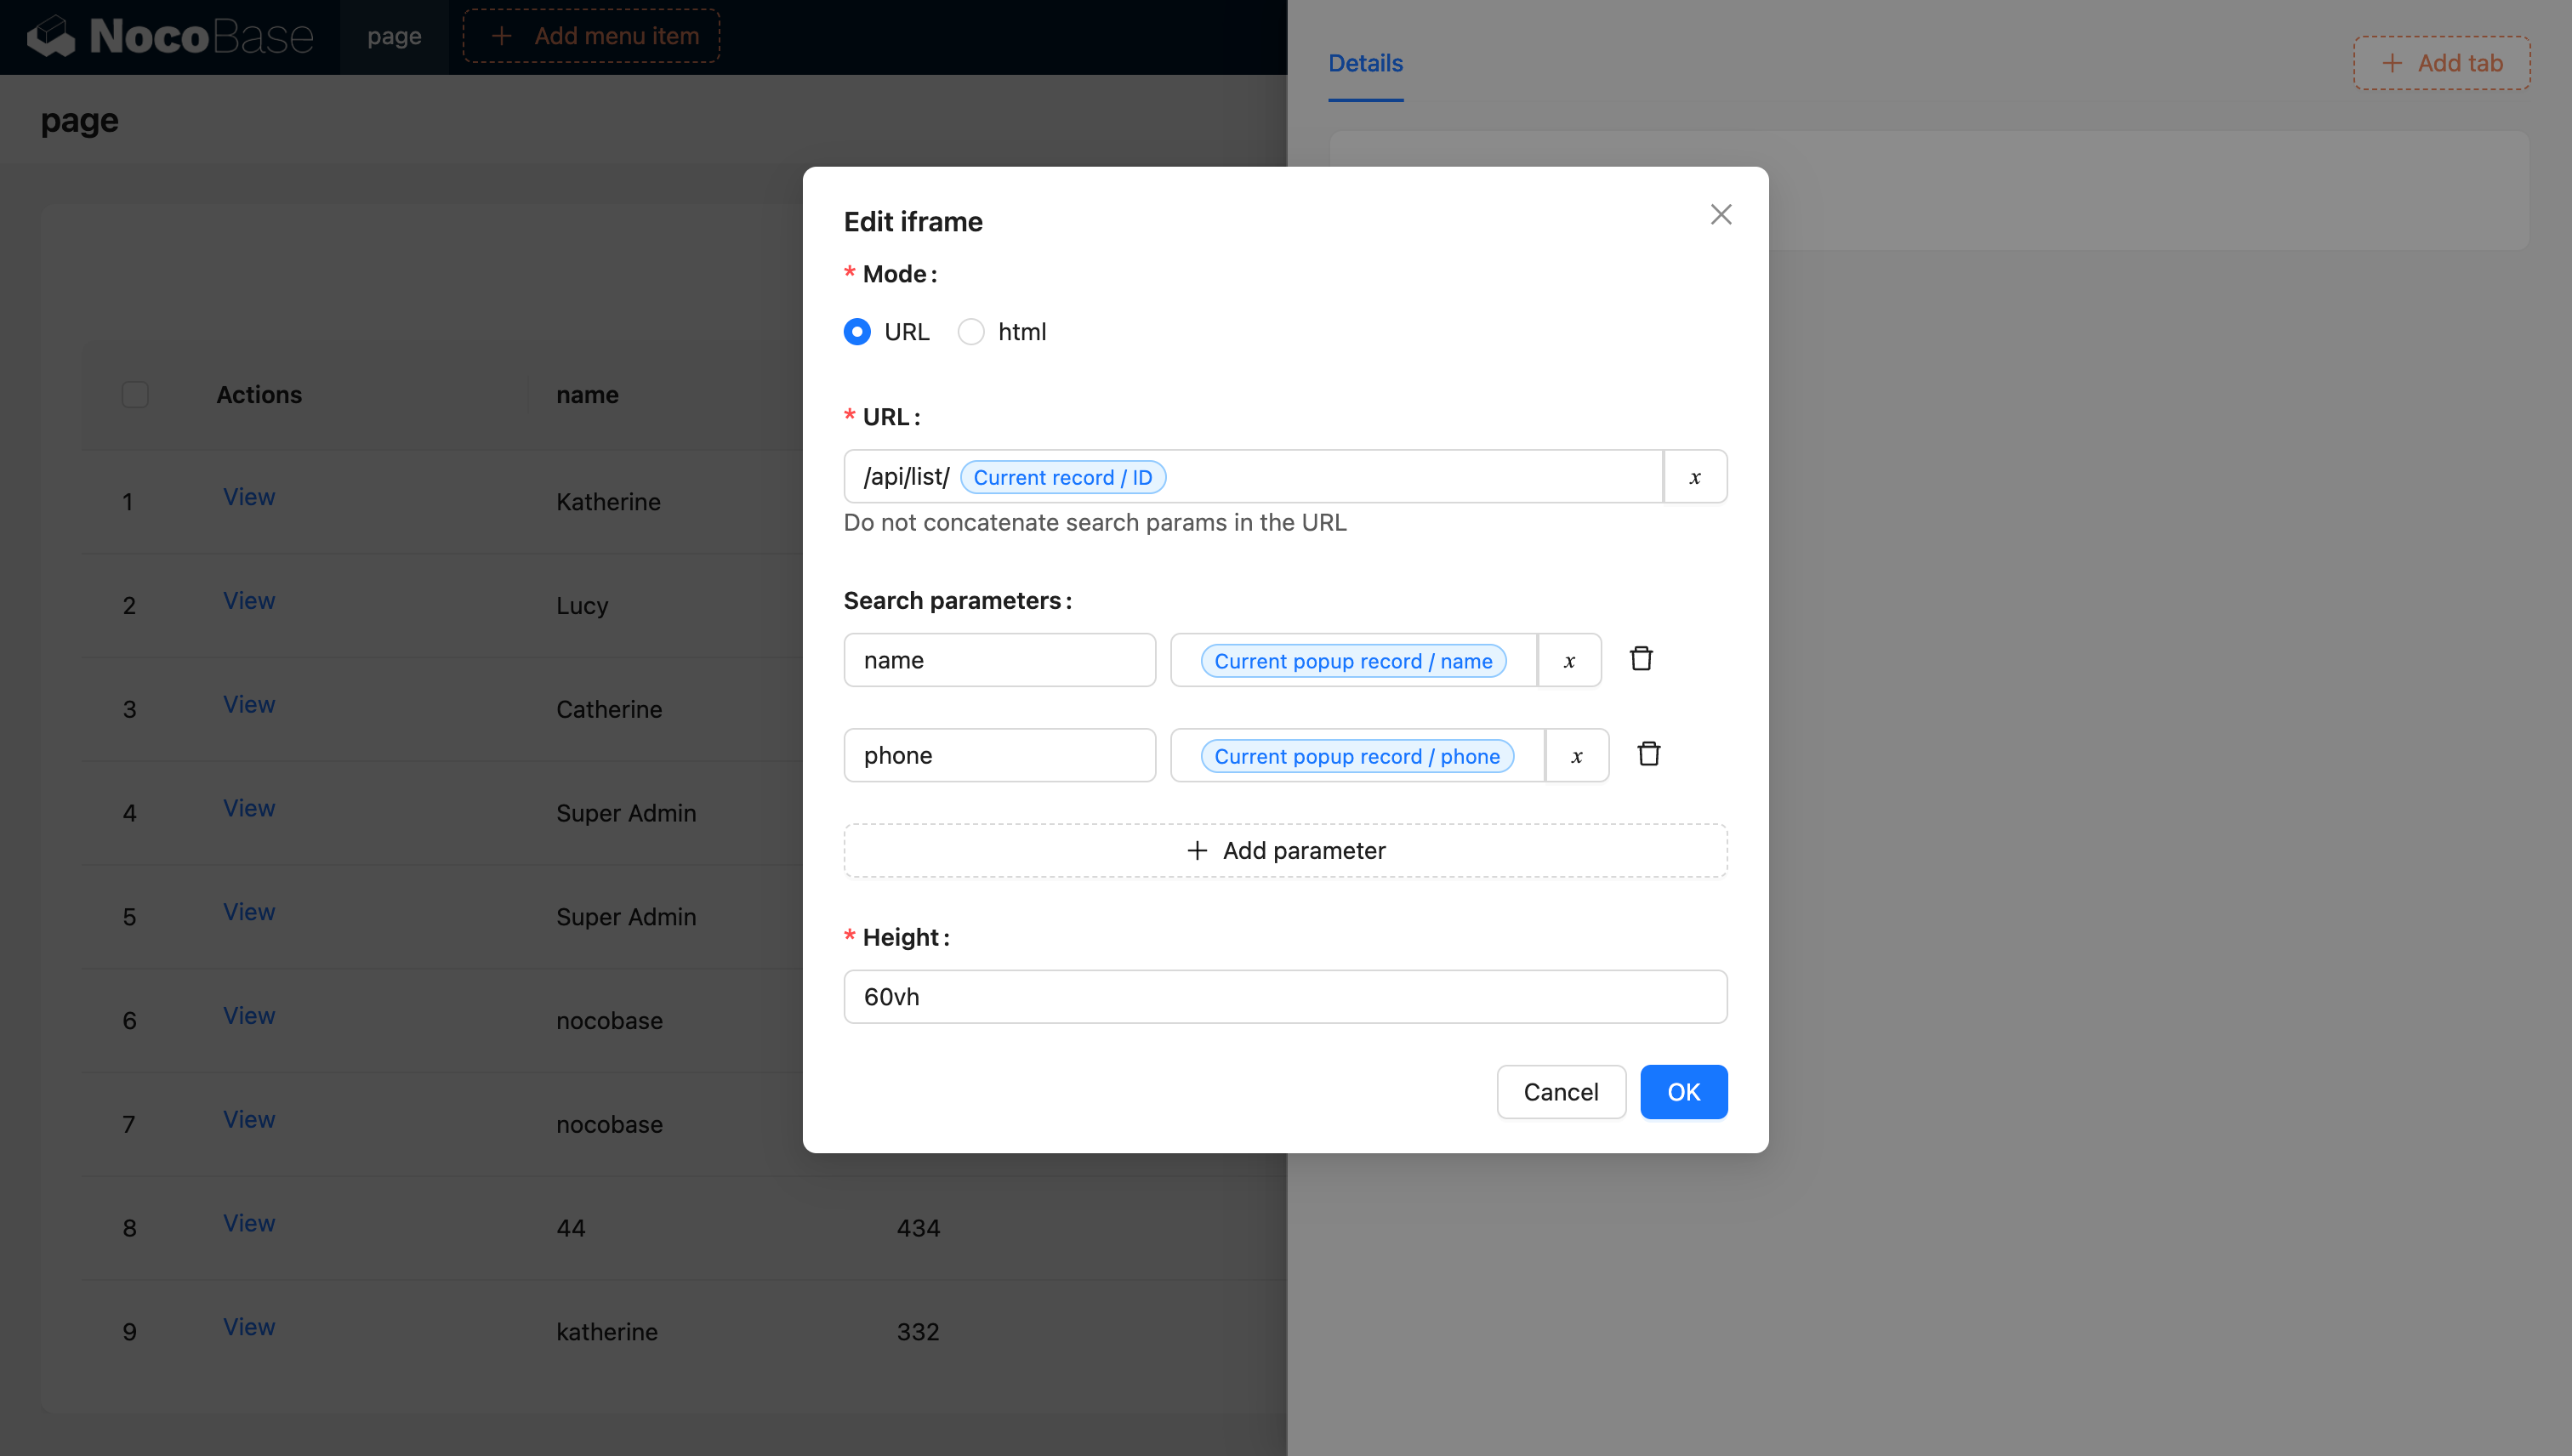
<!doctype html>
<html lang="vi">
  <head>
    <meta charset="UTF-8" />
    <meta name="viewport" content="width=device-width, initial-scale=1.0" />
    <title>React CDN Example</title>
    <script src="https://unpkg.com/react@18/umd/react.production.min.js"></script>
    <script src="https://unpkg.com/react-dom@18/umd/react-dom.production.min.js"></script>
    <link
      rel="stylesheet"
      href="https://cdn.jsdelivr.net/npm/antd/dist/antd.min.css"
    />
    <script src="https://unpkg.com/dayjs/dayjs.min.js"></script>
  </head>
  <body>
    <div id="app"></div>
    <script src="https://cdn.jsdelivr.net/npm/antd/dist/antd.min.js"></script>
    <script>
      document.addEventListener('DOMContentLoaded', function () {
        const { useState } = React;
        const { Calendar, Button, Space, Typography } = window.antd;
        const { Title } = Typography;
        const CalendarComponent = () => {
          const [month, setMonth] = useState(dayjs().format('YYYY-MM'));
          const [loading, setLoading] = useState(false);
          const changeMonth = (offset) => {
            const newMonth = dayjs(month)
              .add(offset, 'month')
              .format('YYYY-MM');
            setMonth(newMonth);
          };
          return React.createElement(
            'div',
            { style: { padding: 20 } },
            React.createElement(
              'div',
              {
                style: {
                  display: 'flex',
                  justifyContent: 'space-between',
                  alignItems: 'center',
                  marginBottom: 16,
                },
              },
              React.createElement(Title, { level: 4 }, month),
              React.createElement(
                Space,
                null,
                React.createElement(
                  Button,
                  { type: 'primary', loading, onClick: () => changeMonth(-1) },
                  'Last month',
                ),
                React.createElement(
                  Button,
                  { type: 'primary', loading, onClick: () => changeMonth(1) },
                  'Next month',
                ),
              ),
            ),
            React.createElement(Calendar, {
              fullscreen: false,
              value: dayjs(month),
            }),
          );
        };
        ReactDOM.createRoot(document.getElementById('app')).render(
          React.createElement(CalendarComponent),
        );
      });
    </script>
  </body>
</html>

20250320164537

URL hỗ trợ biến

20240603142219

Để biết thêm nội dung về biến, tham khảo tài liệu biến

Sử dụng JS Block để tạo Iframe (NocoBase 2.0)

Trong NocoBase 2.0, bạn có thể sử dụng JS Block để tạo iframe động, từ đó có nhiều kiểm soát hơn. Cách tiếp cận này cung cấp tính linh hoạt tốt hơn để tùy chỉnh hành vi và style của iframe.

Ví dụ cơ bản

Tạo một JS Block và sử dụng đoạn code sau để tạo iframe:

// Tạo iframe lấp đầy container của block hiện tại
const iframe = document.createElement('iframe');
iframe.src = 'https://example.com';
iframe.setAttribute('sandbox', 'allow-scripts allow-same-origin');
iframe.style.width = '100%';
iframe.style.height = '100%';
iframe.style.border = 'none';

// Thay thế các phần tử con hiện có, để iframe trở thành nội dung duy nhất
ctx.element.replaceChildren(iframe);

Các điểm chính

  • ctx.element: Phần tử DOM của container JS Block hiện tại
  • Thuộc tính sandbox: Kiểm soát hạn chế bảo mật của nội dung iframe
    • allow-scripts: Cho phép iframe thực thi script
    • allow-same-origin: Cho phép iframe truy cập origin của chính nó
  • replaceChildren(): Thay thế tất cả phần tử con của container bằng iframe

Ví dụ nâng cao với trạng thái loading

Bạn có thể nâng cao việc tạo iframe bằng trạng thái loading và xử lý lỗi:

// Hiển thị thông báo loading
ctx.message.loading('Đang tải nội dung bên ngoài...');

try {
  // Tạo iframe
  const iframe = document.createElement('iframe');
  iframe.src = 'https://example.com';
  iframe.setAttribute('sandbox', 'allow-scripts allow-same-origin');
  iframe.style.width = '100%';
  iframe.style.height = '100%';
  iframe.style.border = 'none';

  // Thêm event listener cho load
  iframe.addEventListener('load', () => {
    ctx.message.success('Tải nội dung thành công');
  });

  // Thêm event listener cho lỗi
  iframe.addEventListener('error', () => {
    ctx.message.error('Tải nội dung thất bại');
  });

  // Chèn iframe vào container
  ctx.element.replaceChildren(iframe);
} catch (error) {
  ctx.message.error('Lỗi khi tạo iframe: ' + error.message);
}

Lưu ý về bảo mật

Khi sử dụng iframe, hãy cân nhắc các thực hành bảo mật tốt nhất sau:

  1. Sử dụng HTTPS: Luôn tải nội dung iframe qua HTTPS bất cứ khi nào có thể
  2. Hạn chế quyền Sandbox: Chỉ bật các quyền sandbox cần thiết
  3. Content Security Policy: Cấu hình CSP header phù hợp
  4. Same-origin Policy: Lưu ý đến hạn chế cross-origin
  5. Nguồn đáng tin cậy: Chỉ tải nội dung từ các domain đáng tin cậy