Tip

このドキュメントはAIによって翻訳されました。不正確な情報については、英語版をご参照ください

クイックスタート:オーケストレーション可能なボタンコンポーネントを構築する

Reactでは、通常このようにボタンコンポーネントをレンダリングします。

import { Button } from 'antd';

export default function App() {
  return <Button type="primary">Primary Button</Button>;
}

上記のコードはシンプルですが、静的コンポーネントであり、ノーコードプラットフォームが求める設定可能性やオーケストレーション能力には対応できません。

NocoBaseのFlowEngineでは、FlowModelFlowDefinitionを使って、設定可能でイベント駆動型のコンポーネントを素早く構築し、より強力なノーコード機能を実現できます。


ステップ1:FlowModelを使ってコンポーネントをレンダリングする

🧠 主要なコンセプト

  • FlowModelFlowEngineにおけるコアコンポーネントモデルであり、コンポーネントのロジック、レンダリング、設定機能をカプセル化します。
  • すべてのUIコンポーネントはFlowModelを通じてインスタンス化され、一元的に管理できます。

📌 実装手順

1. カスタムモデルクラスを作成する

class MyModel extends FlowModel {
  render() {
    return <Button {...this.props} />;
  }
}

2. モデルインスタンスを作成する

const model = await this.flowEngine.createModelAsync({
  uid: 'my-model',
  use: 'MyModel',
  props: {
    type: 'primary',
    children: 'Primary Button',
  },
});

3. <FlowModelRenderer />を使ってレンダリングする

<FlowModelRenderer model={model} />

ステップ2:PropsFlowを追加してボタンのプロパティを設定可能にする

💡 なぜPropsFlowを使うのか?

静的なpropsではなくFlowを使うことで、プロパティの以下の機能を実現できます。

  • 動的な設定
  • ビジュアル編集
  • 状態のリプレイと永続化

🛠 主な変更点

1. ボタンプロパティのFlowを定義する


const buttonSettings = defineFlow({
  key: 'buttonSettings',
  
  title: 'ボタン設定',
  steps: {
    general: {
      title: '一般設定',
      uiSchema: {
        title: {
          type: 'string',
          title: 'ボタンタイトル',
          'x-decorator': 'FormItem',
          'x-component': 'Input',
        },
        type: {
          type: 'string',
          title: 'タイプ',
          'x-decorator': 'FormItem',
          'x-component': 'Select',
          enum: [
            { label: 'プライマリ', value: 'primary' },
            { label: 'デフォルト', value: 'default' },
            { label: '危険', value: 'danger' },
            { label: '点線', value: 'dashed' },
            { label: 'リンク', value: 'link' },
            { label: 'テキスト', value: 'text' },
          ],
        },
        icon: {
          type: 'string',
          title: 'アイコン',
          'x-decorator': 'FormItem',
          'x-component': 'Select',
          enum: [
            { label: '検索', value: 'SearchOutlined' },
            { label: '追加', value: 'PlusOutlined' },
            { label: '削除', value: 'DeleteOutlined' },
            { label: '編集', value: 'EditOutlined' },
            { label: '設定', value: 'SettingOutlined' },
          ],
        },
      },
      defaultParams: {
        type: 'primary',
      },
      // ステップハンドラー関数、モデルプロパティを設定
      handler(ctx, params) {
        ctx.model.setProps('children', params.title);
        ctx.model.setProps('type', params.type);
        ctx.model.setProps('icon', params.icon ? React.createElement(icons[params.icon]) : undefined);
      },
    },
  },
});

MyModel.registerFlow(buttonSettings);

2. 静的なpropsの代わりにstepParamsを使用する

const model = await this.flowEngine.createModelAsync({
  uid: 'my-model',
  use: 'MyModel',
- props: {
-   type: 'primary',
-   children: 'Primary Button',
- },
+ stepParams: {
+   buttonSettings: {
+     general: {
+       title: 'Primary Button',
+       type: 'primary',
+     },
+   },
+ },
});

stepParamsを使用することはFlowEngineが推奨する方法であり、Reactコンポーネントのようなシリアライズ不可能なデータに関する問題を回避できます。

3. プロパティ設定インターフェースを有効にする

- <FlowModelRenderer model={model} />
+ <FlowModelRenderer model={model} showFlowSettings />

ステップ3:ボタンのイベントフロー(EventFlow)をサポートする

🎯 シナリオ:ボタンクリック後に確認ダイアログを表示する

1. onClickイベントをリッスンする

非侵入的な方法でonClickを追加します。

const myPropsFlow = defineFlow({
  key: 'buttonSettings',
  steps: {
    general: {
      // ... 省略
      handler(ctx, params) {
        // ... 省略
+       ctx.model.setProps('onClick', (event) => {
+         ctx.model.dispatchEvent('click', { event });
+       });
      },
    },
  },
});

2. イベントフローを定義する

const myEventFlow = defineFlow({
  key: 'clickSettings',
  on: 'click',
  title: 'ボタンイベント',
  steps: {
    confirm: {
      title: '確認操作設定',
      uiSchema: {
        title: {
          type: 'string',
          title: 'ダイアログのプロンプトタイトル',
          'x-decorator': 'FormItem',
          'x-component': 'Input',
        },
        content: {
          type: 'string',
          title: 'ダイアログのプロンプト内容',
          'x-decorator': 'FormItem',
          'x-component': 'Input.TextArea',
        },
      },
      defaultParams: {
        title: '操作の確認',
        content: 'ボタンをクリックしました。確認しますか?',
      },
      async handler(ctx, params) {
        // ダイアログ
        const confirmed = await ctx.modal.confirm({
          title: params.title,
          content: params.content,
        });
        // メッセージ
        await ctx.message.info(`ボタンをクリックしました。確認結果:${confirmed ? '確認済み' : 'キャンセル'}`);
      },
    },
  },
});
MyModel.registerFlow(myEventFlow);

補足説明:

  • イベントフローEventFlow)を使用すると、ボタンの動作をフローを通じて柔軟に設定できます。例えば、ダイアログの表示、メッセージ、API呼び出しなどです。
  • onClickonMouseEnterなどの異なるイベントに対して、それぞれ異なるイベントフローを登録することで、複雑なビジネス要件に対応できます。

3. イベントフローのパラメーターを設定する

モデルを作成する際に、stepParamsを通じてイベントフローのデフォルトパラメーターを設定できます。

const model = await this.flowEngine.createModelAsync({
  uid: 'my-model',
  use: 'MyModel',
  stepParams: {
    buttonSettings: {
      general: {
        title: 'Primary Button',
        type: 'primary',
      },
    },
    clickSettings: {
      confirm: {
        title: '操作の確認',
        content: 'ボタンをクリックしました。確認しますか?',
      },
    },
  },
});

モデル比較図:ReactComponent vs FlowModel

Flowはコンポーネントの実装方法を変更するものではありません。単にReactComponentPropsFlowEventFlowのサポートを追加し、コンポーネントのプロパティとイベントを視覚的に設定・オーケストレーションできるようにするものです。
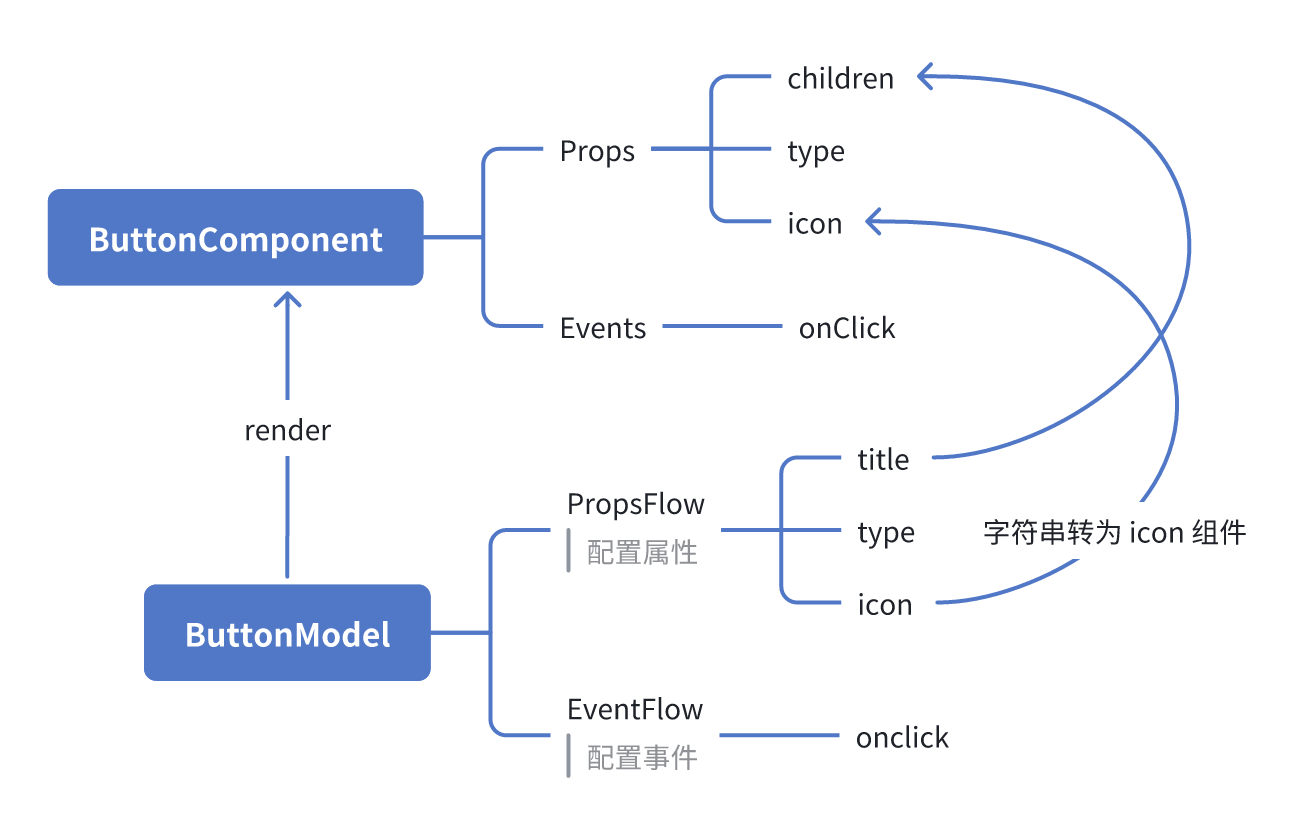
ReactComponent

graph TD
  Button[ButtonComponent]
  Button --> Props[Props]
  Button --> Events[Events]
  Props --> title[title]
  Props --> type[type]
  Props --> icon[icon]
  Events --> onClick[onClick]

FlowModel

graph TD
  Button[ButtonModel]
  Button --> Props[PropsFlow]
  Button --> Events[EventFlow]
  Props --> title[title]
  Props --> type[type]
  Props --> icon[icon]
  Events --> onClick[onClick]

まとめ

以上の3つのステップを通じて、設定とイベントオーケストレーションをサポートするボタンコンポーネントを完成させました。これにより、以下の利点が得られます。

  • 🚀 プロパティ(タイトル、タイプ、アイコンなど)を視覚的に設定可能
  • 🔄 イベント応答をフローで管理可能(例:クリックでダイアログ表示)
  • 🔧 今後の拡張をサポート(例:条件ロジック、変数バインディングなど)

このパターンは、フォーム、リスト、チャートなど、あらゆるUIコンポーネントにも適用できます。NocoBaseのFlowEngineでは、すべてがオーケストレーション可能です