
@nocobase/app-plugin-agents provides AI chat, model configuration, business Skills and machine Agents. Add chat beside a business page, have an Agent follow your team's writing rules, or connect a coding assistant on a machine to execute tasks.
Capabilities
| Capability | What the plugin provides | What the app needs to do |
|---|---|---|
| Model services | Service settings, model lists and connection tests | Add the Models page and configure a service and key |
| AI chat | Streaming replies, stopping generation and conversation history | Compose the interface with chat components |
| Business Skills | Instructions, supporting files, import and versions | Maintain rules in Skills and select them for conversations or tasks |
| Business tools | Tool registration and execution | Integrate business tools or CLI commands and check permissions |
| Machine Agents | Machine connections, tool/model selection and execution status | Add Runtimes and Machine agents pages and a task entry point |
| Usage management | Usage and pricing pages | Add Usage to navigation |
The plugin supplies pages and components. The app chooses where menus and chat appear and which business data can be accessed. After registration, these interfaces still need to be added to the app.
Two ways to connect an Agent
| Model API | Agent on a machine | |
|---|---|---|
| Typical tasks | Chat, content drafting and business operations through tools | Read and edit code, run builds and tests |
| Prerequisites | Model service endpoint, key and model | Installed and authenticated coding tool, plus a Runner connection |
| Execution | NocoBase calls the model and runs selected tools | The coding tool executes on the connected machine |
| Accessible resources | Selected Skills, virtual files and integrated business tools | Projects, files and commands allowed by machine and coding-tool policies |
Both methods can be used together. The first two scenarios below use a model API; the third connects a machine. Model API conversations cannot directly access host source code or run project tests.
Scenarios and examples
Start with Create an app, or run the complete example linked at the end. Keep your app's existing database configuration; DeepSeek is used as the model-service example. The example interface is in English. Run its commands from apps/agents-guide.
Send development prompts to the Coding Agent working in your project. Use conversation prompts in the application's chat interface. The prompts below have been simplified for readers; screenshots come from the original verified conversations. See the verification scope at the end.
Scenario 1: add AI conversations to an application
Give your development Agent this request:
Add an AI chat panel on the right side of the page, opened from a header button. Let me choose a model, send messages, stop a reply and continue a conversation later. Each person should only see their own chats.After the pages are integrated, add a service in Models → Add service. The example uses:
| Field | Example value |
|---|---|
| Provider type | DeepSeek |
| Name | DeepSeek |
| Base URL | https://api.deepseek.com/v1 |
| API key | Your own key, entered only in the credential field |
| Model ID | deepseek-flash, returned by the service during the original verification |
| Model kind | chat |
| Enabled | On |
Click Fetch models and select a chat model available to your account; embedding and rerank models cannot be used for conversations. Run Test connection, then save after it succeeds. When reopening a service, leaving the key field empty retains its saved key. See the DeepSeek documentation for service settings.
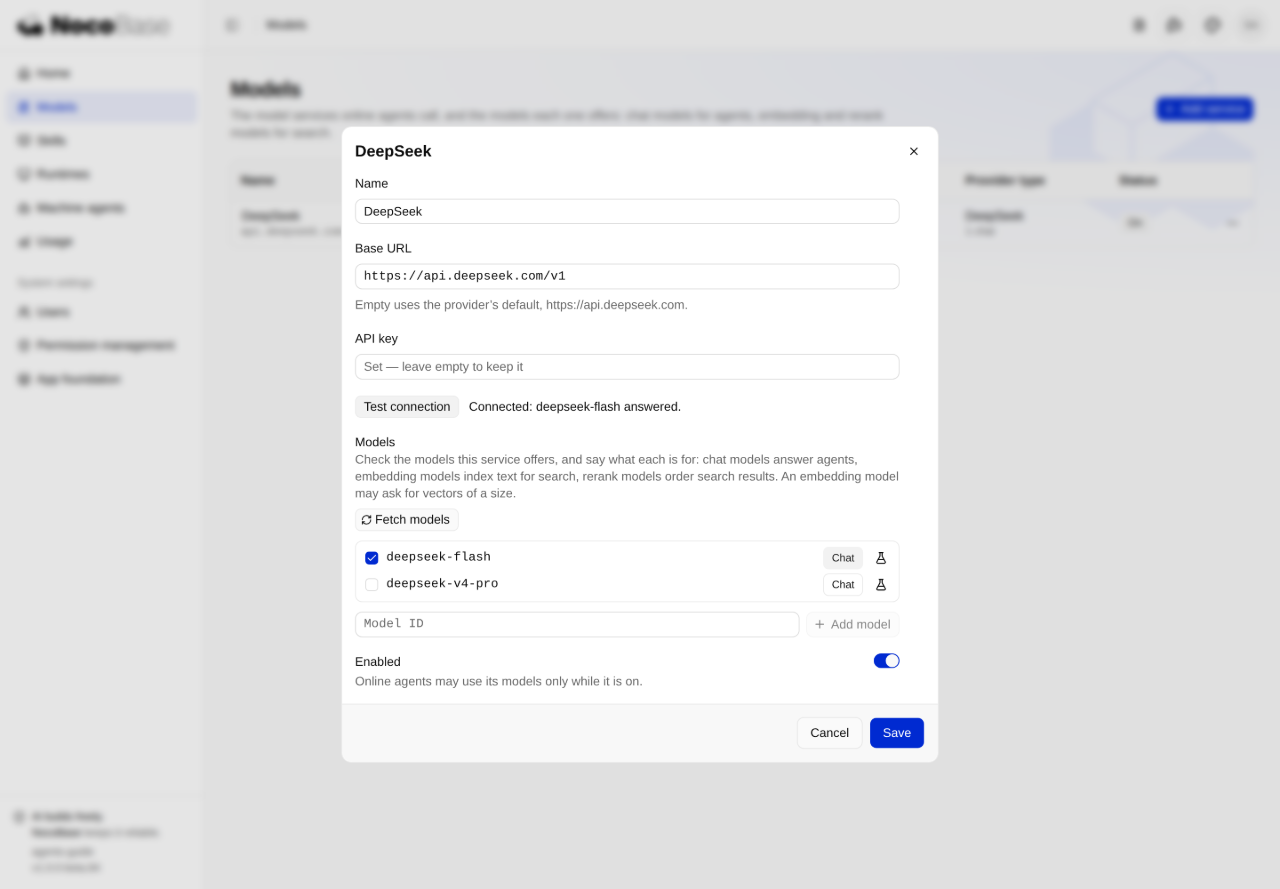
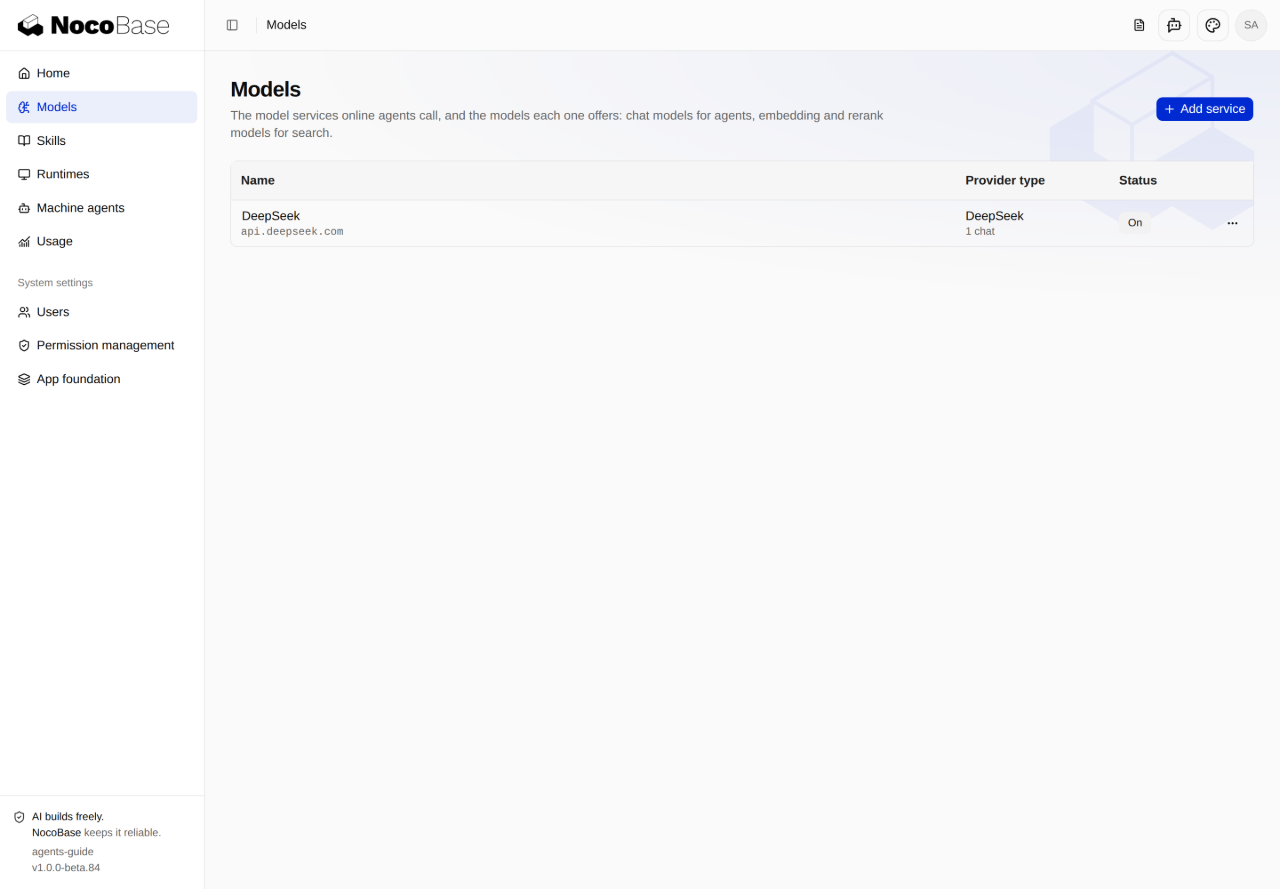
Click Agent chat in the header, select the model and try a message:
Write a one-sentence introduction to this feature: chat with AI in the app and continue the conversation when you return.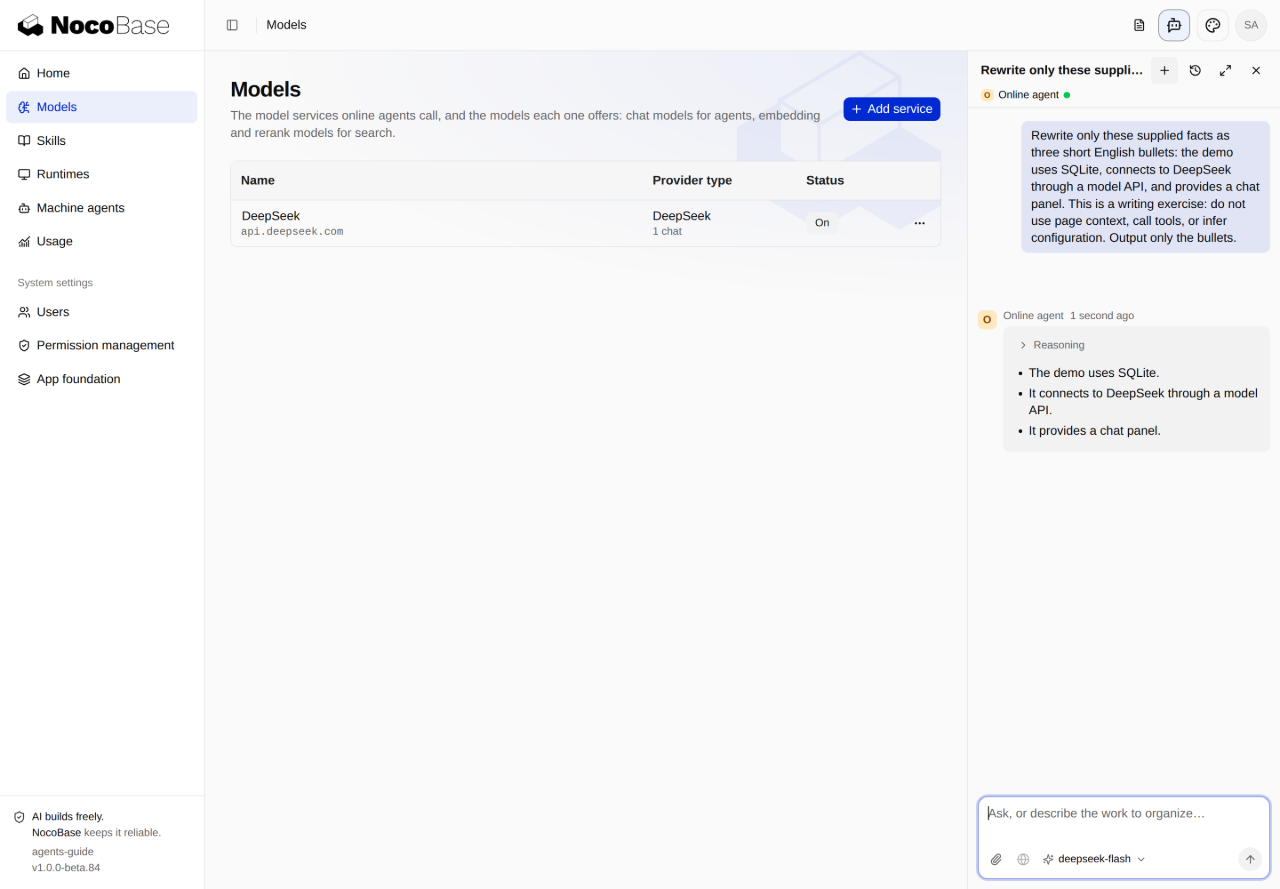
Done whenyou receive a reply and can still read the history after reopening the conversation through Conversations.
Model API conversations do not need an entry in Machine agents. To query orders or process approvals, integrate the relevant business tools and authorization.
Scenario 2: generate release notes using a business Skill
Save your team's writing rules as a business Skill to reuse them in dedicated conversations. A development request could be:
Add a “Draft release notes” button. Use our team's format to turn the changes and test results I provide into a draft. Don't make up missing details or publish it directly.The example's release-notes Skill reads its style guide, then produces Summary, Changes and Verification sections. If no test results are provided, it writes Verification not provided. It drafts text without changing project files or publishing.
- Download the example Skill, import it through Skills → Import and confirm its slug is
release-notes. - Inspect
SKILL.mdand the supportingreferences/style.mdfile in the page. - Click the header file icon, Draft release notes, to open a conversation using the Skill.
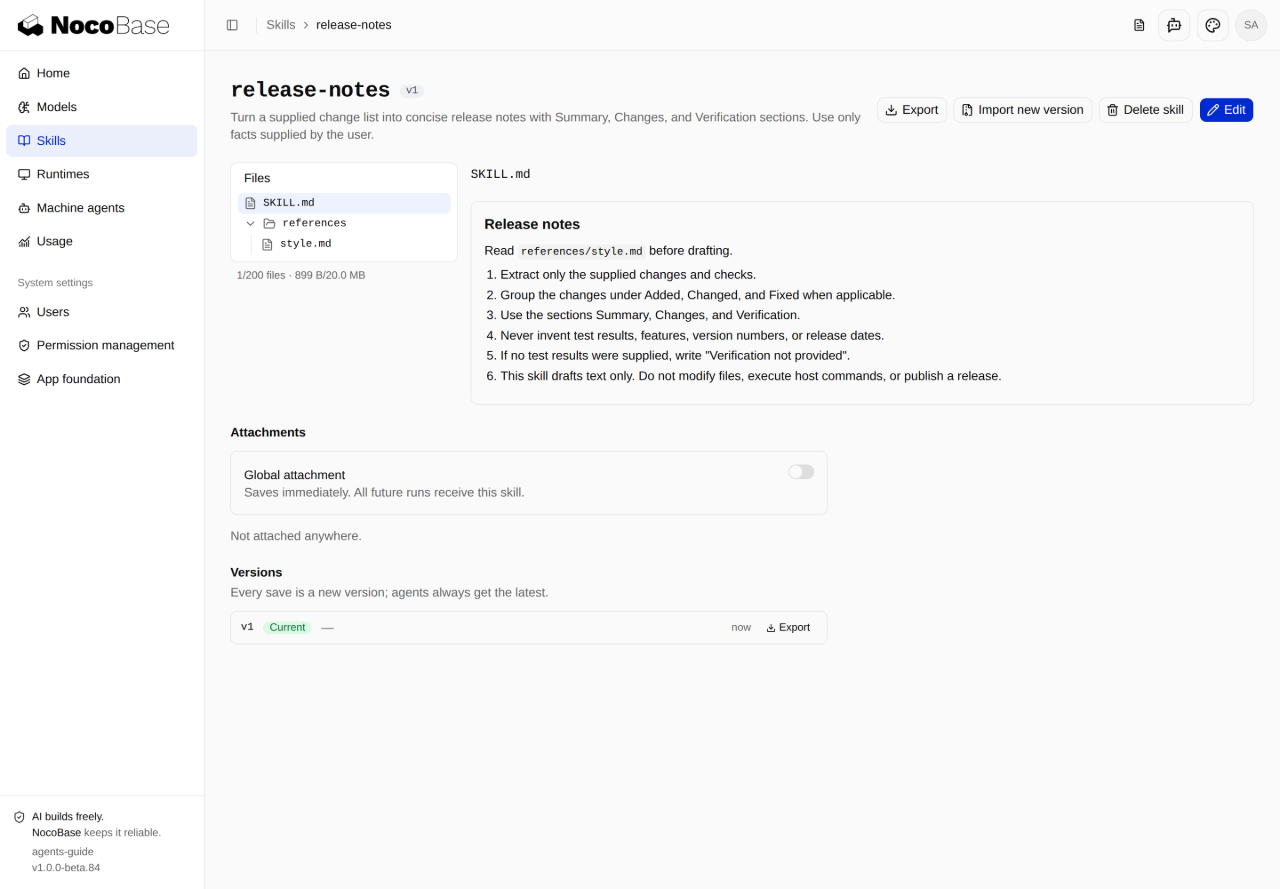
The entry selects the first chat model from enabled services; you can switch before sending. Each click creates a new conversation. Use Conversations to continue an existing draft. The ordinary Agent chat entry does not select this Skill automatically.
Try this in the new conversation:
Write English release notes using our team's rules. We added model configuration and a chat panel, fixed the missing Skills menu entry, and passed the 17 related tests.These changes and test counts are writing material; replace them with your project's actual results. Organizing the text does not mean the Agent ran the tests.
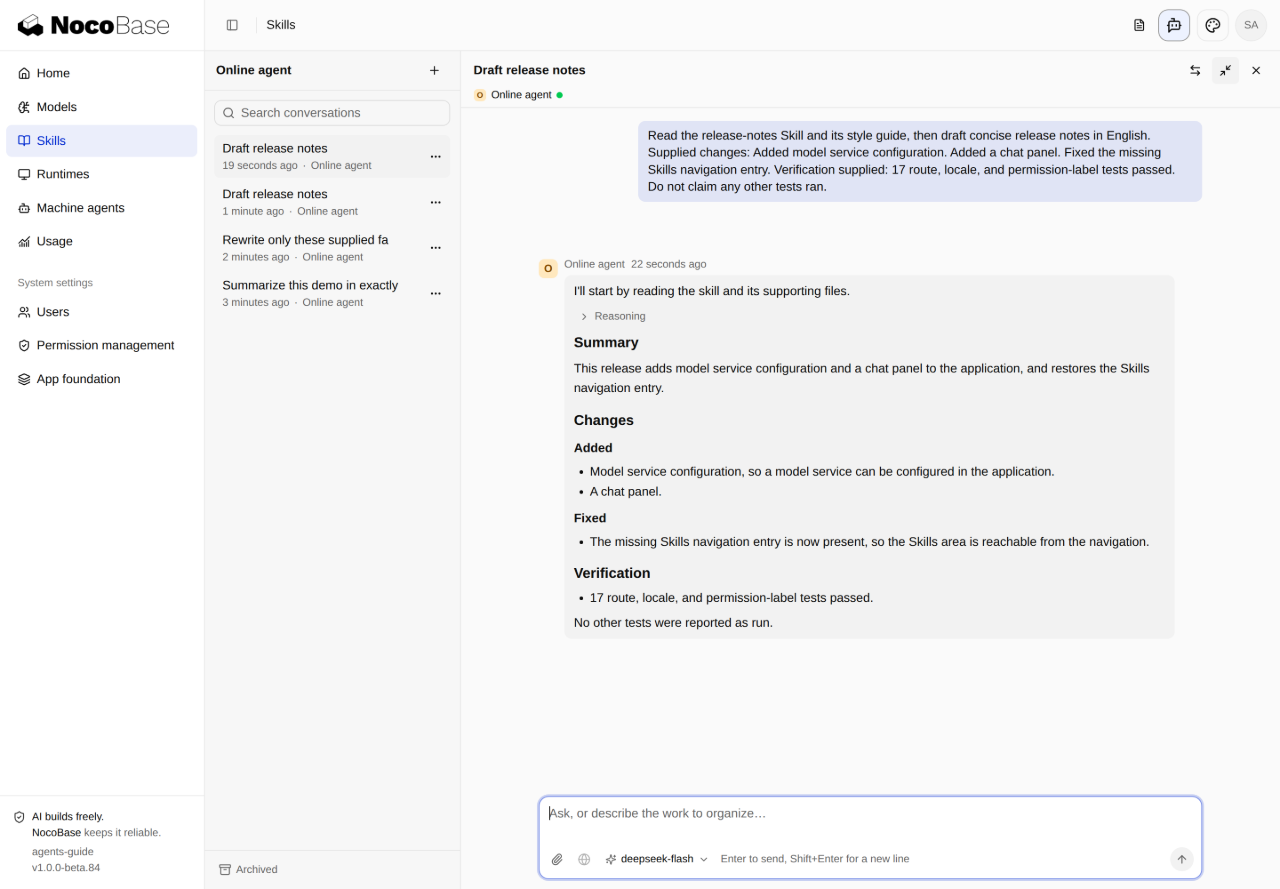
Done whenthe draft follows the team's format, includes only supplied facts, and actual tool records confirm that the Skill and supporting file were read.
If the entry fails to open, check model availability, the Skill slug and server Provider registration. Error feedback and retry logic are in client/components/release-notes-button.tsx.
Scenario 3: invoke a coding assistant on a machine
Connect a coding tool on a computer or server to send tasks and see progress and results in the app. Development prompt:
Connect the coding assistant on my machine so I can choose an available assistant, send it tasks and see its progress and results from the app.Prepare the distributions. The example already declares the application CLI and Runner dependencies and configuration. Run from the example directory:
pnpm nocobase cli build --universal
pnpm nocobase cli build --runner --universal
The commands need npm access; the target machine needs Node.js 24. The distributions are written to storage/runners/dist. Restart the app after initial setup. These commands do not build the production application.
Prepare the CLI and Runner in your own app
The Default template has neither an application-specific CLI nor a downloadable Runner. First:
- Install compatible
@nocobase/app-cli-clientand@nocobase/agent-runnerversions. - Declare
nocobase.cli.bininpackage.json; the example usesagents-guide. - Define
cli.name: 'agents-guide'andcli.package: { kind: 'served' }inserver/config/agents.ts, then register it inserver/config/index.ts. The CLI name must match the packaged product.
Without a Runner distribution, connection-page installation returns 404. Without the application CLI, tasks can fail with cliUnavailable even when the machine is online. Setting agents.cli.name before registering its configuration section returns UNKNOWN_KEY.
Connect the machine.
- Install and sign in to the coding tool on the target machine. Confirm the tool works independently.
- Create a personal or shared connection in Runtimes and select allowed coding tools.
- Follow the page's installation and Runner registration instructions. Wait for tool, sign-in and model reports.
- Add and enable an available tool/model combination in Machine agents. An online machine does not mean an Agent is enabled.
- Open Agent chat → Switch to runner agents and select the Agent.
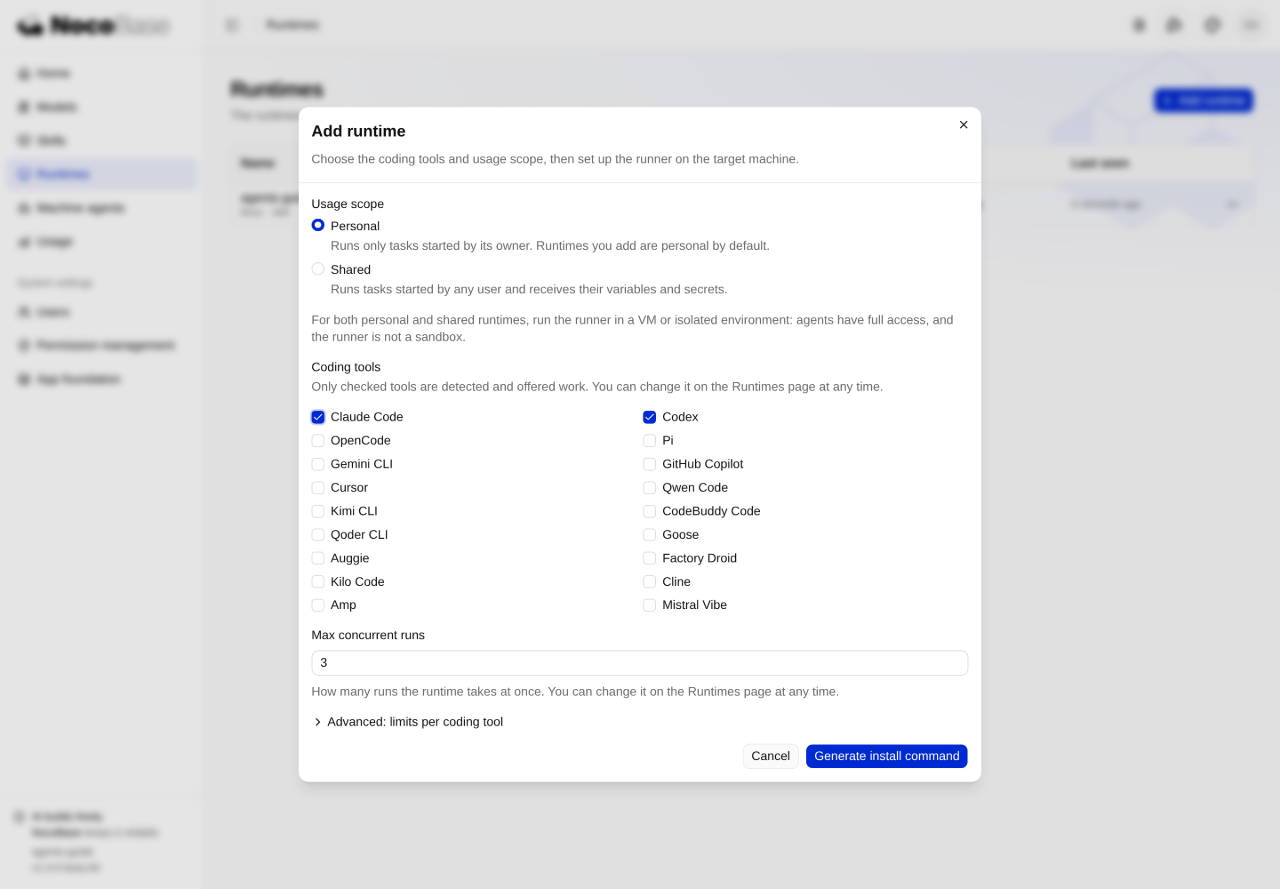
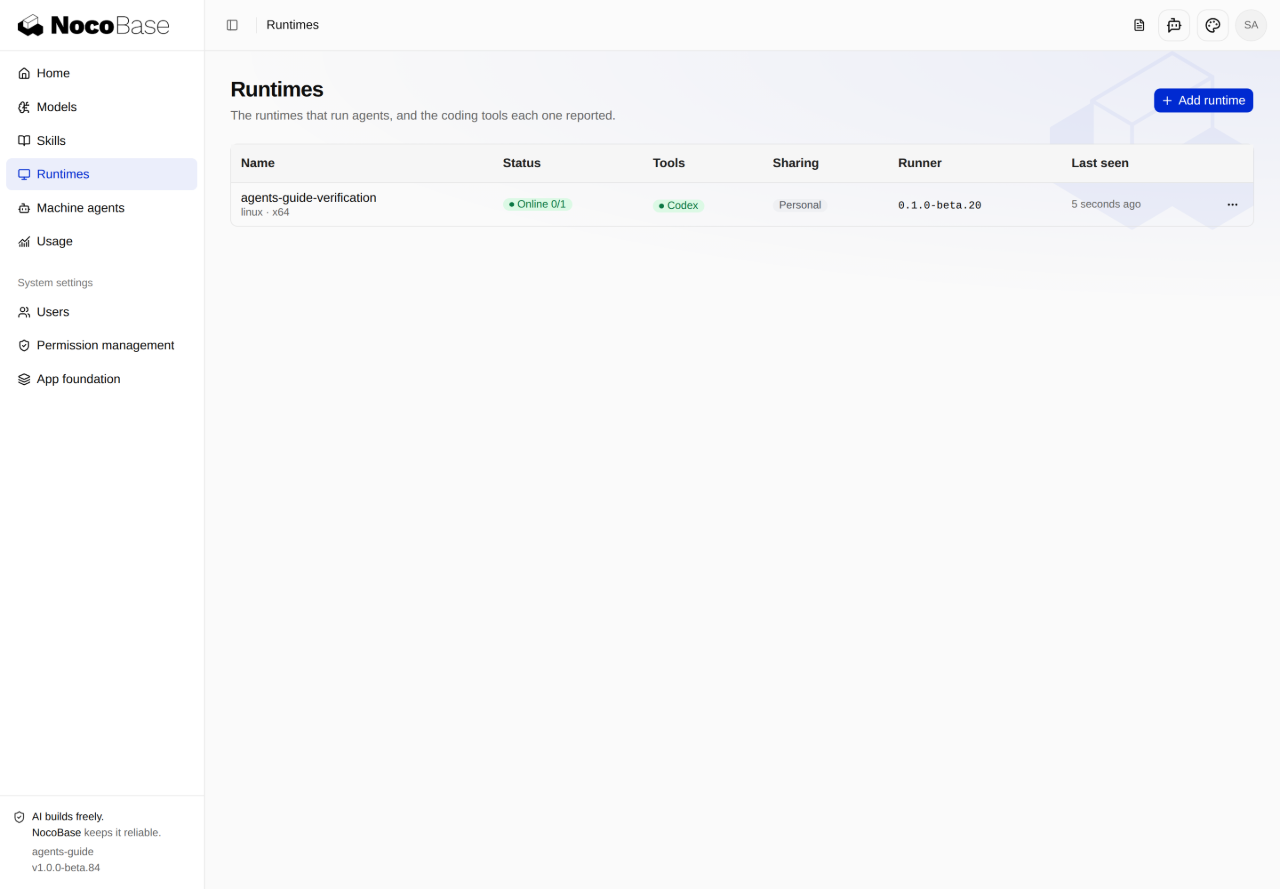
Machine Agents use the coding tool's model credentials, separately from keys in Models. If a task cannot start, check tool sign-in, model availability, Agent enablement, execution slots and local policy.
First ask about the workspace:
What working directory are you in, and what files are there? Just look; don't change anything.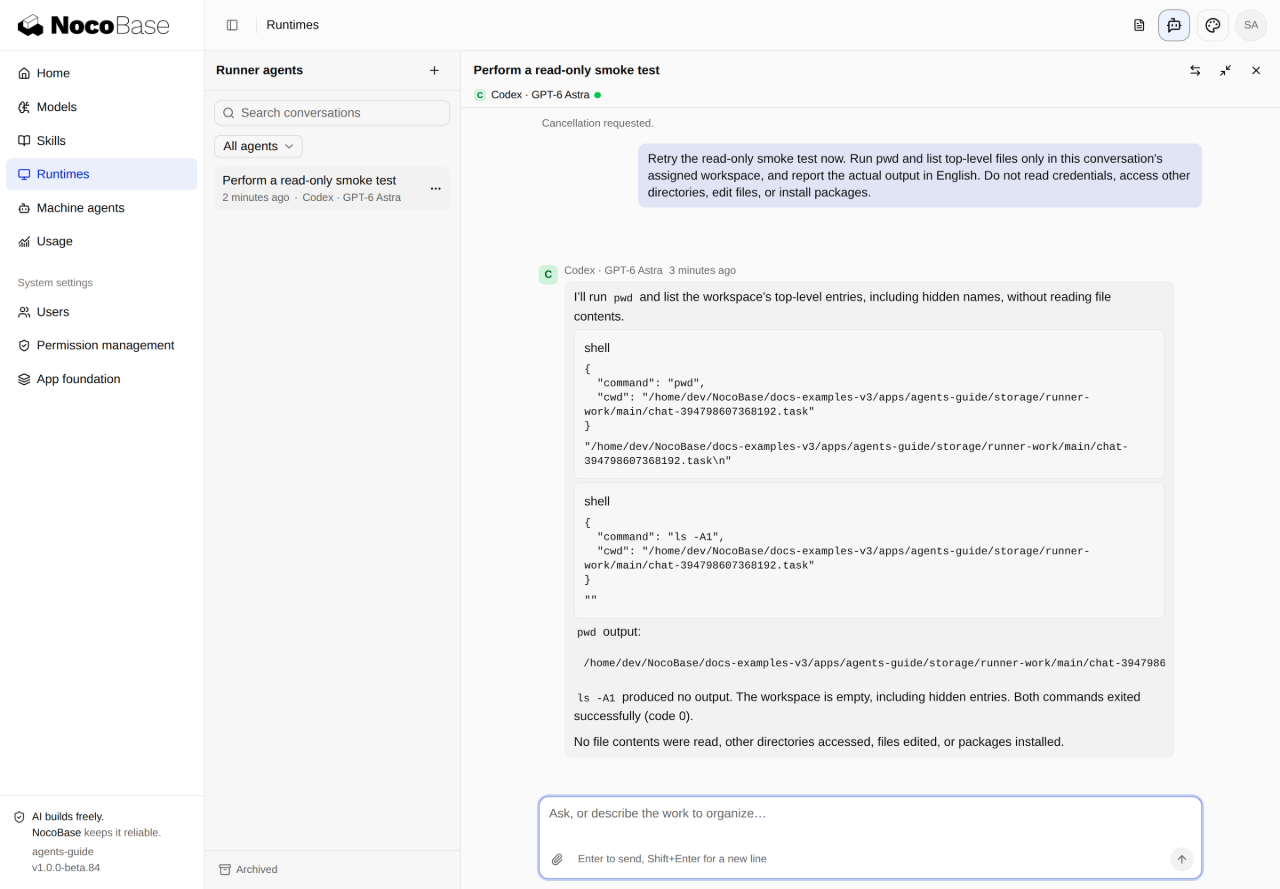
Done whenthe record contains executed commands, the working directory and output, and the run is completed.
An ordinary Runner conversation has its own workspace; it does not enter application source automatically. To work on a business project, the app must provide a project directory authorized by the server rather than trusting a host path typed in chat. Once integrated, try a small task:
Add English and Chinese tooltip text to this project's chat button. Keep its other behavior the same.For project tasks, also check the code diff and check results. This example verified only read-only execution in the conversation workspace, not project edits or builds.
Key principles and implementation
How files relate to the interface
| File or directory | Purpose |
|---|---|
client/plugins.ts, server/plugins.ts, cli/plugins.ts | Register the plugin's three contributions |
client/routes.ts | Compose management pages while retaining Home, sign-in and system settings |
client/extensions/nocobase-agent-chat/ | Chat UI source installed from the Registry |
client/components/agents-provider.tsx | Manage the current account's chat state |
client/layouts/app-layout.tsx, client/layouts/components/header-actions.tsx | Mount the chat panel and entry points |
client/components/release-notes-button.tsx | Create release-note conversations; handle repeated clicks, retry and account changes |
server/providers/agents.ts, server/providers/index.ts | Register release-note conversation configuration |
examples/release-notes/ | Business Skill and supporting files |
package.json, server/config/agents.ts, server/config/index.ts | Configure application CLI naming and distribution |
client/locales/, client/pages/settings/page-permission-titles.ts | English/Chinese copy and permission labels |
tests/client/ | Page, locale, permission-label and business-entry tests |
Model settings, imported Skills and chat history are runtime data, not part of the source distribution. Configure your model and import the Skill after starting the example.
Register the plugin and management pages
The Default template used here already includes the Agents dependency but does not register it. These commands register it, then preview and apply database changes:
pnpm nocobase plugin register agents --dry-run --json
pnpm nocobase plugin register agents --json
pnpm nocobase db apply --dry-run --json
pnpm nocobase db apply --json
Registration updates the three plugin lists. The database commands apply the plugin's migrations and seed data. See Manage plugins for general installation and upgrade steps.
Compose management pages into the app in client/routes.ts:
| Export | Default path | Purpose |
|---|---|---|
modelsRoute | /models | Model services and connection tests |
agentsRoute | /agents | Coding tool/model combinations on machines |
runtimesRoute | /runtimes | Machine connections |
skillsRoute | /skills | Business Skills and versions |
usageRoute | /usage | Usage and pricing |
For example, add a menu label and icon to Models:
import { BrainCircuit } from 'lucide-react';
import { modelsRoute } from '@nocobase/app-plugin-agents/client/routes';

// Use this entry inside the application's existing defineAppRoutes contribution.
const modelsPage = {
  ...modelsRoute,
  navigation: { title: 'agentDemo.models', icon: BrainCircuit },
};
Spreading modelsRoute preserves its page component, sign-in requirement, authorization and child routes. Compose the other pages the same way and export them alongside the original appRoutes. The runtime handles deployment prefixes such as /main; do not put them in page paths. If a menu is missing, check route registration and the user's permissions. Models uses settings:agents.services authorization.
Chat components and account state
The example installs the chat UI through the Registry:
pnpm exec shadcn add @nocobase/agent-chatInspect dependency changes after installation. In this example, the Registry downgraded Agents to 0.1.0-beta.14; the template-compatible 1.0.0-beta.29 had to be restored and Skills synchronized. The commands below apply to this example's versions; check compatibility with your own template.
pnpm add @nocobase/app-plugin-agents@1.0.0-beta.29 --save-exact
pnpm nocobase skills sync --dry-run --json
pnpm nocobase skills sync --json
The plugin's client/chat supplies conversation state and hooks; Registry components display them. Other layout components are omitted below:
<AgentsProvider>
  {/* Preserve the application's existing layout and route providers. */}
  <header><ChatHeaderButton /></header>
  <div className="relative flex min-h-0 flex-1">
    <main className="relative min-w-0 flex-1 overflow-hidden">
      <Outlet />
    </main>
    <ChatPanel />
  </div>
  <ChatFloatingButton />
</AgentsProvider>
ChatPanel sits beside main. The header and mobile buttons share conversation state.
AgentsProvider is an example-owned component wrapping the plugin's ChatProvider. It uses the signed-in user ID as the React key and memoryScope, and clears query caches and panel state on identity changes to avoid reusing the previous account's chat. The server still checks conversation ownership and access.
Select a Skill for a business conversation
Development Skills in the project's .agents/skills/ guide coding tools in integrating the plugin. Business Skills in the application's Skills library guide runtime tasks. They do not synchronize automatically.
The release-note Skill contains SKILL.md and references/style.md. After import, server/providers/agents.ts selects it through a named scope, and server/providers/index.ts loads the Provider. The key code is:
const agents = this.app.container.resolve(agentsToken);
agents.onlineAgent.configurator.registerOnlineAgentScope(
  'release-notes',
  async () => {
    const skill = (await agents.skills.list()).find(
      (item) => item.slug === 'release-notes',
    );
    if (!skill)
      throw new Error('Create the release-notes Skill before using this scope.');
    return {
      agentId: 'online',
      tool: ['bash', 'skill'],
      skill: [skill.id],
      systemPromptTemplate:
        'Help write release notes from the supplied facts. Use the release-notes Skill and its supporting style guide when the user requests release notes. Never claim an unperformed check succeeded.',
    };
  },
);
agentsToken is the plugin's public service entry point. The server selects one Skill by slug and the skill and bash tools needed to read it. systemPromptTemplate adds release-note rules. A scope selects capabilities; it does not grant business permissions.
ReleaseNotesButton uses the authenticated application API client to send this body to POST /api/agents/conversations:
{
  "agentId": "online",
  "title": "Draft release notes",
  "config": { "scope": ["release-notes"] },
  "selectedModel": { "modelService": "deepseek", "model": "deepseek-flash" }
}
After creation, the button calls panel.openChat({ conversationId }) to open the conversation. modelService identifies the configured service, and model must be enabled in it. Ordinary conversations without the release-notes scope do not select this Skill automatically.
Global attachment on the Skills page merges Skills into subsequent Runner tasks. It does not select Skills for model API conversations, which need the server scope above.
Execution and tool access
In code, agentId: 'online' selects the model API backend, named native. Machine tasks use a specific Agent ID and the runner backend. Both share the agentsToken.onlineAgent conversation service. The model API backend also supports structured background execution with JSON Schema; Runner has its own task queue and does not support that background interface.
The model API backend's virtual Shell can read /skills and write /tmp. It cannot access the host filesystem or directly run project Node, Python, builds or tests. Business actions such as querying orders need registered tools or allowed CLI commands with server-side identity, input and data-access checks. Add Knowledge when tasks need document retrieval.
AI development constraints and verification
What to check during integration
The development Agent should read the installed .agents/skills/nocobase-app-plugin-agents/SKILL.md and the references relevant to the task. After installing or upgrading dependencies, run pnpm nocobase skills sync and check public exports and types. If guidance and implementation differ, verify the interface before using it.
| Check | Behavior to confirm |
|---|---|
| Page authorization | Composed routes retain authorization; unauthorized users cannot bypass it through direct API requests |
| Account switching | Old chats, caches and pending requests do not affect the new account after sign-out or a switch |
| Business Skill | The conversation selects the intended Skill, with tool records showing its instructions and supporting files were read |
| Added tools | The server validates identity, input, action permissions and data access |
| Machine tasks | The execution machine and authorized directory are correct; command output, diffs and check results belong to this task |
Runner access depends on machine and coding-tool policies; Runner itself is not a filesystem sandbox. Prompts and Skills cannot replace code-level authorization or runtime verification.
Check the integration
Ask the development Agent to check the common interactions first:
Check that chat replies work and the history is still there when I reopen it. If I switch accounts, can I see anything from the previous person's chats?If you added a business Skill or machine tasks, check the corresponding rows above too. A model's claims do not prove correct configuration, Skill use or code execution; inspect connection status, tool records and actual results.
Run the example's relevant automated tests from its application directory:
pnpm exec vitest run tests/client/client-routes.test.ts tests/client/app-locale-coverage.test.ts tests/client/page-permission-titles.test.ts tests/client/release-notes-button.test.tsxBefore delivery, follow the project's checks with pnpm check, covering package checks, lint, formatting, types, tests and build. Inspect the cases and results: a successful exit with no tests found is not verification. See Testing for more methods.
Example verification scope
These results were recorded on 2026-10-29 using Default template 1.0.0-beta.84, Agents 1.0.0-beta.29, SQLite, DeepSeek deepseek-flash, Runner 0.1.0-beta.20 and Codex 0.165.0.
| Verified | Result |
|---|---|
| Types, scoped lint and formatting | Client, server and tooling checks passed |
| Pages and business entry | 4 test files and 23 cases passed, covering routes, locales, permission labels, creation/retry, repeated clicks and account changes |
| Model chat | Connection succeeded, real replies arrived and history survived reopening |
| Business Skill | Original tool records confirmed reads of the Skill and references/style.md |
| Runner | After the application CLI was supplied, pwd and ls -A1 ran in the empty conversation workspace and the run completed |
| Anonymous access | Model-service and Skills APIs returned 401 |
Full pnpm check, production build/deployment, multi-account browser acceptance, the full role matrix, business writes, attachment parsing and project edits/builds remain unverified. Narrow-screen and dark pages received limited checks; Chinese IME, the full language/mobile matrix and stopping model streaming were not fully verified either. The simplified prompts in this guide were not rerun; screenshots and results belong to the original conversations.
Example source
- Complete example: pinned to commit
b91adc8, with the integration code for the three scenarios. - Setup and verification: versions, installation, startup, tests and limitations.
- Download source ZIP: matches that commit and excludes secrets, runtime data and dependencies.