做一个插件设置页
很多插件需要一个设置页面来让用户配置参数——比如第三方服务的 API Key、Webhook 地址等。这个示例展示怎么用 pluginSettingsManager + React 组件 + ctx.api 做一个完整的插件设置页。
这个示例不涉及 FlowEngine,纯粹是 Plugin + Router + Component + Context 的组合。
最终效果
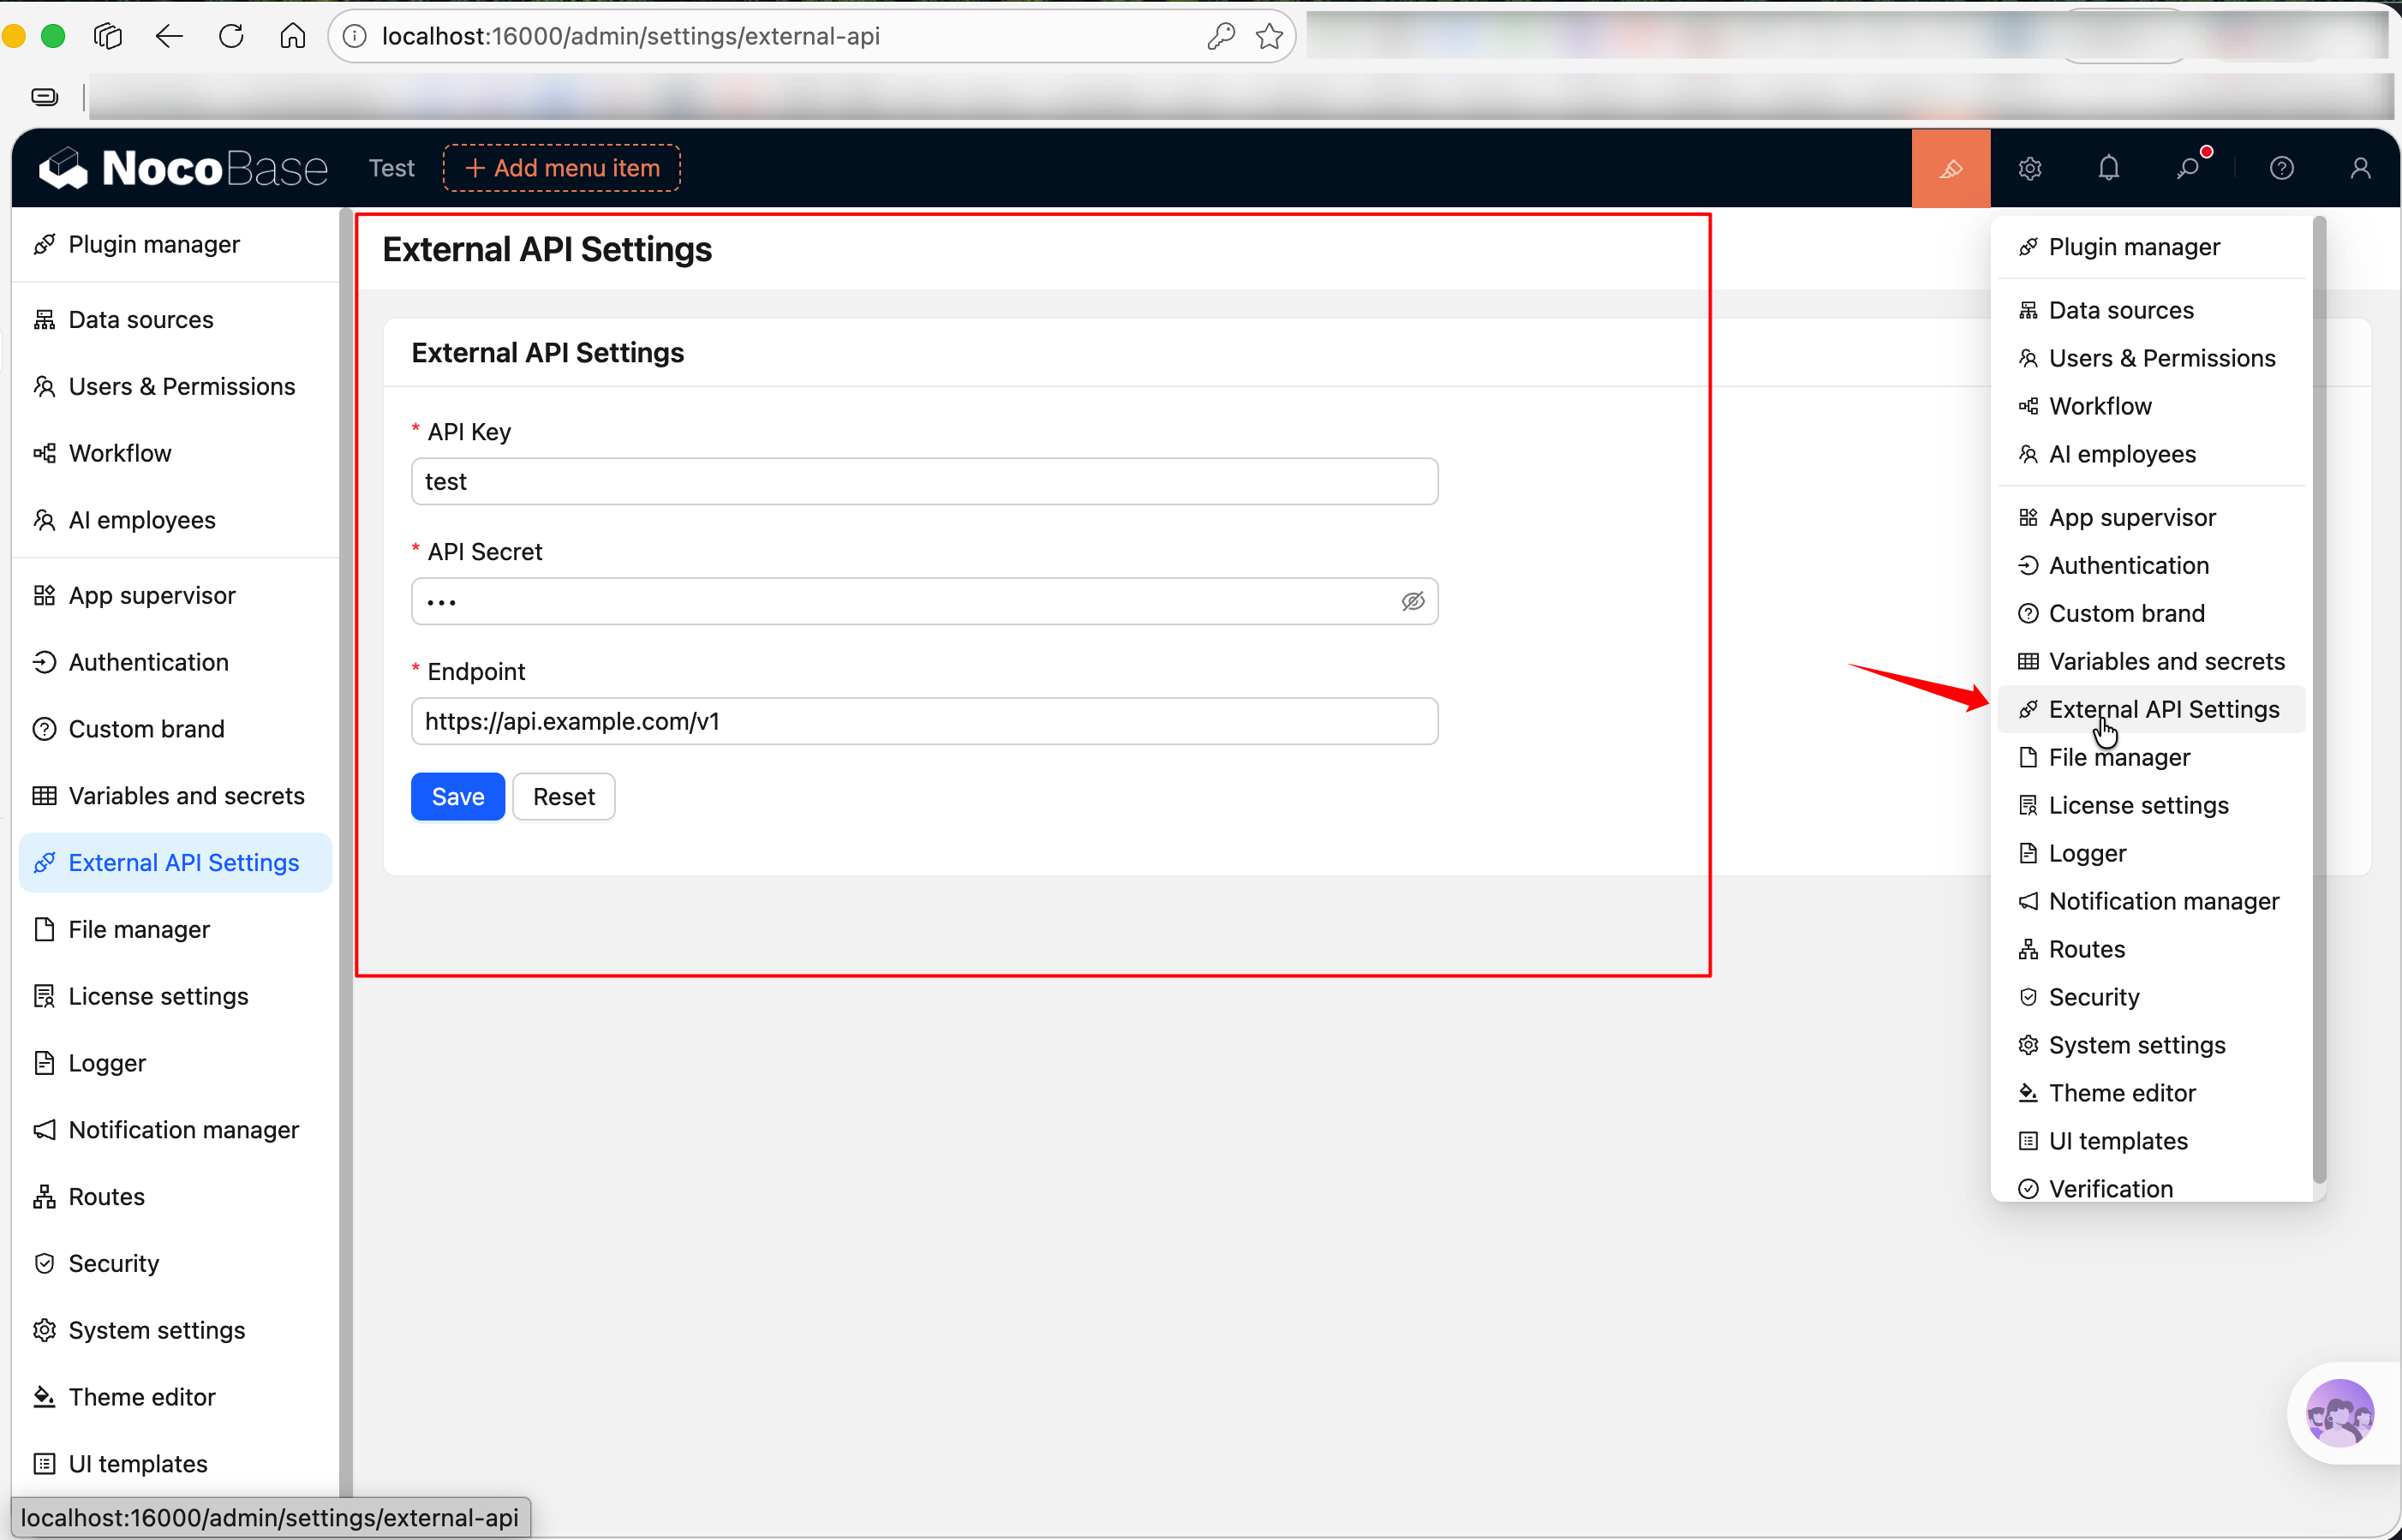
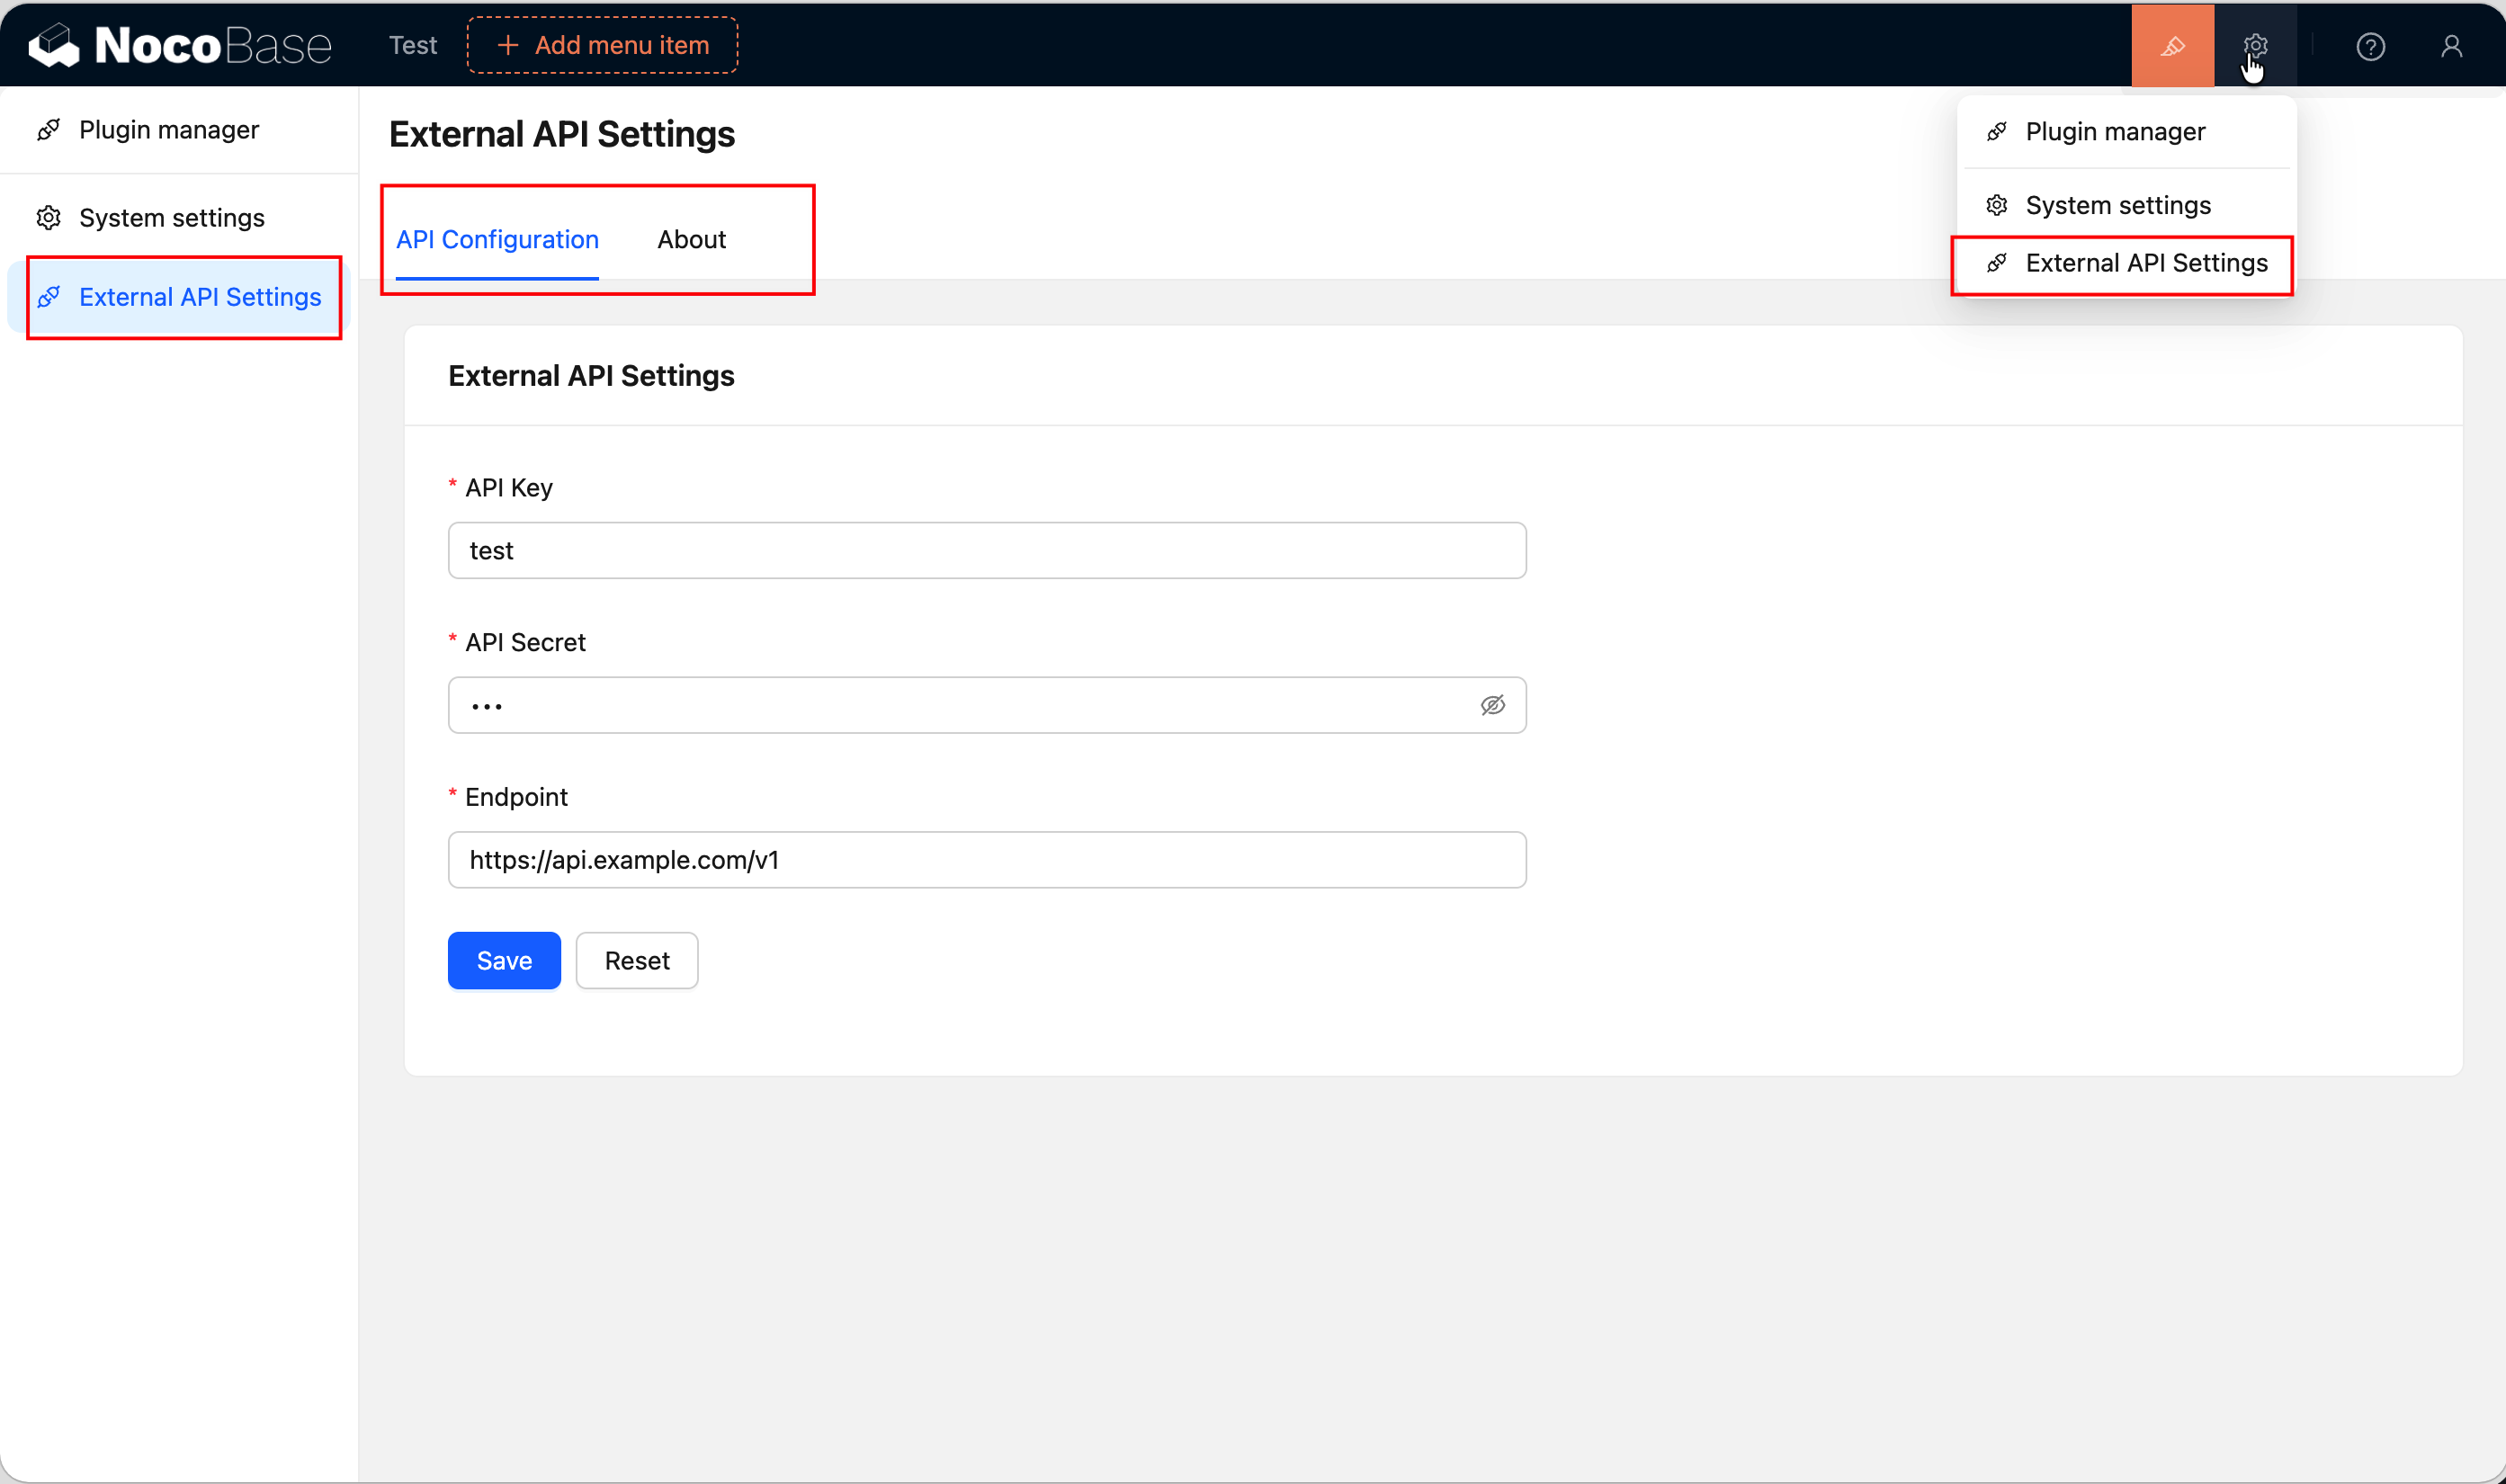
我们要做的是一个「外部服务配置」设置页:
- 在「插件配置」菜单里出现
- 用 Antd Form 提供表单 UI
- 通过
ctx.api 调用后端接口读取和保存配置
- 保存成功后给出提示
完整源码见 @nocobase-example/plugin-settings-page。如果你想直接在本地跑起来看效果:
yarn pm enable @nocobase-example/plugin-settings-page
下面从零开始,一步步搭建这个插件。
第一步:创建插件骨架
在仓库根目录执行:
yarn pm create @my-project/plugin-settings-page
这会在 packages/plugins/@my-project/plugin-settings-page 下生成基础文件结构,包括 src/client-v2/、src/server/、src/locale/ 等目录。详细说明见 编写第一个插件。
第二步:注册设置页
编辑 src/client-v2/plugin.tsx,在 load() 里用 this.pluginSettingsManager 注册设置页。分两步——先用 addMenuItem() 注册菜单入口,再用 addPageTabItem() 注册实际页面:
// src/client-v2/plugin.tsx
import { Plugin, Application } from '@nocobase/client-v2';

export class PluginSettingsPageClient extends Plugin<any, Application> {
  async load() {
    // 注册菜单入口
    this.pluginSettingsManager.addMenuItem({
      key: 'external-api',
      title: this.t('External API Settings'),
      icon: 'ApiOutlined', // Ant Design 图标,参考 https://5x.ant.design/components/icon
    });

    // Tab 1:API 配置(key 为 'index',映射到菜单根路径 /admin/settings/external-api)
    this.pluginSettingsManager.addPageTabItem({
      menuKey: 'external-api',
      key: 'index',
      title: this.t('API Configuration'),
      componentLoader: () => import('./pages/ExternalApiSettingsPage'),
      sort: -1, // 排序值越小越靠前
    });

    // Tab 2:关于页面(映射到 /admin/settings/external-api/about)
    this.pluginSettingsManager.addPageTabItem({
      menuKey: 'external-api',
      key: 'about',
      title: this.t('About'),
      componentLoader: () => import('./pages/AboutPage'),
    });
  }
}

export default PluginSettingsPageClient;
注册后,「插件配置」菜单里会出现一个「外部服务配置」入口,顶部会有两个 tab——「API 配置」和「关于」。当菜单下只有一个页面时 tab 栏会自动隐藏,这里注册了两个页面所以会自动显示。this.t() 会自动以当前插件的包名作为 i18n namespace,详见 Context → 常用能力。
第三步:编写设置页组件
新建 src/client-v2/pages/ExternalApiSettingsPage.tsx。设置页就是一个普通的 React 组件,这里用 Antd 的 Form 和 Card 来搭 UI,用 useFlowContext() 拿到 ctx.api 来和后端交互,用 useT() 获取翻译函数。
// src/client-v2/pages/ExternalApiSettingsPage.tsx
import React from 'react';
import { Form, Input, Button, Card, Space, message } from 'antd';
import { useFlowContext } from '@nocobase/flow-engine';
import { useRequest } from 'ahooks';
import { useT } from '../locale';

interface ExternalApiSettings {
  apiKey: string;
  apiSecret: string;
  endpoint: string;
}

export default function ExternalApiSettingsPage() {
  const ctx = useFlowContext();
  const t = useT();
  const [form] = Form.useForm<ExternalApiSettings>();

  // 加载已有配置
  const { loading } = useRequest(
    () =>
      ctx.api.request({
        url: 'externalApi:get',
        method: 'get',
      }),
    {
      onSuccess(response) {
        if (response?.data?.data) {
          form.setFieldsValue(response.data.data);
        }
      },
    },
  );

  // 保存配置
  const { run: save, loading: saving } = useRequest(
    (values: ExternalApiSettings) =>
      ctx.api.request({
        url: 'externalApi:set',
        method: 'post',
        data: values,
      }),
    {
      manual: true,
      onSuccess() {
        message.success(t('Saved successfully'));
      },
      onError() {
        message.error(t('Save failed'));
      },
    },
  );

  const handleSave = async () => {
    const values = await form.validateFields();
    save(values);
  };

  return (
    <Card title={t('External API Settings')} loading={loading}>
      <Form form={form} layout="vertical" style={{ maxWidth: 600 }}>
        <Form.Item
          label="API Key"
          name="apiKey"
          rules={[{ required: true, message: t('Please enter API Key') }]}
        >
          <Input placeholder="sk-xxxxxxxxxxxx" autoComplete="off" />
        </Form.Item>

        <Form.Item
          label="API Secret"
          name="apiSecret"
          rules={[{ required: true, message: t('Please enter API Secret') }]}
        >
          <Input.Password placeholder="••••••••" autoComplete="new-password" />
        </Form.Item>

        <Form.Item
          label="Endpoint"
          name="endpoint"
          rules={[{ required: true, message: t('Please enter endpoint URL') }]}
        >
          <Input placeholder="https://api.example.com/v1" />
        </Form.Item>

        <Form.Item>
          <Space>
            <Button type="primary" onClick={handleSave} loading={saving}>
              {t('Save')}
            </Button>
            <Button onClick={() => form.resetFields()}>
              {t('Reset')}
            </Button>
          </Space>
        </Form.Item>
      </Form>
    </Card>
  );
}
几个关键点:
useFlowContext() — 从 @nocobase/flow-engine 导入,拿到 ctx.api 等上下文能力useT() — 从 locale.ts 导入的翻译 hook,已绑定插件的 namespace,详见 i18n 国际化useRequest() — 来自 ahooks,处理请求的 loading、error 状态。manual: true 表示不自动发请求,需要手动调用 run()ctx.api.request() — 和 Axios 用法一致,NocoBase 会自动带上认证信息
第四步:添加多语言文件
编辑插件的 src/locale/ 下的翻译文件:
// src/locale/zh-CN.json
{
  "External API Settings": "外部服务配置",
  "API Configuration": "API 配置",
  "About": "关于",
  "Plugin name": "插件名称",
  "Version": "版本",
  "This is a demo plugin showing how to register a settings page with multiple tabs.": "这是一个演示插件,展示如何注册带多个 Tab 的设置页。",
  "Please enter API Key": "请输入 API Key",
  "Please enter API Secret": "请输入 API Secret",
  "Please enter endpoint URL": "请输入接口地址",
  "Save": "保存",
  "Reset": "重置",
  "Saved successfully": "保存成功",
  "Save failed": "保存失败"
}
// src/locale/en-US.json
{
  "External API Settings": "External API Settings",
  "API Configuration": "API Configuration",
  "About": "About",
  "Plugin name": "Plugin name",
  "Version": "Version",
  "This is a demo plugin showing how to register a settings page with multiple tabs.": "This is a demo plugin showing how to register a settings page with multiple tabs.",
  "Please enter API Key": "Please enter API Key",
  "Please enter API Secret": "Please enter API Secret",
  "Please enter endpoint URL": "Please enter endpoint URL",
  "Save": "Save",
  "Reset": "Reset",
  "Saved successfully": "Saved successfully",
  "Save failed": "Save failed"
}
关于翻译文件的写法、useT() hook、tExpr() 等更多用法,详见 i18n 国际化。
第五步:服务端接口
客户端的表单需要后端提供 externalApi:get 和 externalApi:set 两个接口。服务端部分不复杂——定义一个数据表存配置,再注册两个接口就行。
定义数据表
新建 src/server/collections/externalApiSettings.ts,NocoBase 会自动加载这个目录下的 collection 定义:
// src/server/collections/externalApiSettings.ts
import { defineCollection } from '@nocobase/database';

export default defineCollection({
  name: 'externalApiSettings',
  fields: [
    { name: 'apiKey', type: 'string', title: 'API Key' },
    { name: 'apiSecret', type: 'string', title: 'API Secret' },
    { name: 'endpoint', type: 'string', title: 'Endpoint' },
  ],
});
注册资源和接口
编辑 src/server/plugin.ts,用 resourceManager.define() 注册资源,再配置 ACL 权限:
// src/server/plugin.ts
import { Plugin } from '@nocobase/server';

export class PluginSettingsPageServer extends Plugin {
  async load() {
    // 注册资源和接口
    this.app.resourceManager.define({
      name: 'externalApi',
      actions: {
        // GET /api/externalApi:get — 读取配置
        async get(ctx, next) {
          const repo = ctx.db.getRepository('externalApiSettings');
          const record = await repo.findOne();
          ctx.body = record?.toJSON() ?? {};
          await next();
        },
        // POST /api/externalApi:set — 保存配置
        async set(ctx, next) {
          const repo = ctx.db.getRepository('externalApiSettings');
          const values = ctx.action.params.values;
          const existing = await repo.findOne();
          if (existing) {
            await repo.update({ values, filter: { id: existing.id } });
          } else {
            await repo.create({ values });
          }
          ctx.body = { ok: true };
          await next();
        },
      },
    });

    // 登录用户可以读取配置
    this.app.acl.allow('externalApi', 'get', 'loggedIn');
  }
}

export default PluginSettingsPageServer;
几个关键点:
ctx.db.getRepository() — 通过 collection 名称拿到数据操作对象ctx.action.params.values — POST 请求的 body 数据acl.allow() — 'loggedIn' 表示登录用户即可访问。set 接口没有显式 allow,默认只有管理员能调用await next() — 每个 action 最后都要调用,这是 Koa 中间件的约定
第六步:编写「关于」页面
在第二步里我们注册了两个 tab,「API 配置」的页面组件已经在第三步写好了,现在来写「关于」tab 的页面。
新建 src/client-v2/pages/AboutPage.tsx:
// src/client-v2/pages/AboutPage.tsx
import React from 'react';
import { Card, Descriptions, Typography } from 'antd';
import { useT } from '../locale';

const { Paragraph } = Typography;

export default function AboutPage() {
  const t = useT();

  return (
    <Card title={t('About')}>
      <Descriptions column={1} bordered style={{ maxWidth: 600 }}>
        <Descriptions.Item label={t('Plugin name')}>
          @nocobase-example/plugin-settings-page
        </Descriptions.Item>
        <Descriptions.Item label={t('Version')}>1.0.0</Descriptions.Item>
      </Descriptions>
      <Paragraph style={{ marginTop: 16, color: '#888' }}>
        {t('This is a demo plugin showing how to register a settings page with multiple tabs.')}
      </Paragraph>
    </Card>
  );
}
这个页面很简单——用 Antd 的 Descriptions 展示插件信息。实际项目中,「关于」tab 可以用来放版本号、更新日志、帮助链接等。
第七步:启用插件
yarn pm enable @my-project/plugin-settings-page
启用后刷新页面,在「插件配置」菜单里就能看到「外部服务配置」入口了。
完整源码
小结
这个示例用到的能力:
相关链接

