プラグイン設定ページを作る
多くのプラグインでは、ユーザーがパラメータを設定するための設定ページが必要です。例えばサードパーティサービスの API Key、Webhook URL などです。この例では pluginSettingsManager + React コンポーネント + ctx.api を使って完全なプラグイン設定ページを作る方法を示します。
この例では FlowEngine を使わず、純粋に Plugin + Router + Component + Context の組み合わせです。
前提知識
以下の内容を事前に理解しておくと、開発がスムーズになります:
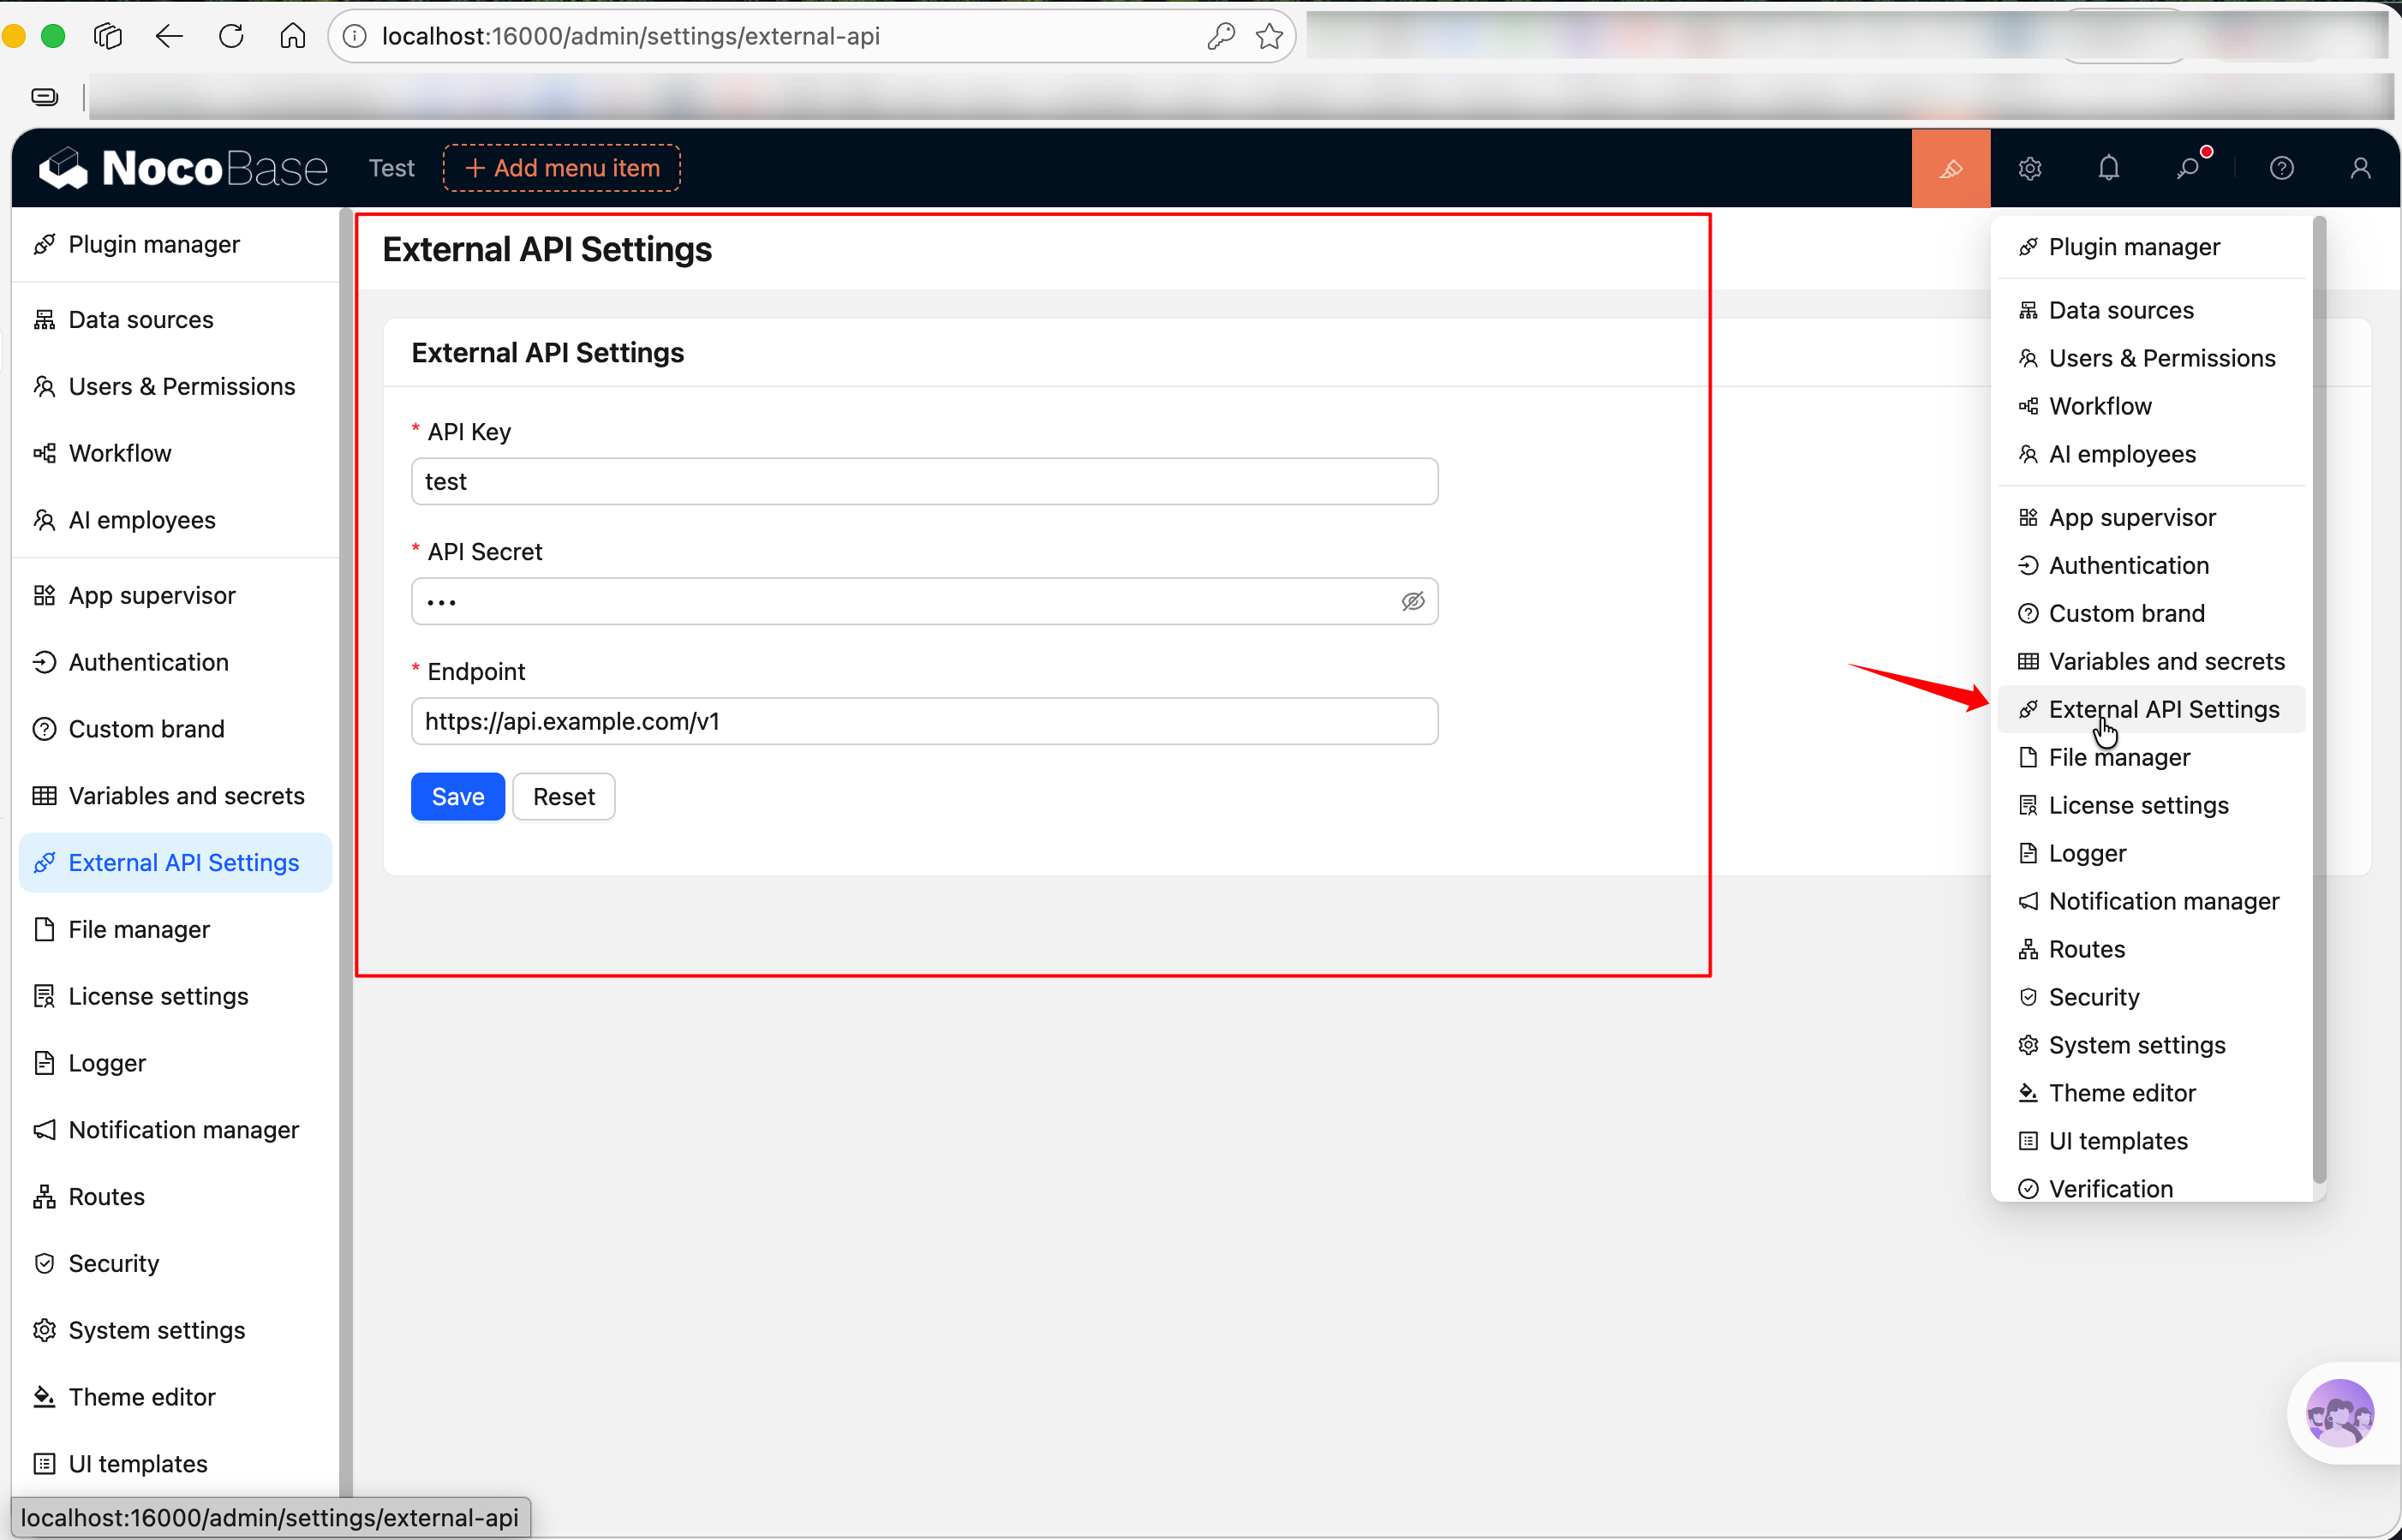
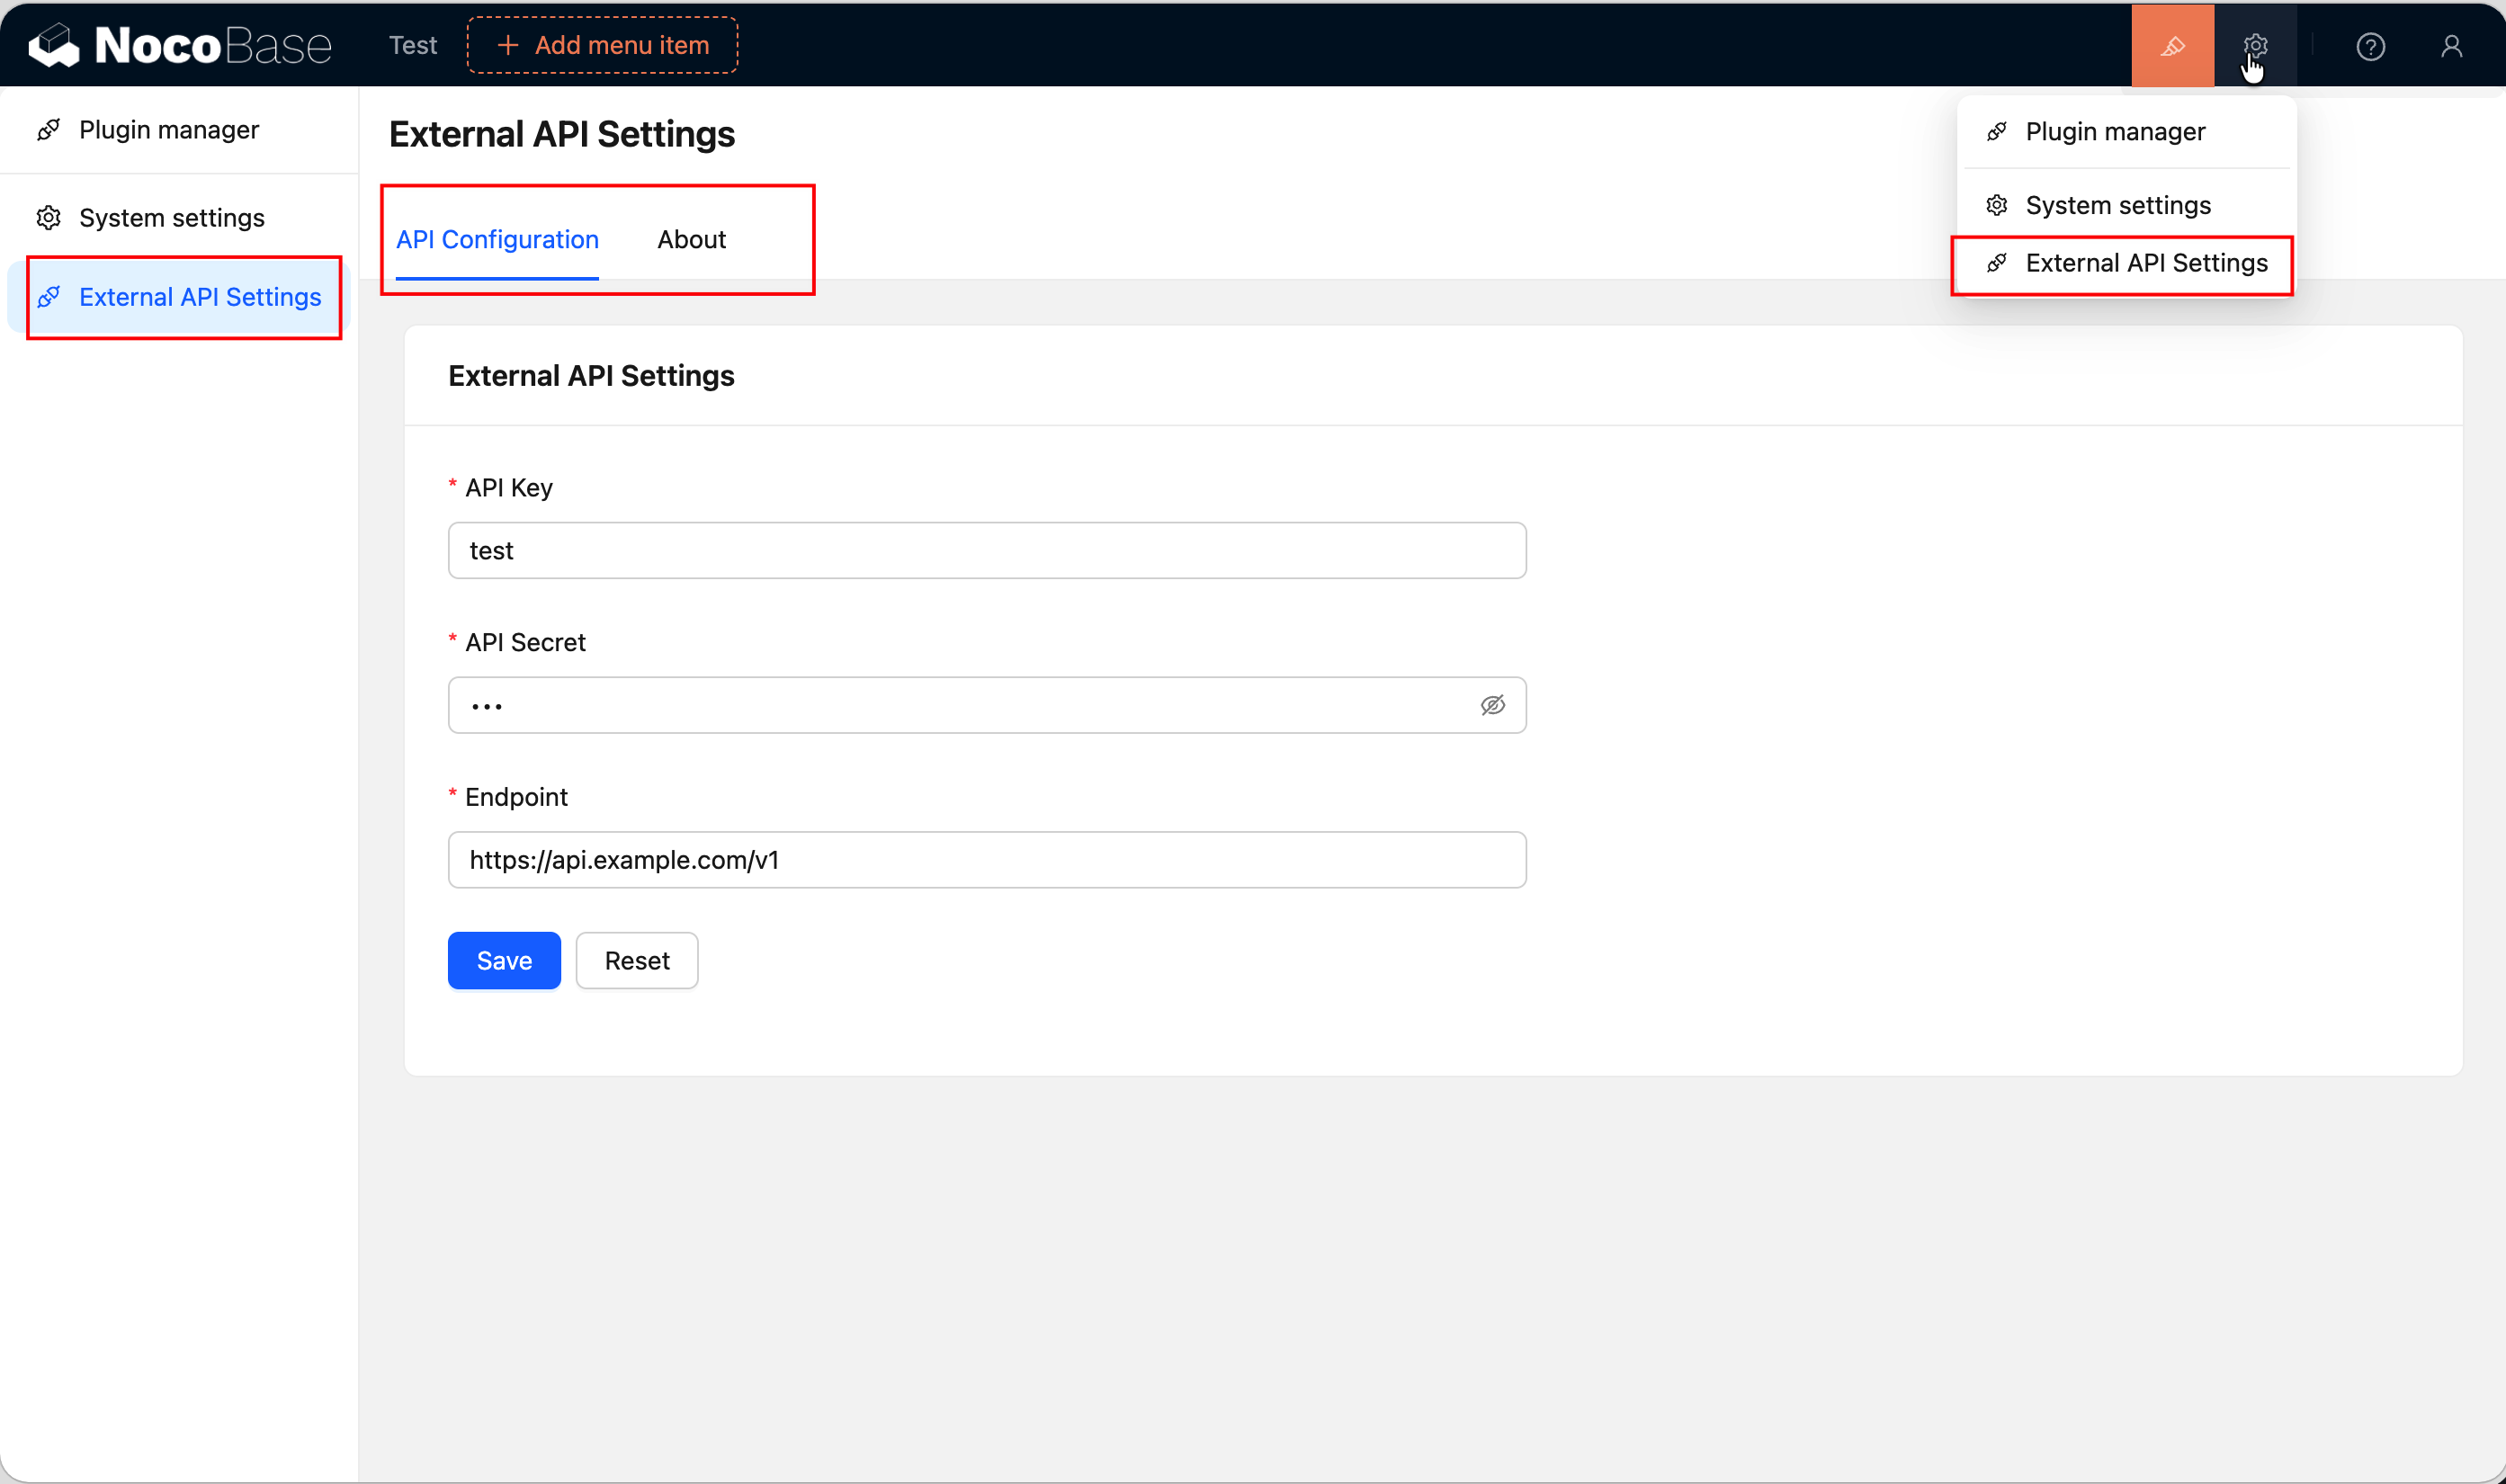
最終的な効果
「外部サービス設定」の設定ページを作ります:
- 「プラグイン設定」メニューに表示
- Antd Form でフォーム UI を提供
ctx.api でバックエンドインターフェースを呼び出して設定の読み込みと保存- 保存成功時にメッセージを表示
完全なソースコードは @nocobase-example/plugin-settings-page を参照してください。ローカルで動作確認したい場合:
yarn pm enable @nocobase-example/plugin-settings-page
以下、ゼロからこのプラグインを構築していきます。
ステップ1:プラグインスケルトンの作成
リポジトリのルートで実行します:
yarn pm create @my-project/plugin-settings-page
packages/plugins/@my-project/plugin-settings-page 配下に src/client-v2/、src/server/、src/locale/ などのディレクトリを含む基本的なファイル構成が生成されます。詳しくははじめてのプラグインを書くをご覧ください。
ステップ2:設定ページの登録
src/client-v2/plugin.tsx を編集し、load() 内で this.pluginSettingsManager を使って設定ページを登録します。2ステップで行います — まず addMenuItem() でメニューエントリを登録し、次に addPageTabItem() で実際のページを登録します:
// src/client-v2/plugin.tsx
import { Plugin, Application } from '@nocobase/client-v2';

export class PluginSettingsPageClient extends Plugin<any, Application> {
  async load() {
    // メニューエントリの登録
    this.pluginSettingsManager.addMenuItem({
      key: 'external-api',
      title: this.t('External API Settings'),
      icon: 'ApiOutlined', // Ant Design アイコン。参考:https://5x.ant.design/components/icon
    });

    // Tab 1:API 設定(key が 'index' の場合、メニュールートパス /admin/settings/external-api にマッピング)
    this.pluginSettingsManager.addPageTabItem({
      menuKey: 'external-api',
      key: 'index',
      title: this.t('API Configuration'),
      componentLoader: () => import('./pages/ExternalApiSettingsPage'),
      sort: -1, // ソート値が小さいほど前に表示
    });

    // Tab 2:バージョン情報ページ(/admin/settings/external-api/about にマッピング)
    this.pluginSettingsManager.addPageTabItem({
      menuKey: 'external-api',
      key: 'about',
      title: this.t('About'),
      componentLoader: () => import('./pages/AboutPage'),
    });
  }
}

export default PluginSettingsPageClient;
登録後、「プラグイン設定」メニューに「外部サービス設定」エントリが表示され、上部に「API 設定」と「バージョン情報」の2つの tab が表示されます。メニュー配下にページが1つだけの場合は tab バーが自動的に非表示になりますが、ここでは2つのページを登録しているため自動的に表示されます。this.t() は自動的に現在のプラグインのパッケージ名を i18n namespace として使用します。詳しくは Context → 共通機能をご覧ください。
ステップ3:設定ページコンポーネントの作成
src/client-v2/pages/ExternalApiSettingsPage.tsx を新規作成します。設定ページは普通の React コンポーネントです。ここでは Antd の Form と Card で UI を構築し、useFlowContext() で ctx.api を取得してバックエンドと通信し、useT() で翻訳関数を取得します。
// src/client-v2/pages/ExternalApiSettingsPage.tsx
import React from 'react';
import { Form, Input, Button, Card, Space, message } from 'antd';
import { useFlowContext } from '@nocobase/flow-engine';
import { useRequest } from 'ahooks';
import { useT } from '../locale';

interface ExternalApiSettings {
  apiKey: string;
  apiSecret: string;
  endpoint: string;
}

export default function ExternalApiSettingsPage() {
  const ctx = useFlowContext();
  const t = useT();
  const [form] = Form.useForm<ExternalApiSettings>();

  // 既存の設定を読み込み
  const { loading } = useRequest(
    () =>
      ctx.api.request({
        url: 'externalApi:get',
        method: 'get',
      }),
    {
      onSuccess(response) {
        if (response?.data?.data) {
          form.setFieldsValue(response.data.data);
        }
      },
    },
  );

  // 設定の保存
  const { run: save, loading: saving } = useRequest(
    (values: ExternalApiSettings) =>
      ctx.api.request({
        url: 'externalApi:set',
        method: 'post',
        data: values,
      }),
    {
      manual: true,
      onSuccess() {
        message.success(t('Saved successfully'));
      },
      onError() {
        message.error(t('Save failed'));
      },
    },
  );

  const handleSave = async () => {
    const values = await form.validateFields();
    save(values);
  };

  return (
    <Card title={t('External API Settings')} loading={loading}>
      <Form form={form} layout="vertical" style={{ maxWidth: 600 }}>
        <Form.Item
          label="API Key"
          name="apiKey"
          rules={[{ required: true, message: t('Please enter API Key') }]}
        >
          <Input placeholder="sk-xxxxxxxxxxxx" autoComplete="off" />
        </Form.Item>

        <Form.Item
          label="API Secret"
          name="apiSecret"
          rules={[{ required: true, message: t('Please enter API Secret') }]}
        >
          <Input.Password placeholder="••••••••" autoComplete="new-password" />
        </Form.Item>

        <Form.Item
          label="Endpoint"
          name="endpoint"
          rules={[{ required: true, message: t('Please enter endpoint URL') }]}
        >
          <Input placeholder="https://api.example.com/v1" />
        </Form.Item>

        <Form.Item>
          <Space>
            <Button type="primary" onClick={handleSave} loading={saving}>
              {t('Save')}
            </Button>
            <Button onClick={() => form.resetFields()}>
              {t('Reset')}
            </Button>
          </Space>
        </Form.Item>
      </Form>
    </Card>
  );
}
重要なポイント:
useFlowContext() — @nocobase/flow-engine からインポートし、ctx.api などのコンテキスト機能を取得useT() — locale.ts からインポートする翻訳 hook。プラグインの namespace がバインド済み。詳しくは i18n 国際化を参照useRequest() — ahooks から。リクエストの loading、error 状態を処理。manual: true は自動リクエストしないことを意味し、手動で run() を呼び出す必要があるctx.api.request() — Axios と同じ使い方。NocoBase が認証情報を自動的に付与
ステップ4:多言語ファイルの追加
プラグインの src/locale/ 配下の翻訳ファイルを編集します:
// src/locale/zh-CN.json
{
  "External API Settings": "外部服务配置",
  "API Configuration": "API 配置",
  "About": "关于",
  "Plugin name": "插件名称",
  "Version": "版本",
  "This is a demo plugin showing how to register a settings page with multiple tabs.": "这是一个演示插件,展示如何注册带多个 Tab 的设置页。",
  "Please enter API Key": "请输入 API Key",
  "Please enter API Secret": "请输入 API Secret",
  "Please enter endpoint URL": "请输入接口地址",
  "Save": "保存",
  "Reset": "重置",
  "Saved successfully": "保存成功",
  "Save failed": "保存失败"
}
// src/locale/en-US.json
{
  "External API Settings": "External API Settings",
  "API Configuration": "API Configuration",
  "About": "About",
  "Plugin name": "Plugin name",
  "Version": "Version",
  "This is a demo plugin showing how to register a settings page with multiple tabs.": "This is a demo plugin showing how to register a settings page with multiple tabs.",
  "Please enter API Key": "Please enter API Key",
  "Please enter API Secret": "Please enter API Secret",
  "Please enter endpoint URL": "Please enter endpoint URL",
  "Save": "Save",
  "Reset": "Reset",
  "Saved successfully": "Saved successfully",
  "Save failed": "Save failed"
}
注意
初めて言語ファイルを追加した場合、アプリの再起動が必要です。
翻訳ファイルの書き方、useT() hook、tExpr() などのその他の使い方については、i18n 国際化をご覧ください。
ステップ5:サーバーサイドインターフェース
クライアントのフォームにはバックエンドの externalApi:get と externalApi:set の2つのインターフェースが必要です。サーバーサイドの実装は複雑ではなく、設定を格納するデータテーブルを定義し、2つのインターフェースを登録するだけです。
データテーブルの定義
src/server/collections/externalApiSettings.ts を新規作成します。NocoBase はこのディレクトリ配下の collection 定義を自動的に読み込みます:
// src/server/collections/externalApiSettings.ts
import { defineCollection } from '@nocobase/database';

export default defineCollection({
  name: 'externalApiSettings',
  fields: [
    { name: 'apiKey', type: 'string', title: 'API Key' },
    { name: 'apiSecret', type: 'string', title: 'API Secret' },
    { name: 'endpoint', type: 'string', title: 'Endpoint' },
  ],
});
リソースとインターフェースの登録
src/server/plugin.ts を編集し、resourceManager.define() でリソースを登録し、ACL 権限を設定します:
// src/server/plugin.ts
import { Plugin } from '@nocobase/server';

export class PluginSettingsPageServer extends Plugin {
  async load() {
    // リソースとインターフェースの登録
    this.app.resourceManager.define({
      name: 'externalApi',
      actions: {
        // GET /api/externalApi:get — 設定の読み込み
        async get(ctx, next) {
          const repo = ctx.db.getRepository('externalApiSettings');
          const record = await repo.findOne();
          ctx.body = record?.toJSON() ?? {};
          await next();
        },
        // POST /api/externalApi:set — 設定の保存
        async set(ctx, next) {
          const repo = ctx.db.getRepository('externalApiSettings');
          const values = ctx.action.params.values;
          const existing = await repo.findOne();
          if (existing) {
            await repo.update({ values, filter: { id: existing.id } });
          } else {
            await repo.create({ values });
          }
          ctx.body = { ok: true };
          await next();
        },
      },
    });

    // ログインユーザーが設定を読み込み可能
    this.app.acl.allow('externalApi', 'get', 'loggedIn');
  }
}

export default PluginSettingsPageServer;
重要なポイント:
ctx.db.getRepository() — collection 名でデータ操作オブジェクトを取得ctx.action.params.values — POST リクエストの body データacl.allow() — 'loggedIn' はログインユーザーがアクセス可能であることを意味。set インターフェースには明示的な allow がないため、デフォルトでは管理者のみが呼び出し可能await next() — 各 action の最後に呼び出す必要がある。Koa ミドルウェアの規約
ステップ6:「バージョン情報」ページの作成
ステップ2で2つの tab を登録しましたが、「API 設定」のページコンポーネントはステップ3で作成済みです。ここでは「バージョン情報」tab のページを作成します。
src/client-v2/pages/AboutPage.tsx を新規作成:
// src/client-v2/pages/AboutPage.tsx
import React from 'react';
import { Card, Descriptions, Typography } from 'antd';
import { useT } from '../locale';

const { Paragraph } = Typography;

export default function AboutPage() {
  const t = useT();

  return (
    <Card title={t('About')}>
      <Descriptions column={1} bordered style={{ maxWidth: 600 }}>
        <Descriptions.Item label={t('Plugin name')}>
          @nocobase-example/plugin-settings-page
        </Descriptions.Item>
        <Descriptions.Item label={t('Version')}>1.0.0</Descriptions.Item>
      </Descriptions>
      <Paragraph style={{ marginTop: 16, color: '#888' }}>
        {t('This is a demo plugin showing how to register a settings page with multiple tabs.')}
      </Paragraph>
    </Card>
  );
}
このページはシンプルで、Antd の Descriptions でプラグイン情報を表示しています。実際のプロジェクトでは「バージョン情報」tab にバージョン番号、更新履歴、ヘルプリンクなどを配置できます。
ステップ7:プラグインの有効化
yarn pm enable @my-project/plugin-settings-page
有効化後にページをリフレッシュすると、「プラグイン設定」メニューに「外部サービス設定」エントリが表示されます。
完全なソースコード
まとめ
この例で使用した機能:
関連リンク

