

Event flow
Introduction
Event flow allows you to trigger custom actions when certain events occur, such as form changes. Beyond forms, pages, blocks, buttons, and fields can all use event flows to configure custom operations.
How to use
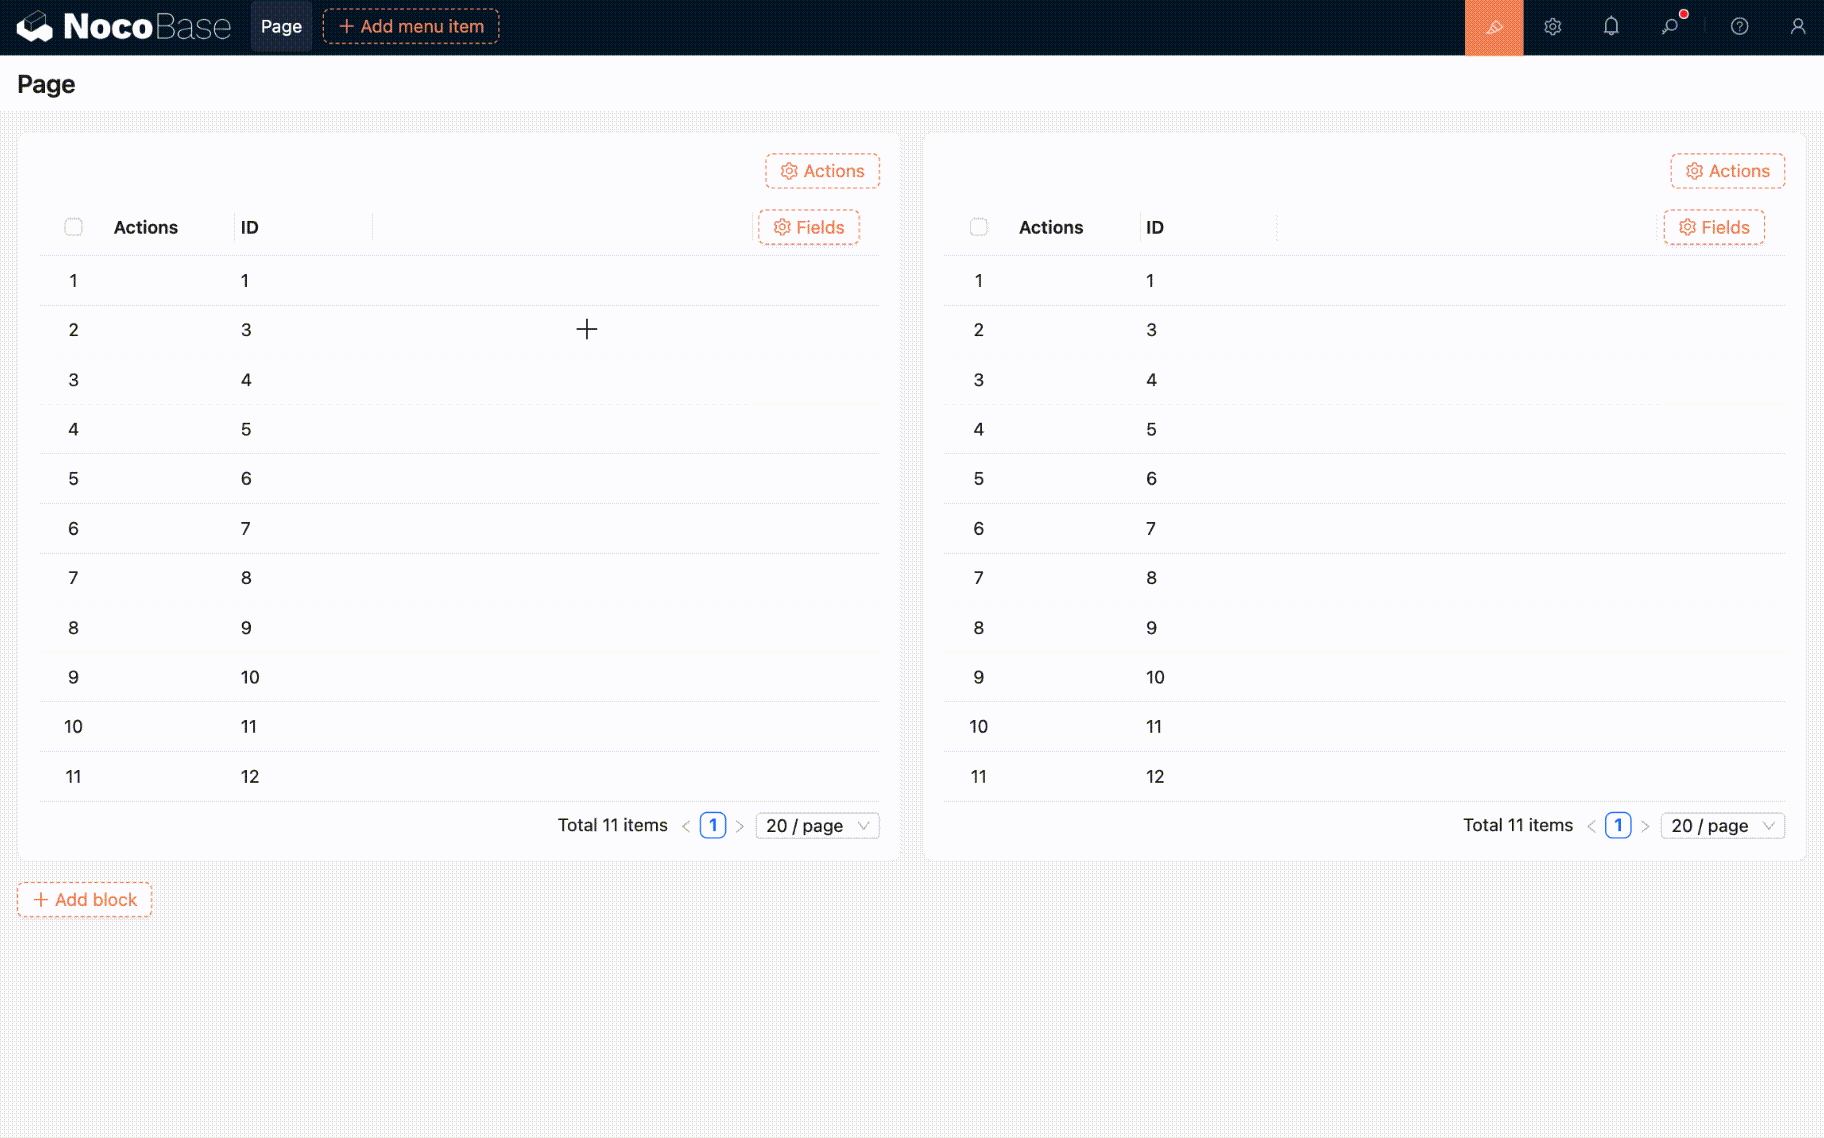
Let's walk through a simple example to understand how to configure event flows. We'll create a linkage between two tables where clicking a row in the left table automatically filters the data in the right table.
Configuration steps:
- Click the "lightning" icon in the top-right corner of the left table block to open the event flow configuration panel.
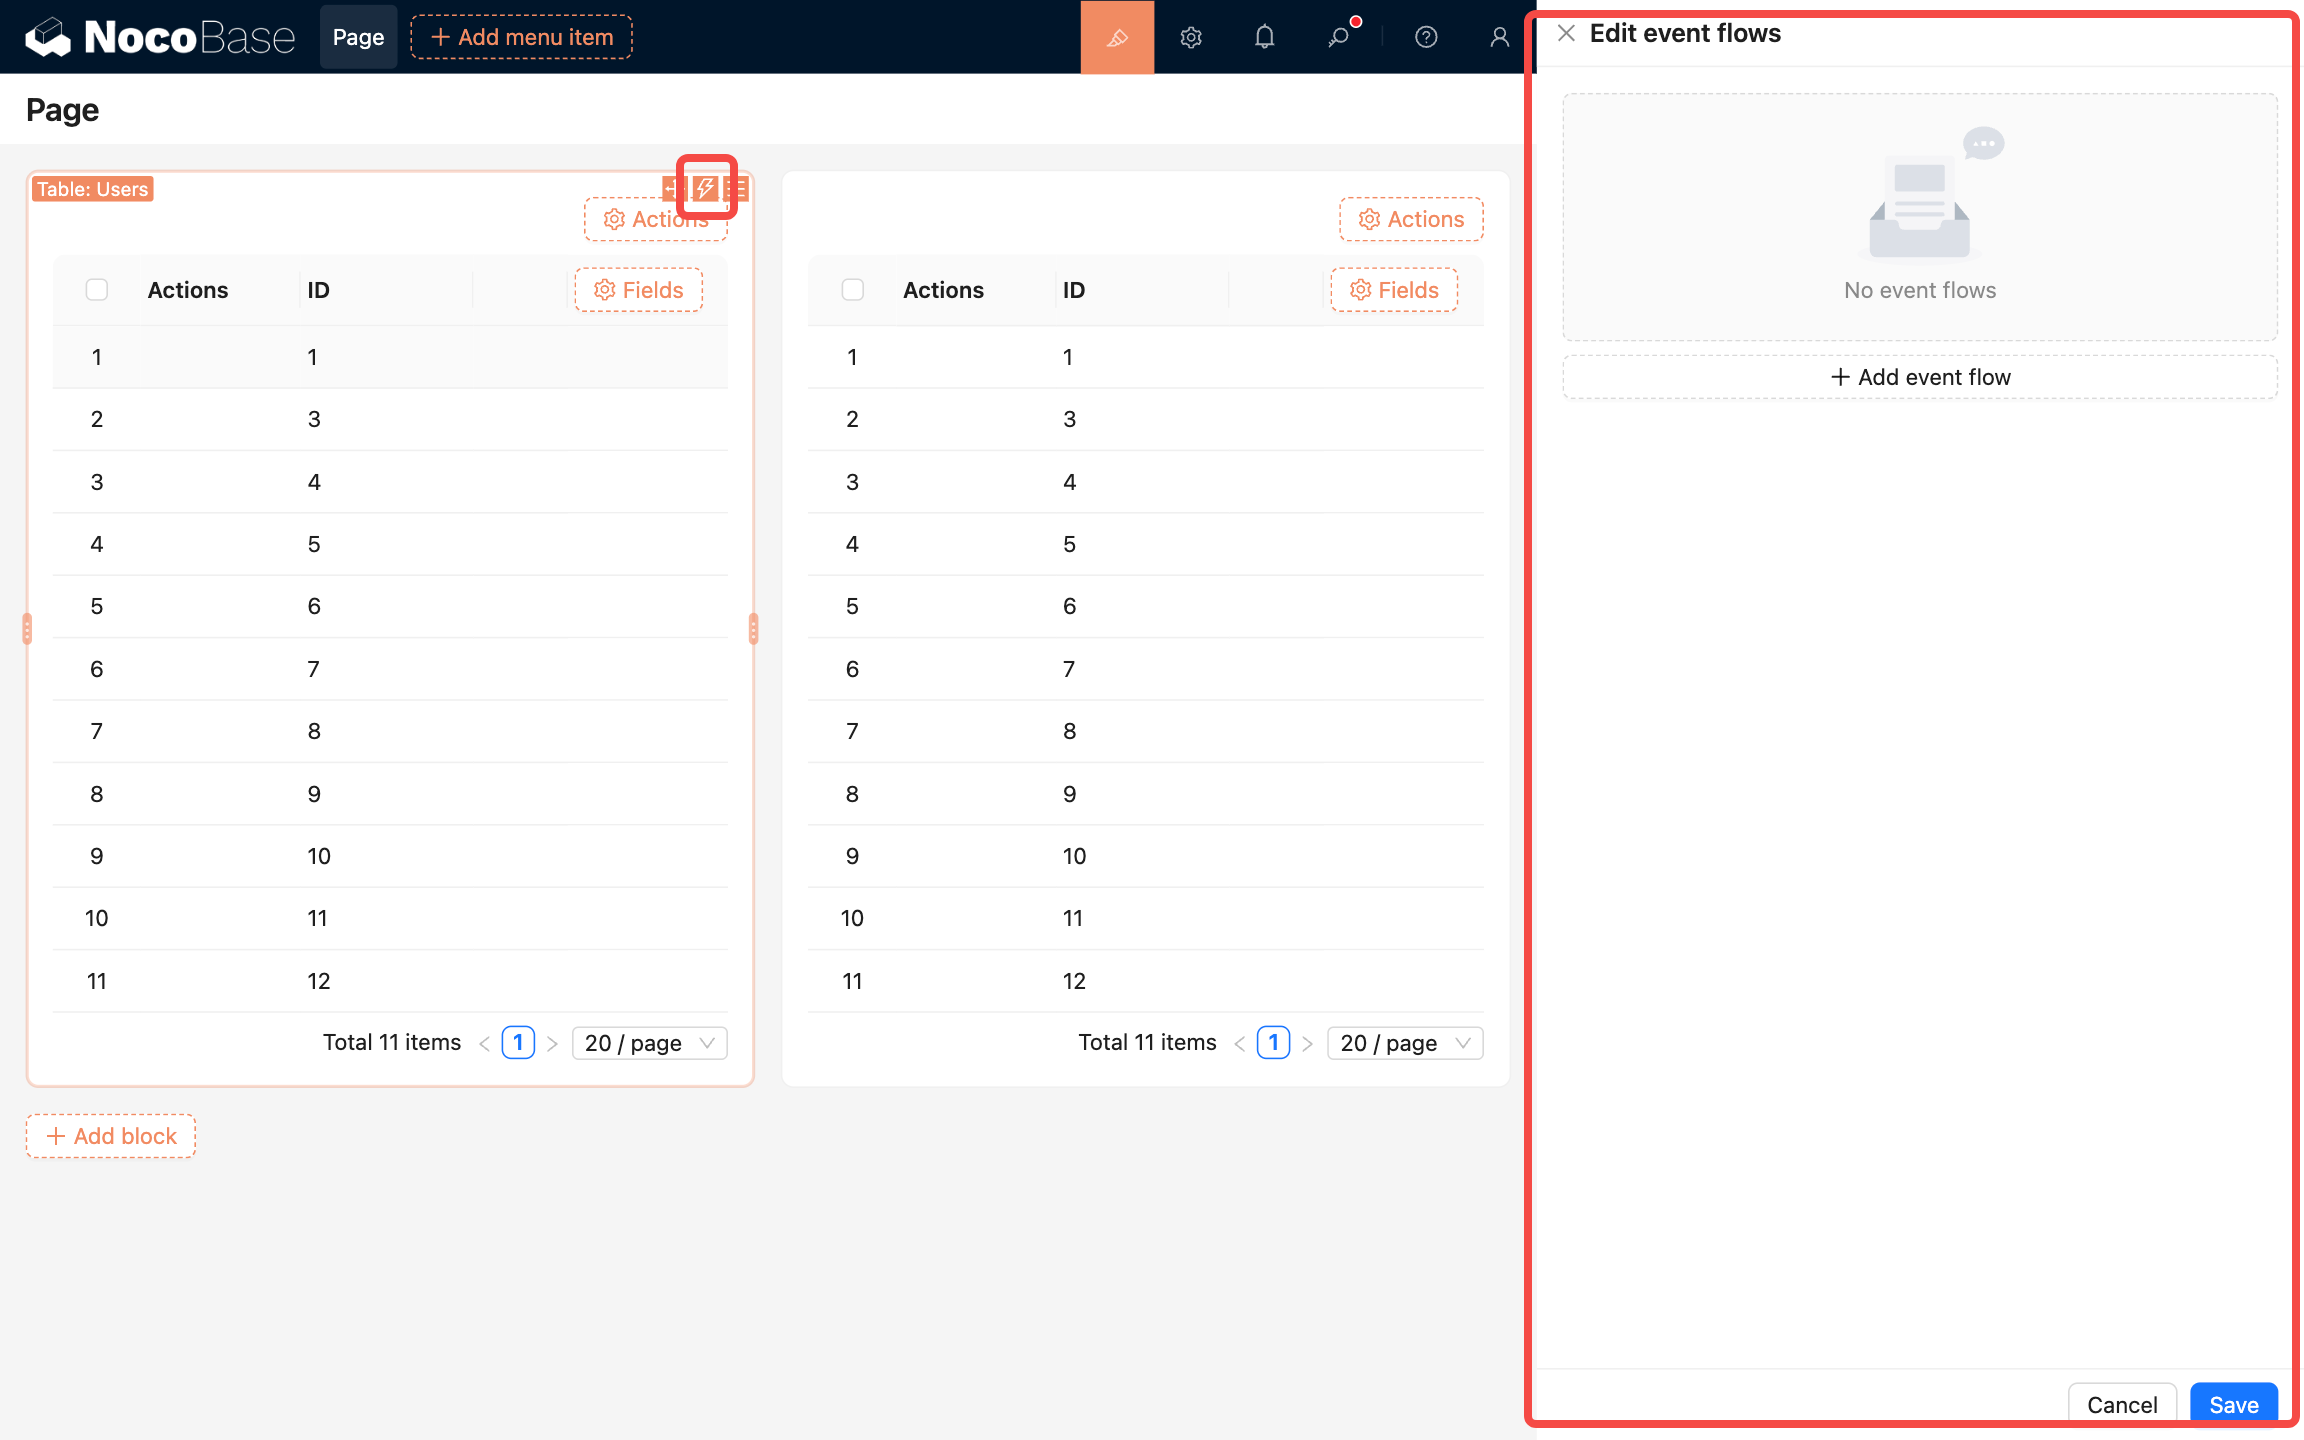
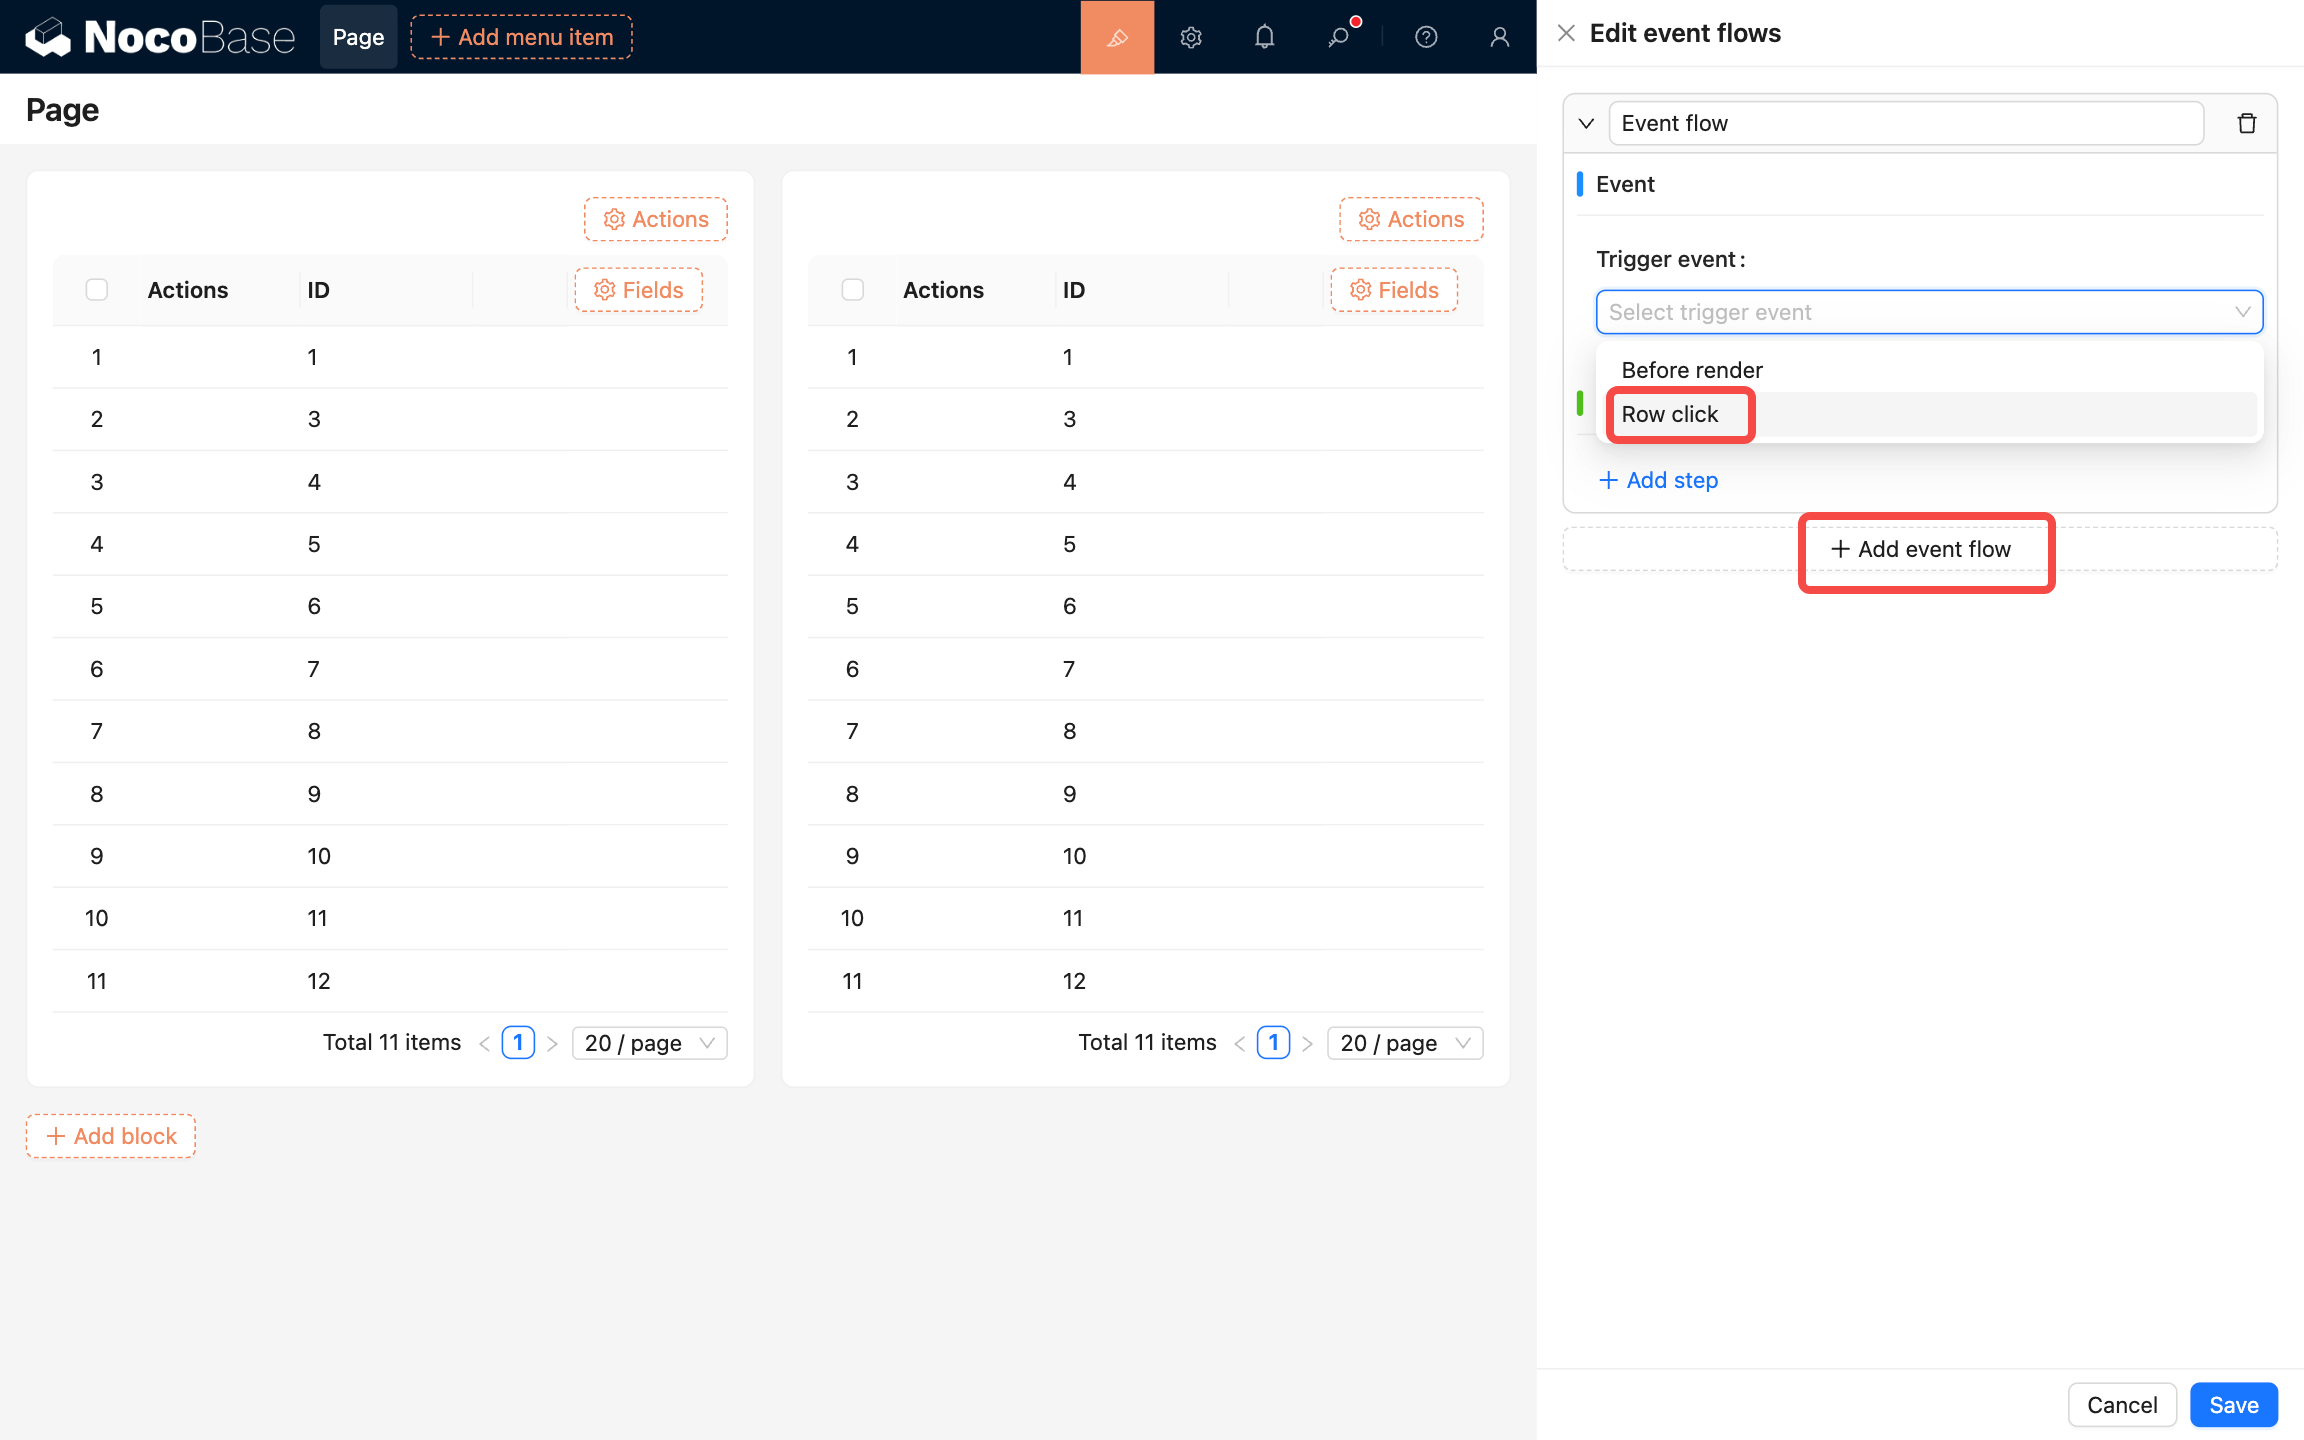
- Click "Add event flow", select "Row click" as the "Trigger event", which means the flow will trigger when a table row is clicked.
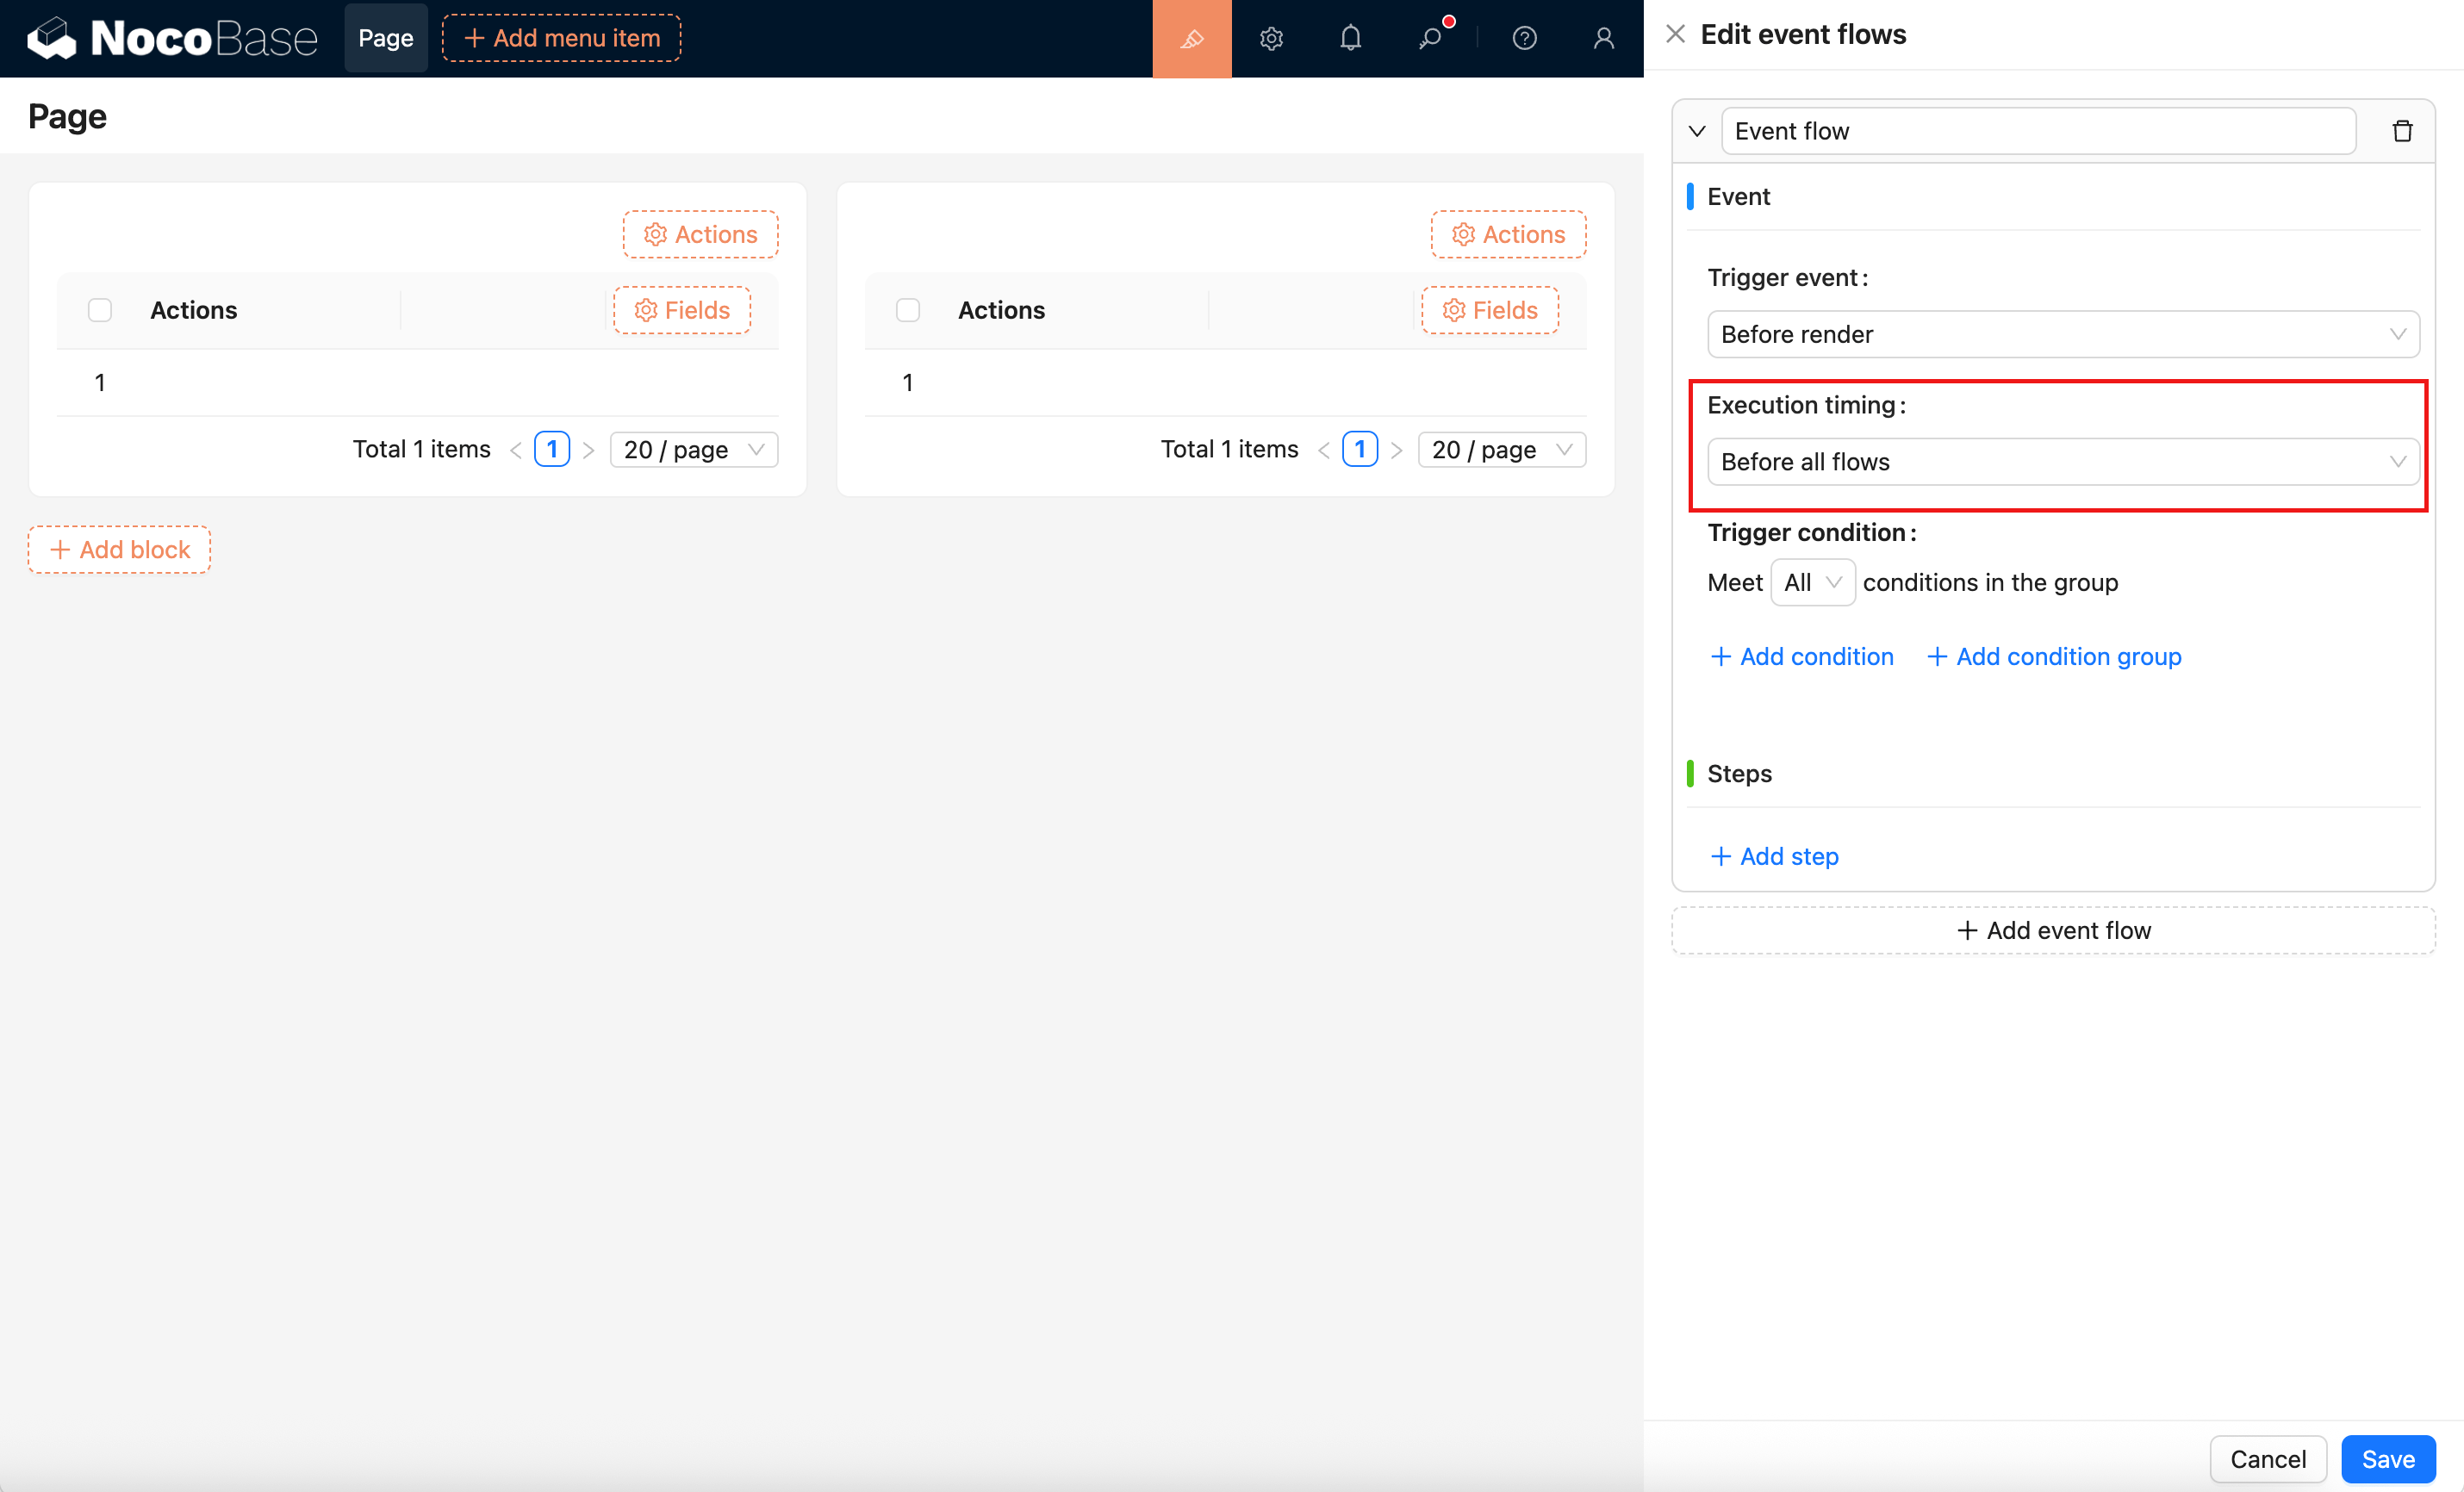
- Configure "Execution timing" to decide where this custom flow runs relative to built-in flows. In most cases, keep the default. If you want to show feedback or navigate after built-in logic finishes, choose "After all flows". See Execution timing below.
- "Trigger condition" is used to configure conditions. The event flow will only trigger when these conditions are met. In this case, we don't need to configure any conditions, so the flow will trigger on any row click.
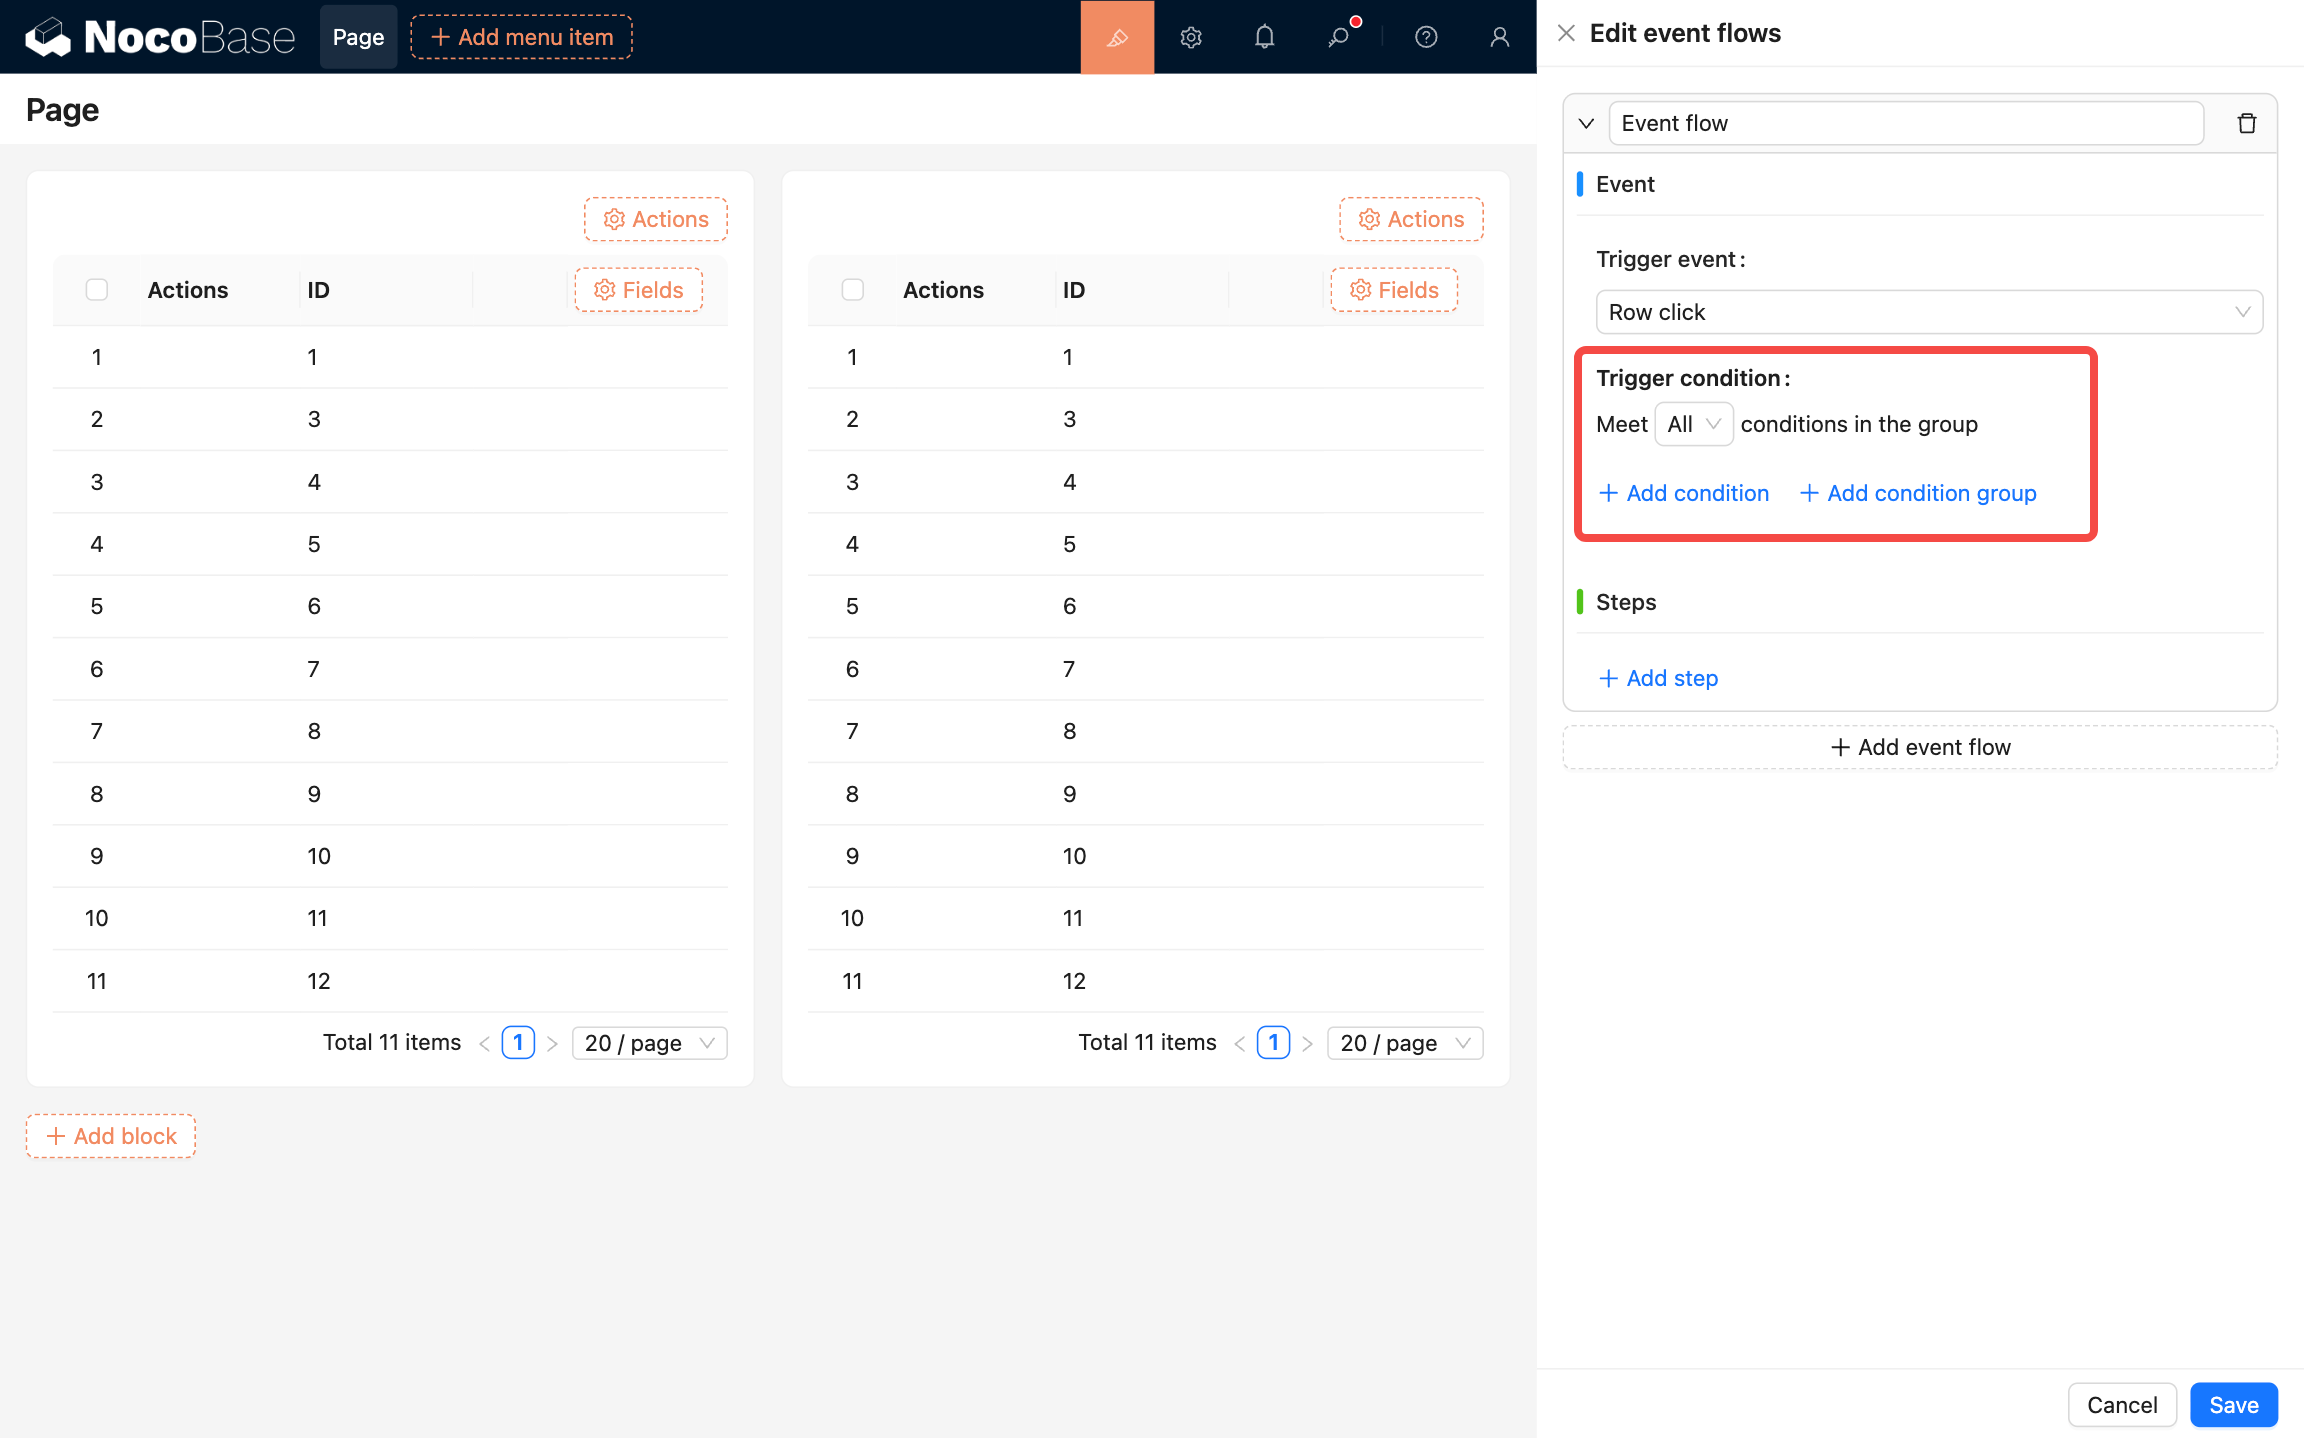
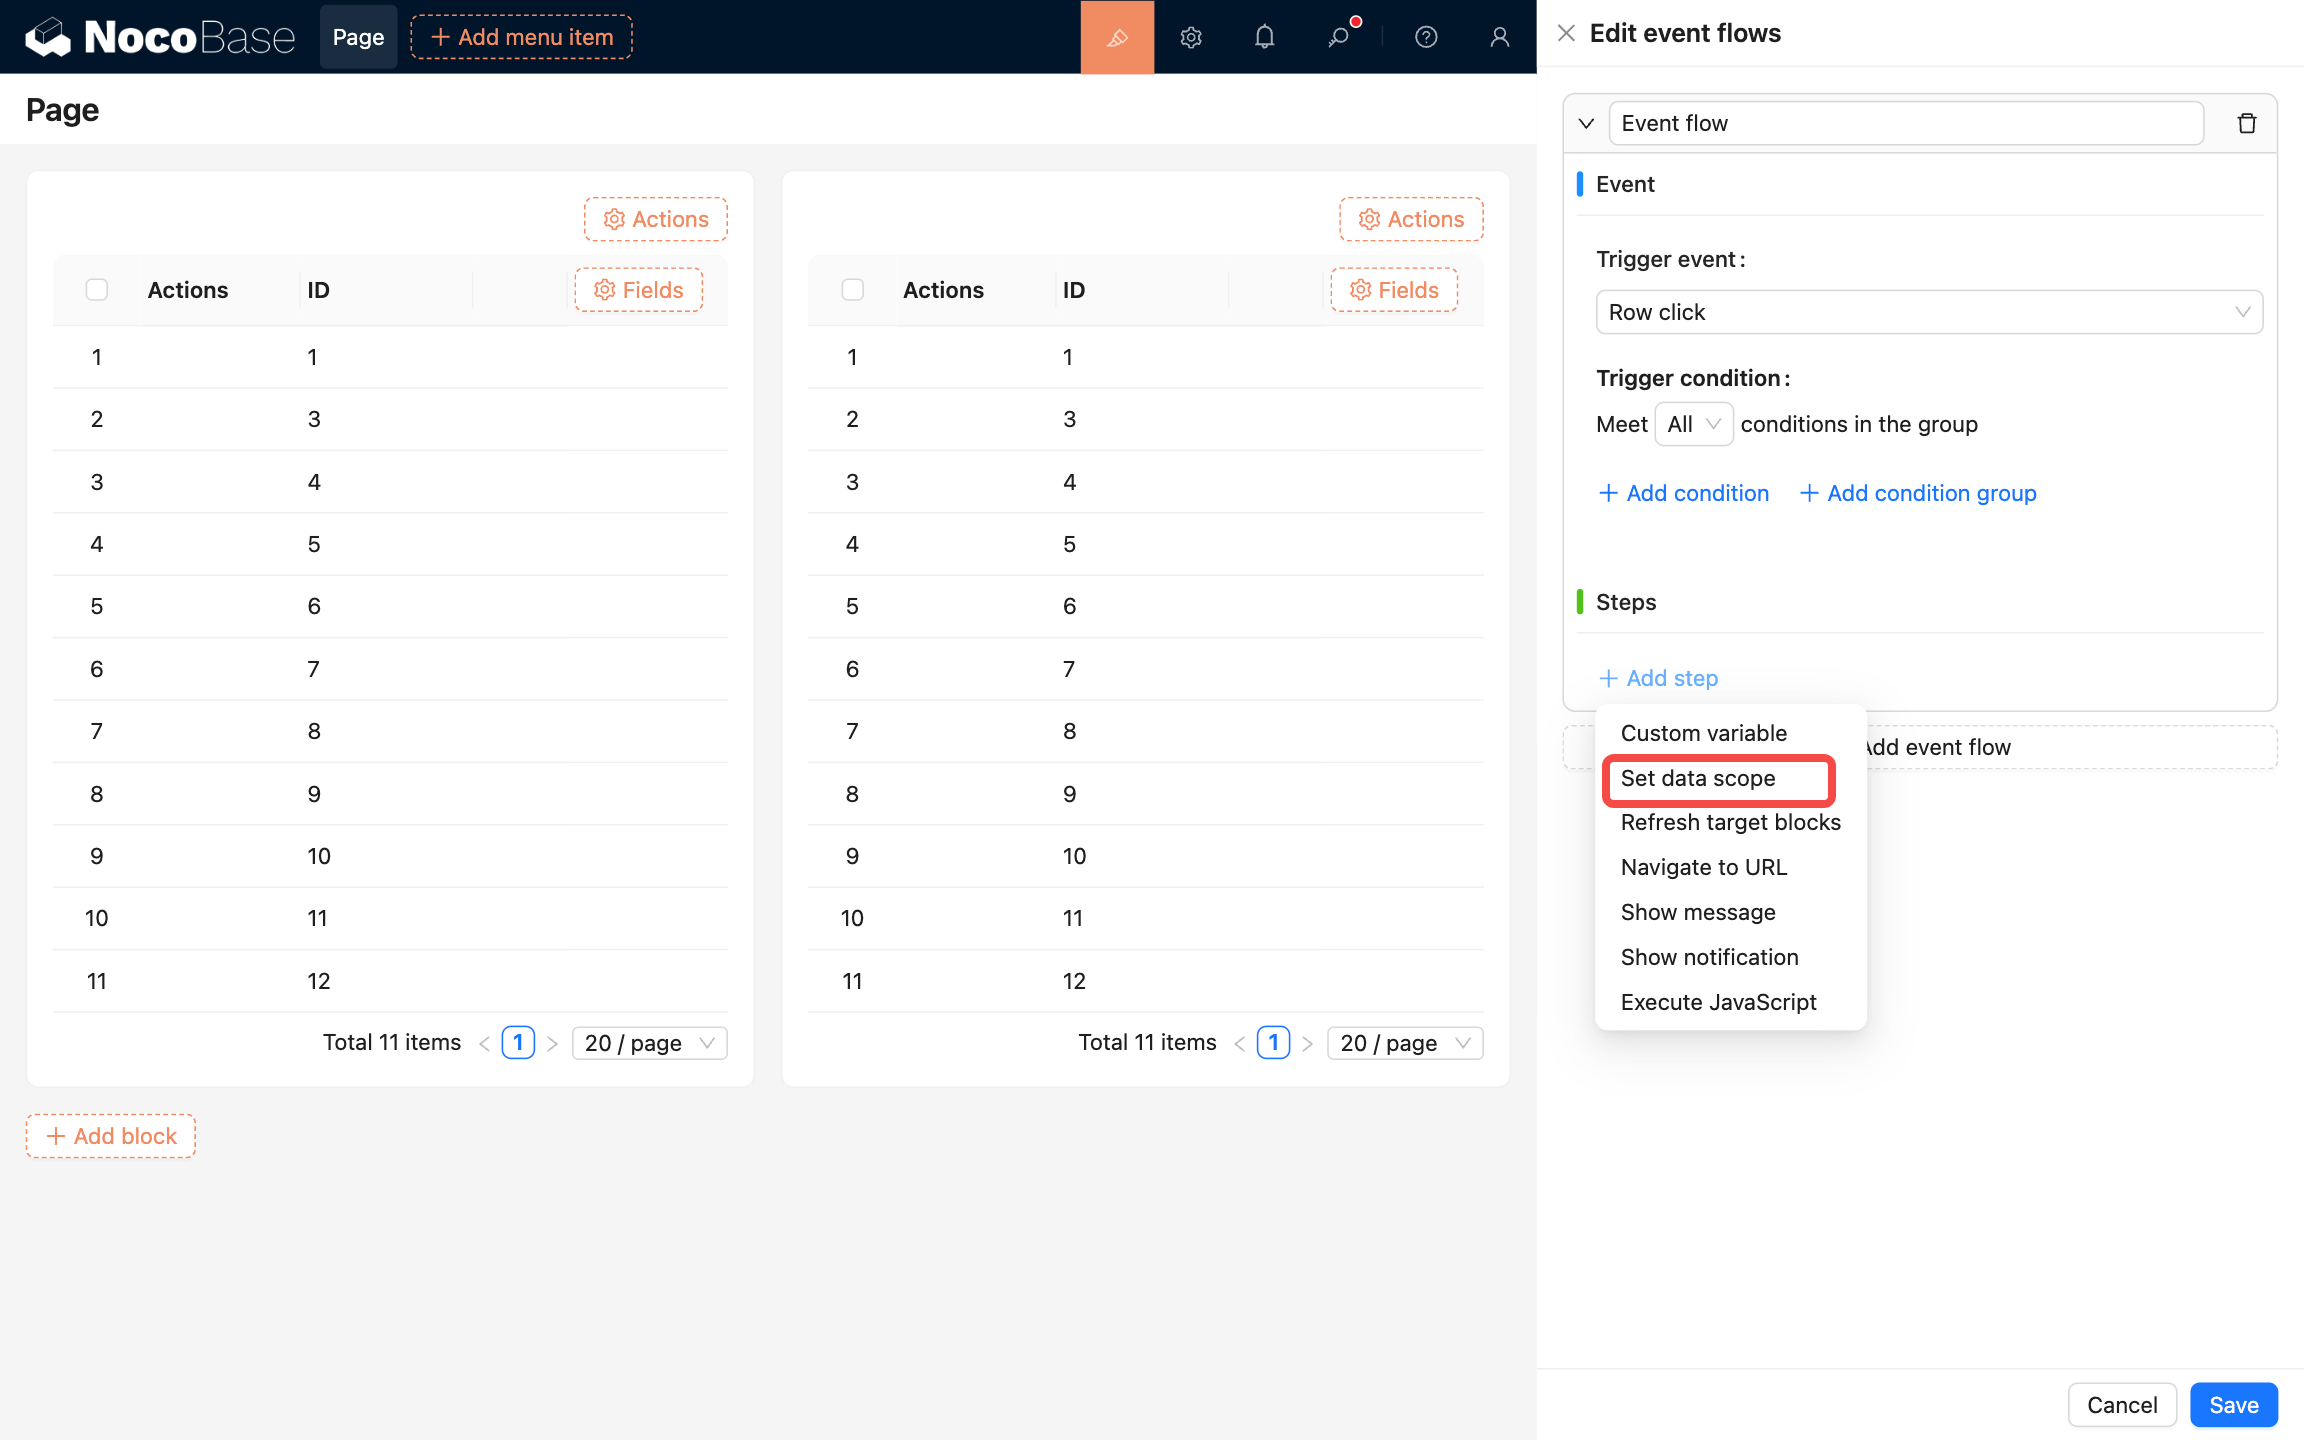
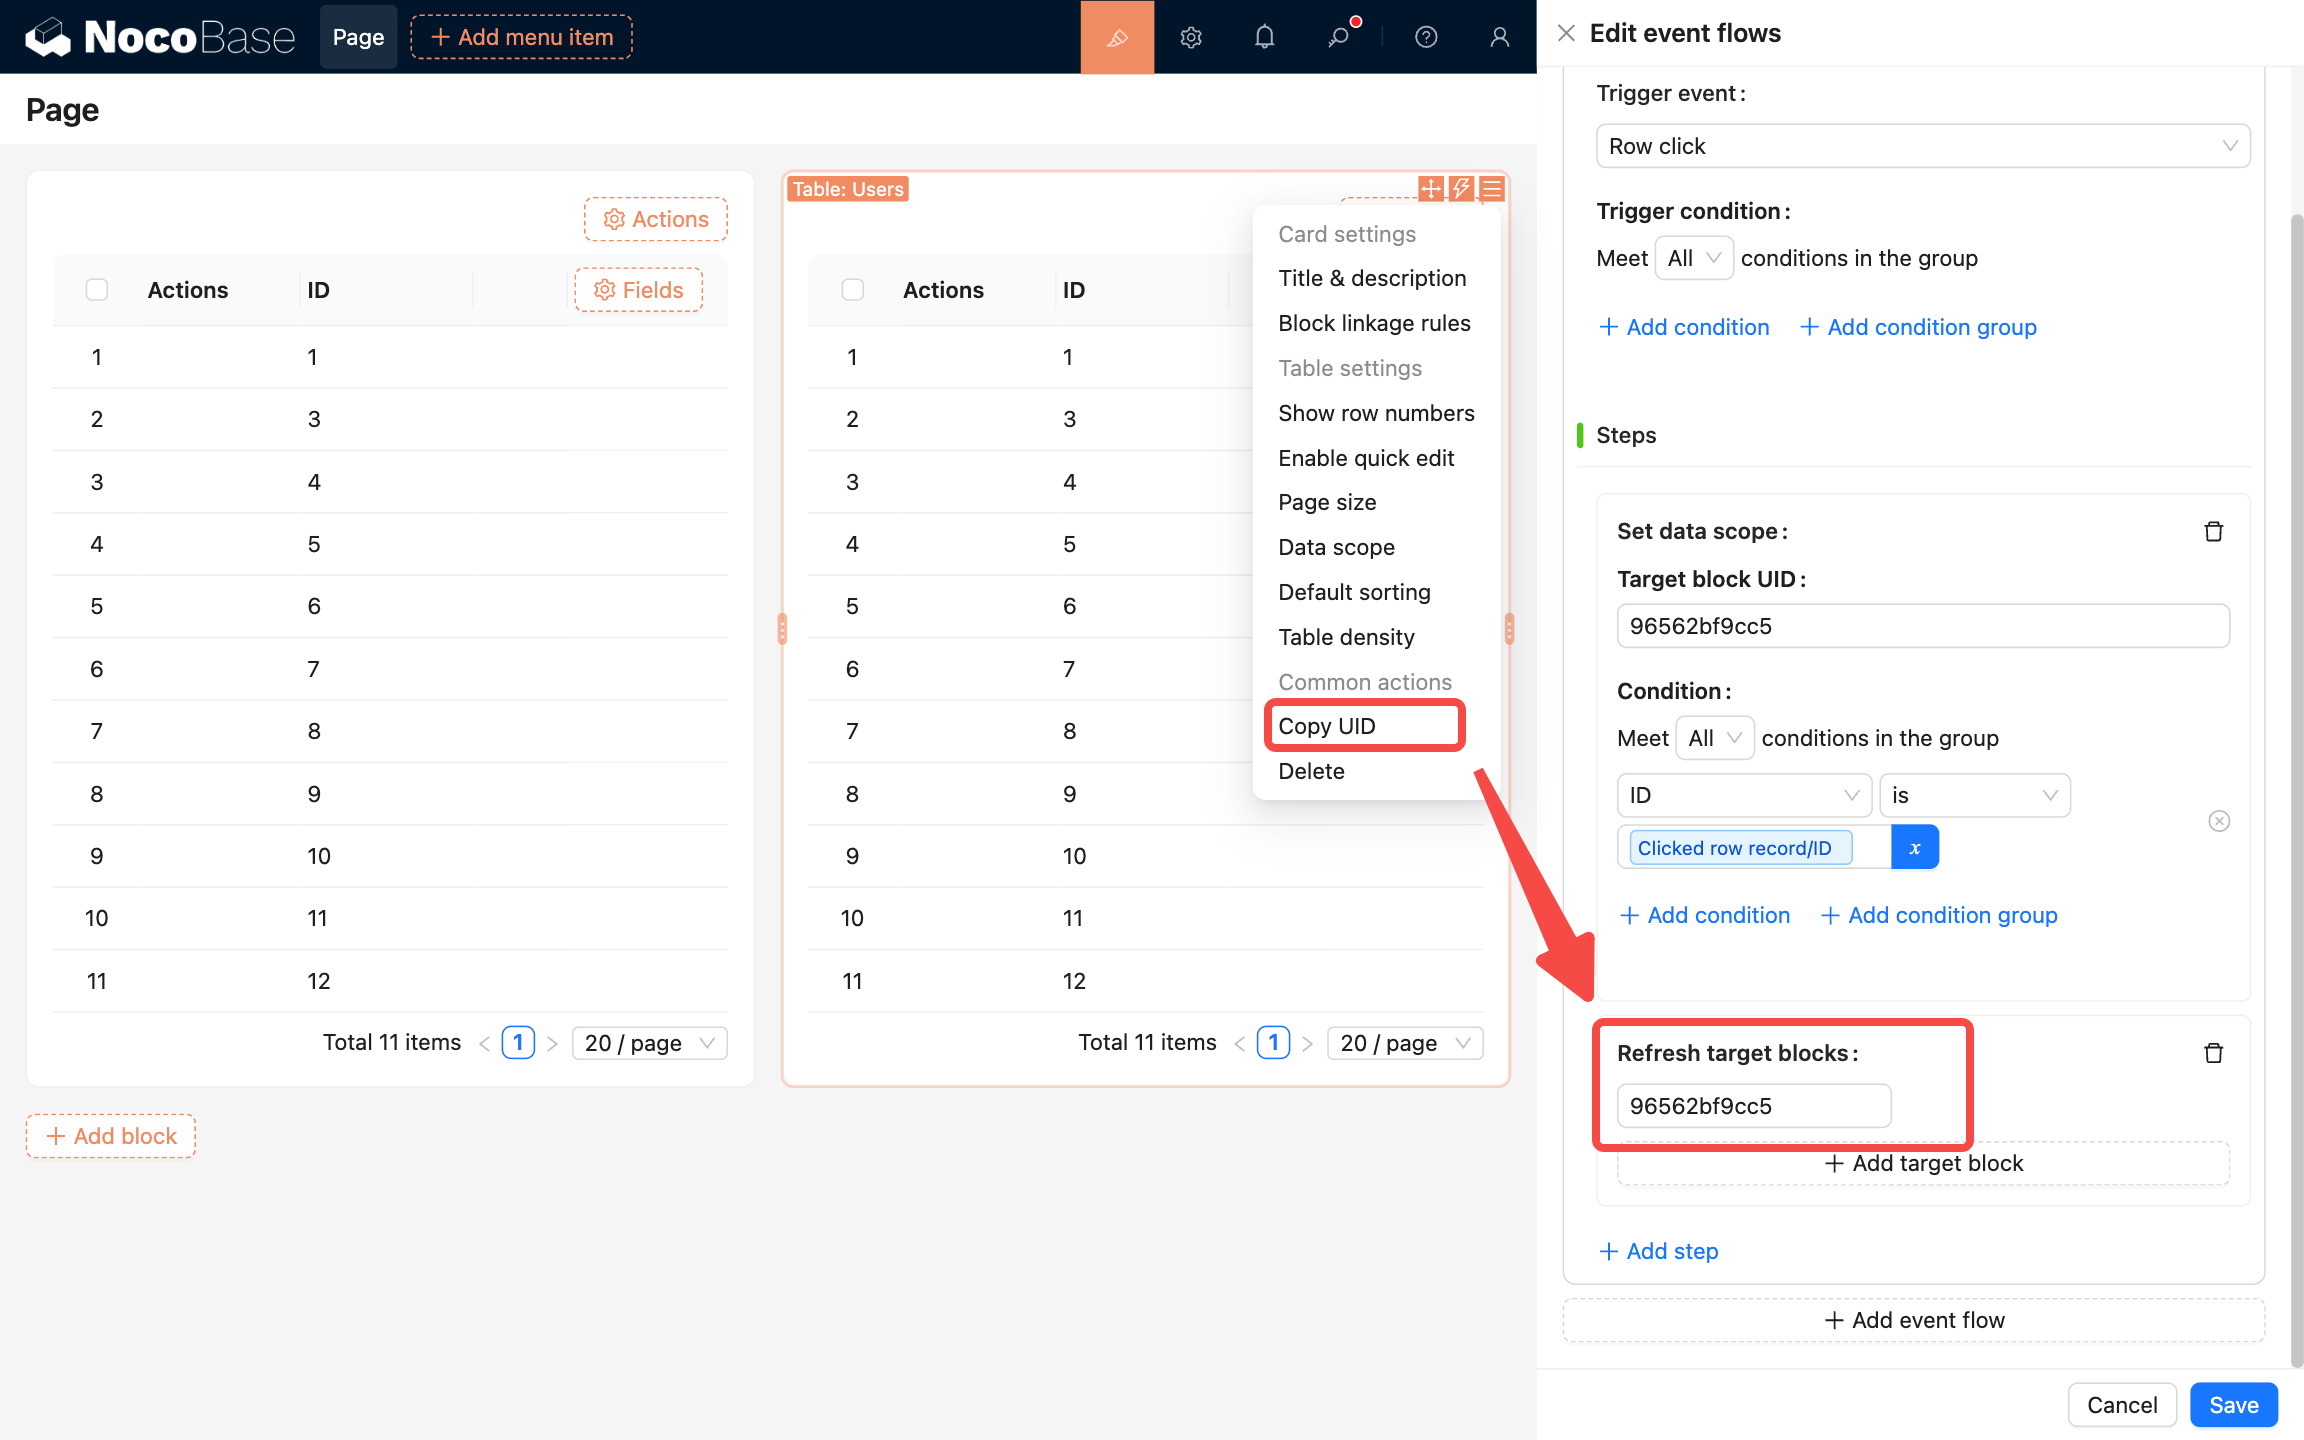
- Hover over "Add step" to add operation steps. Select "Set data scope" to configure the data scope for the right table.
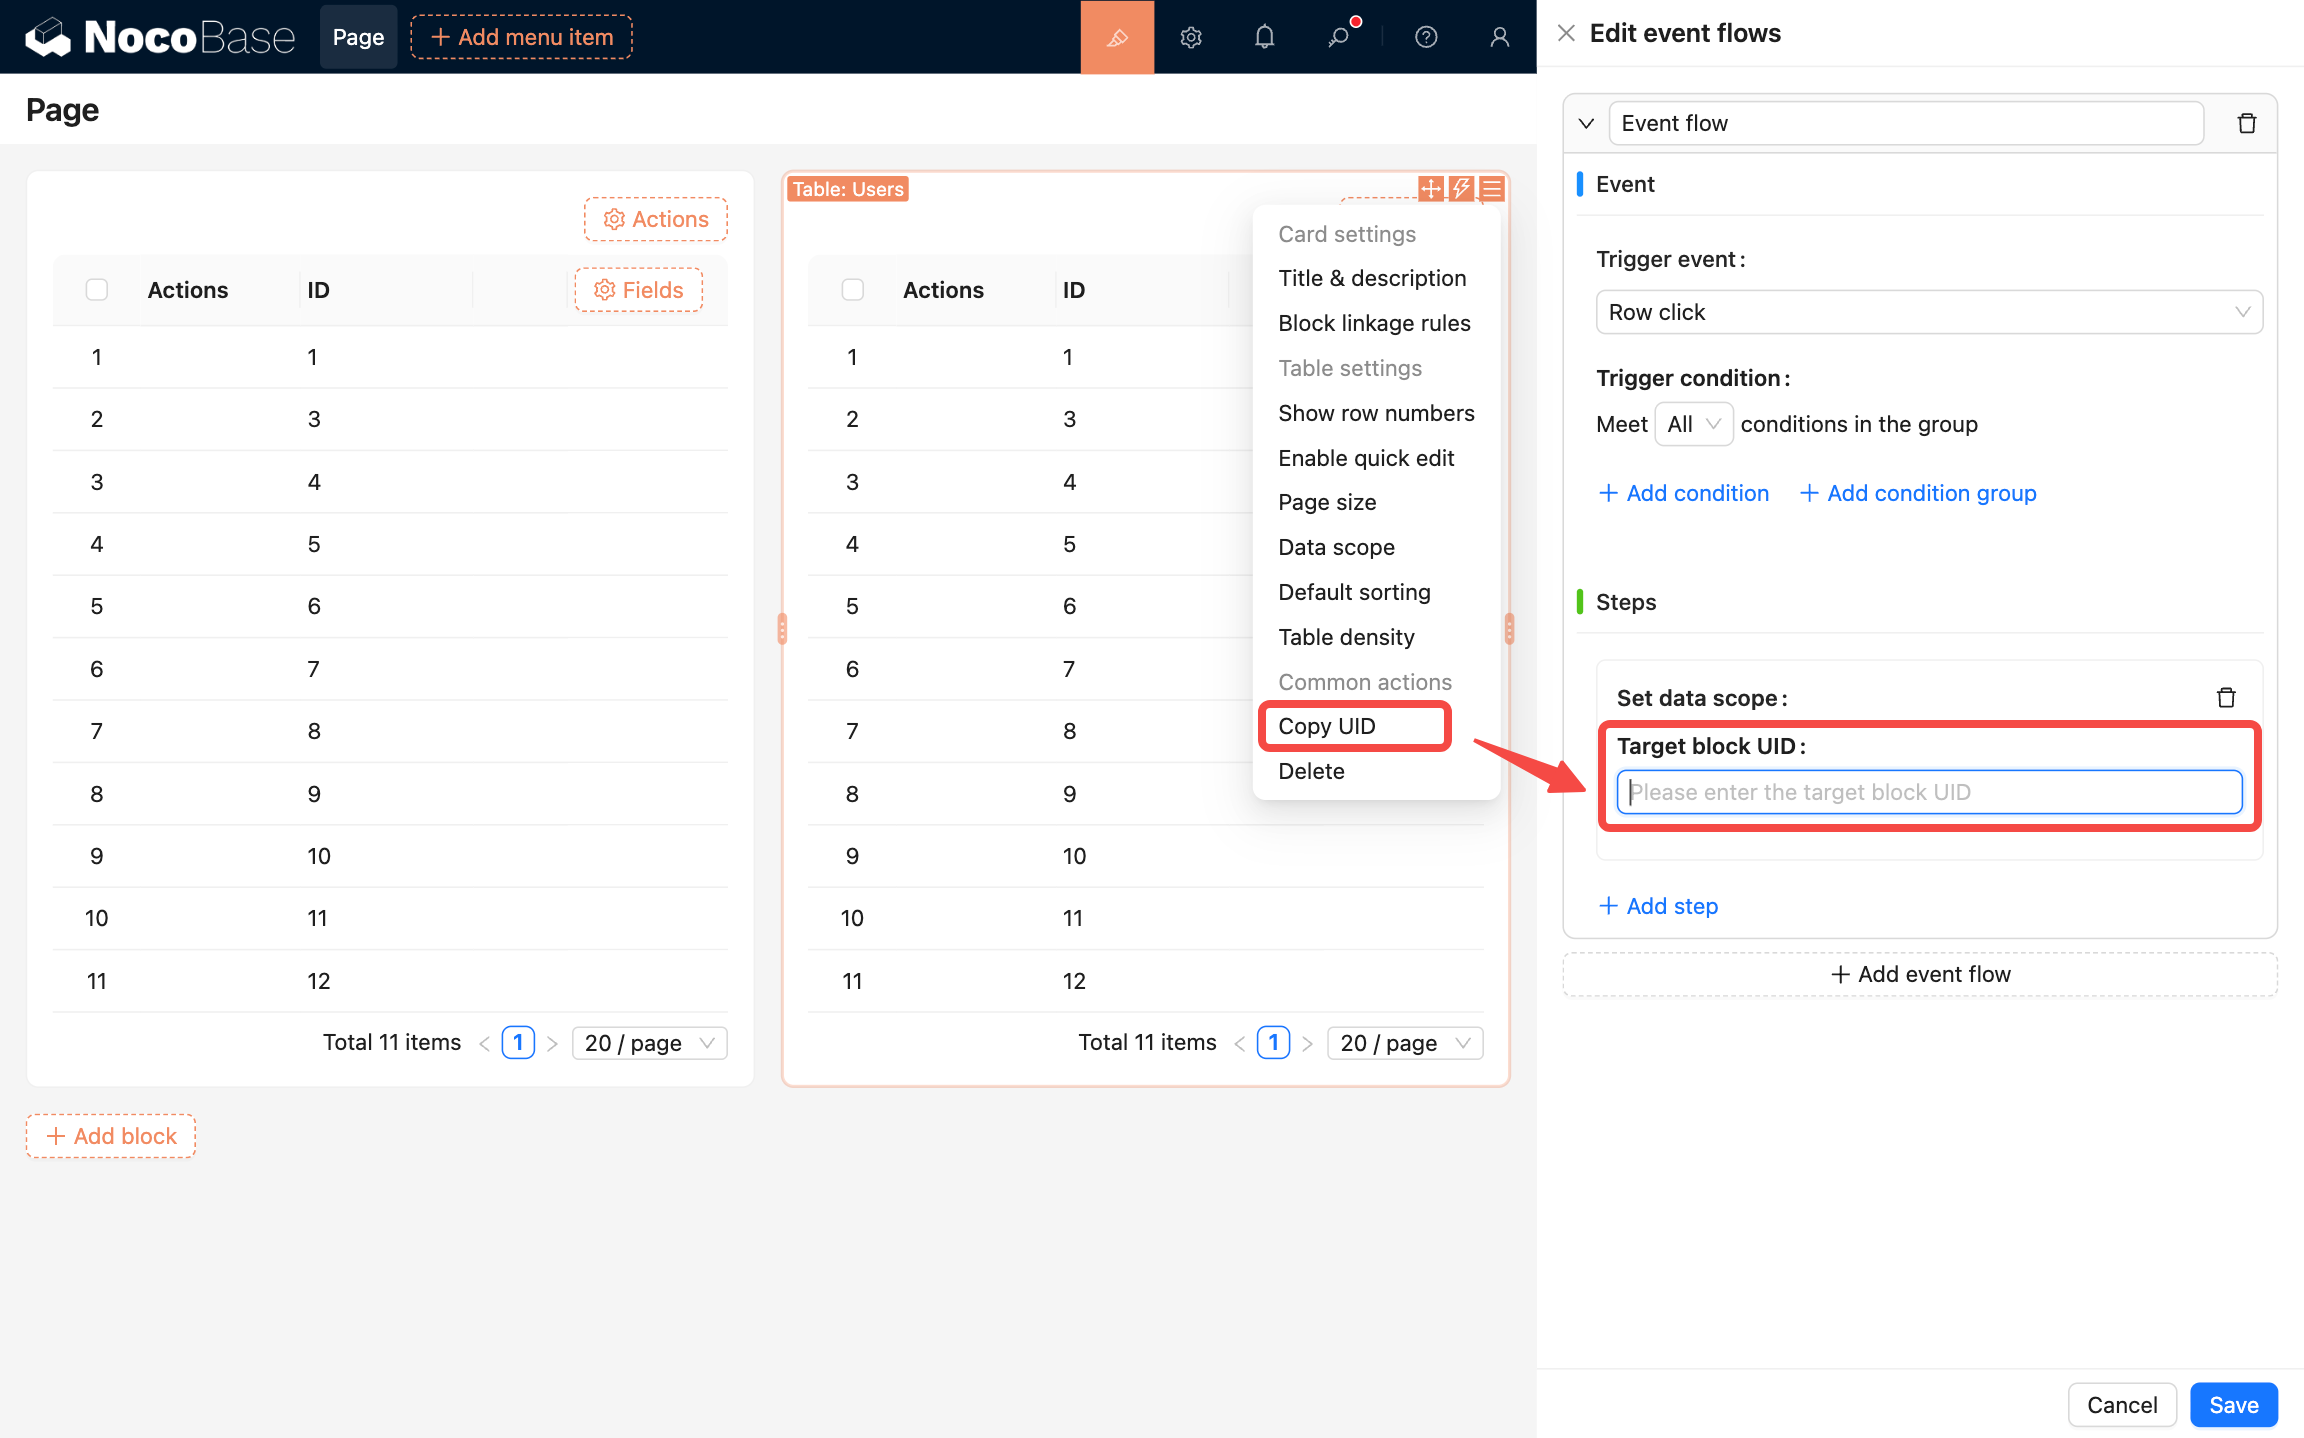
- Copy the UID of the right table and paste it into the "Target block UID" input field. A condition configuration panel will appear below, where you can configure the data scope for the right table.
- Configure a condition as shown below:
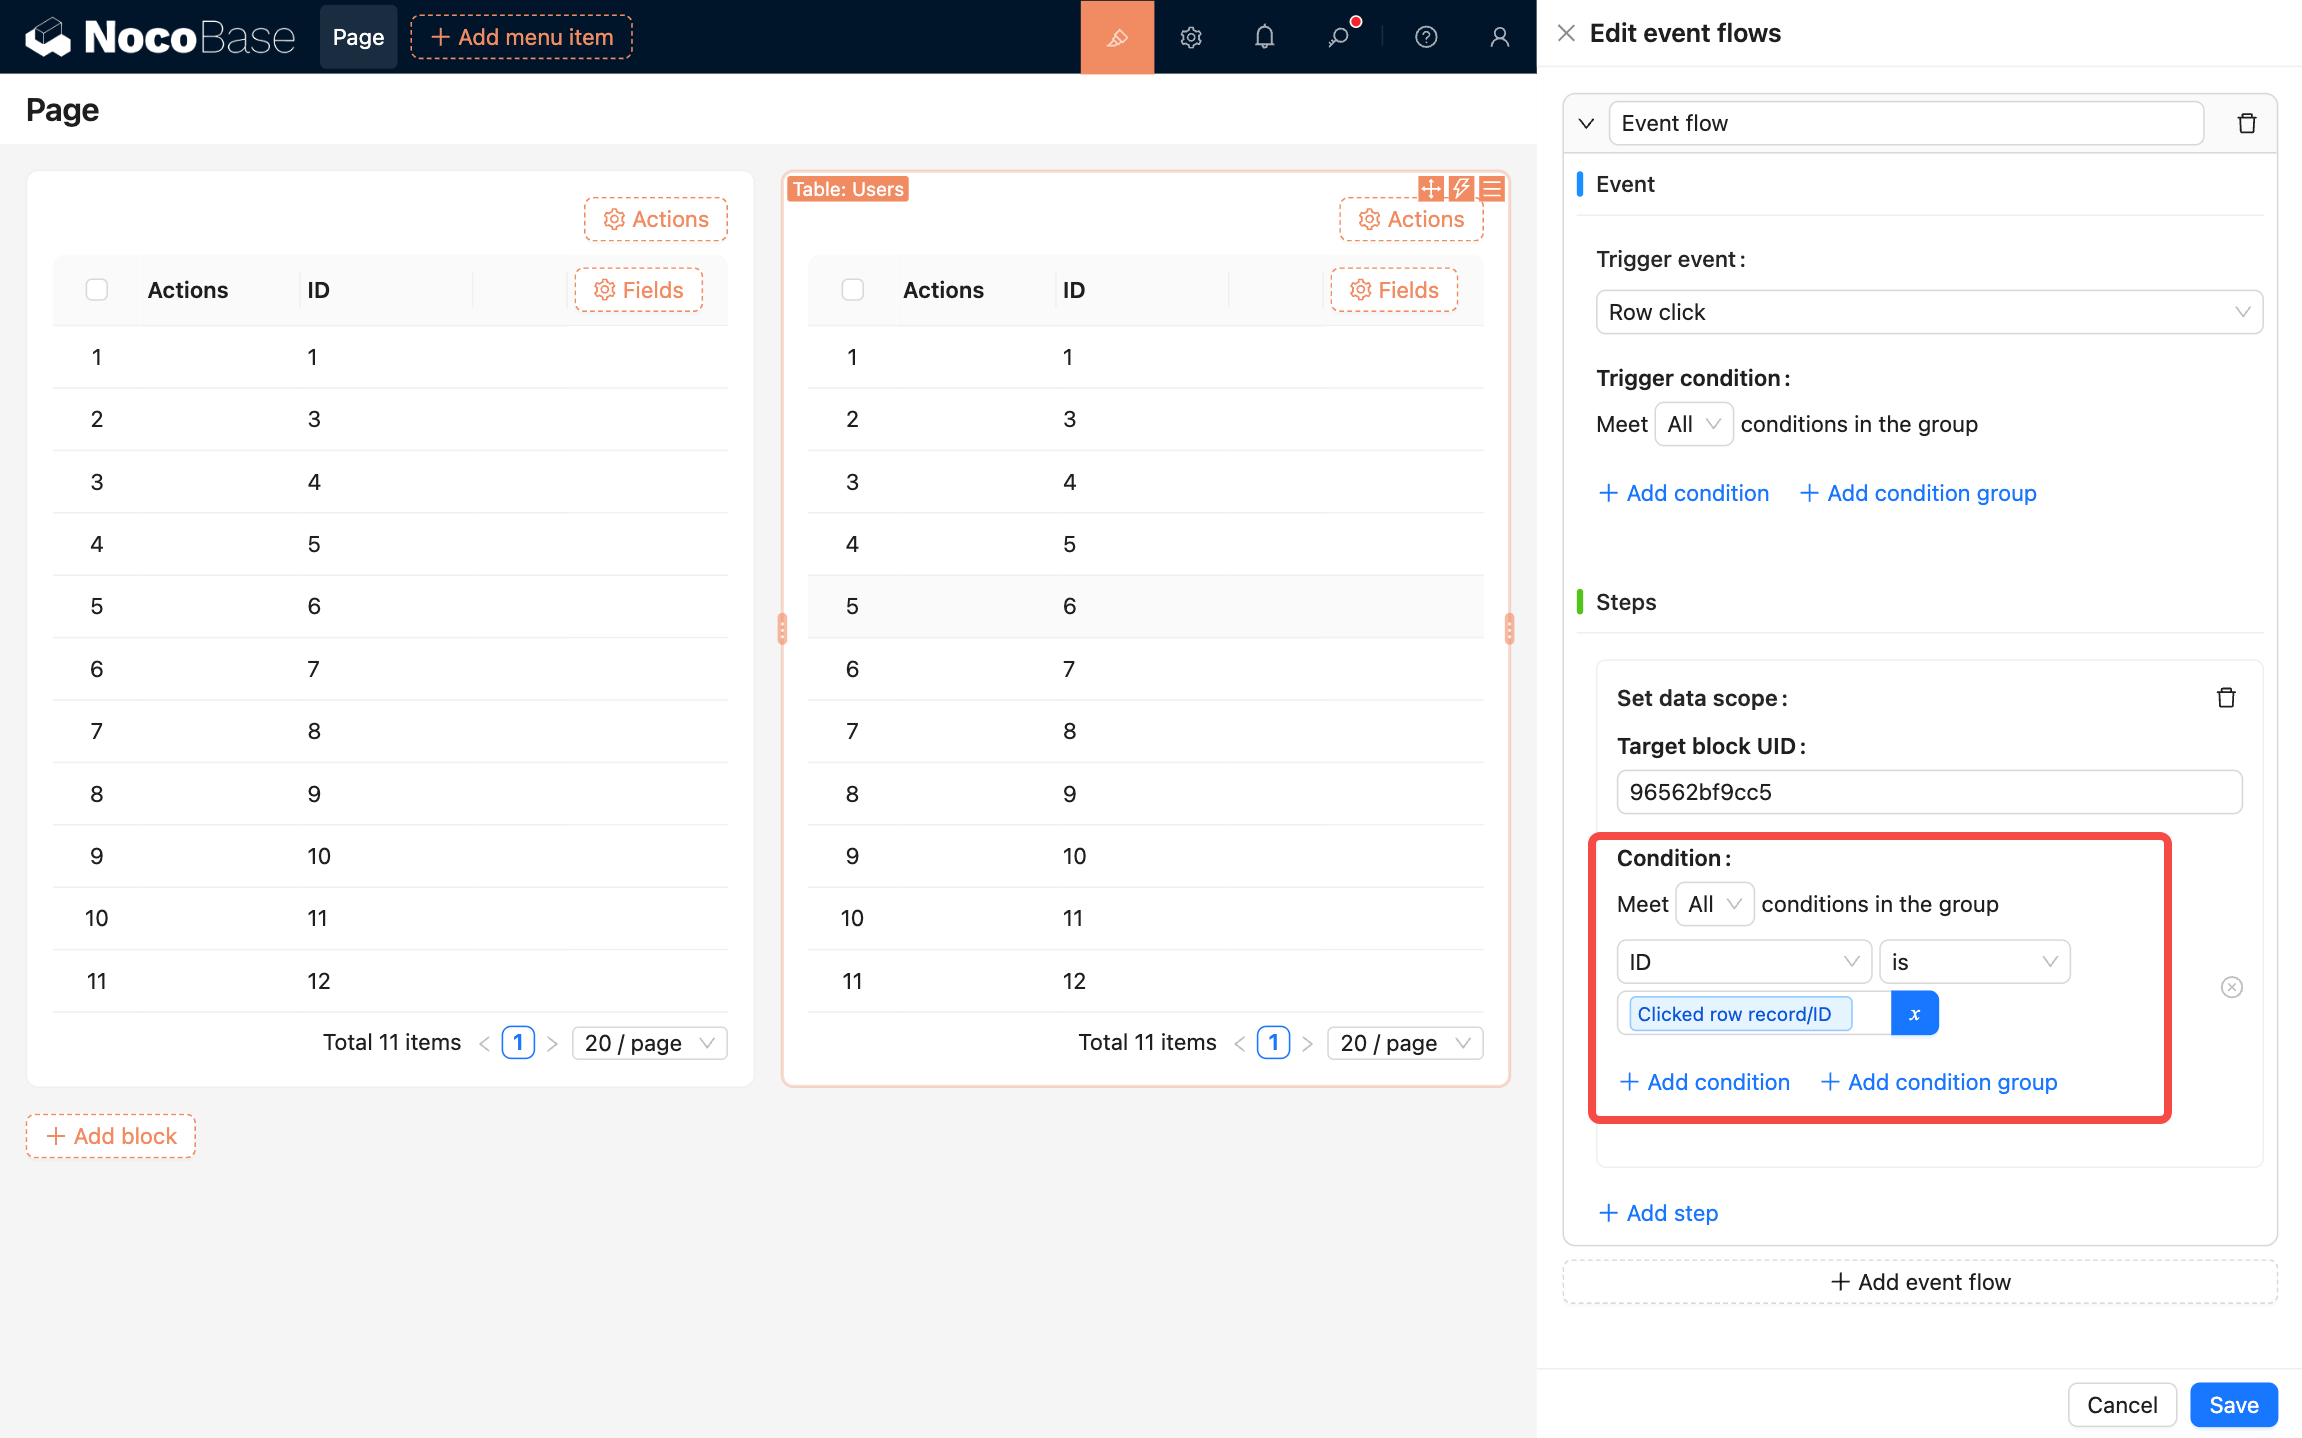
- After configuring the data scope, you need to refresh the block to display the filtered results. Add a "Refresh target blocks" step and enter the UID of the right table.
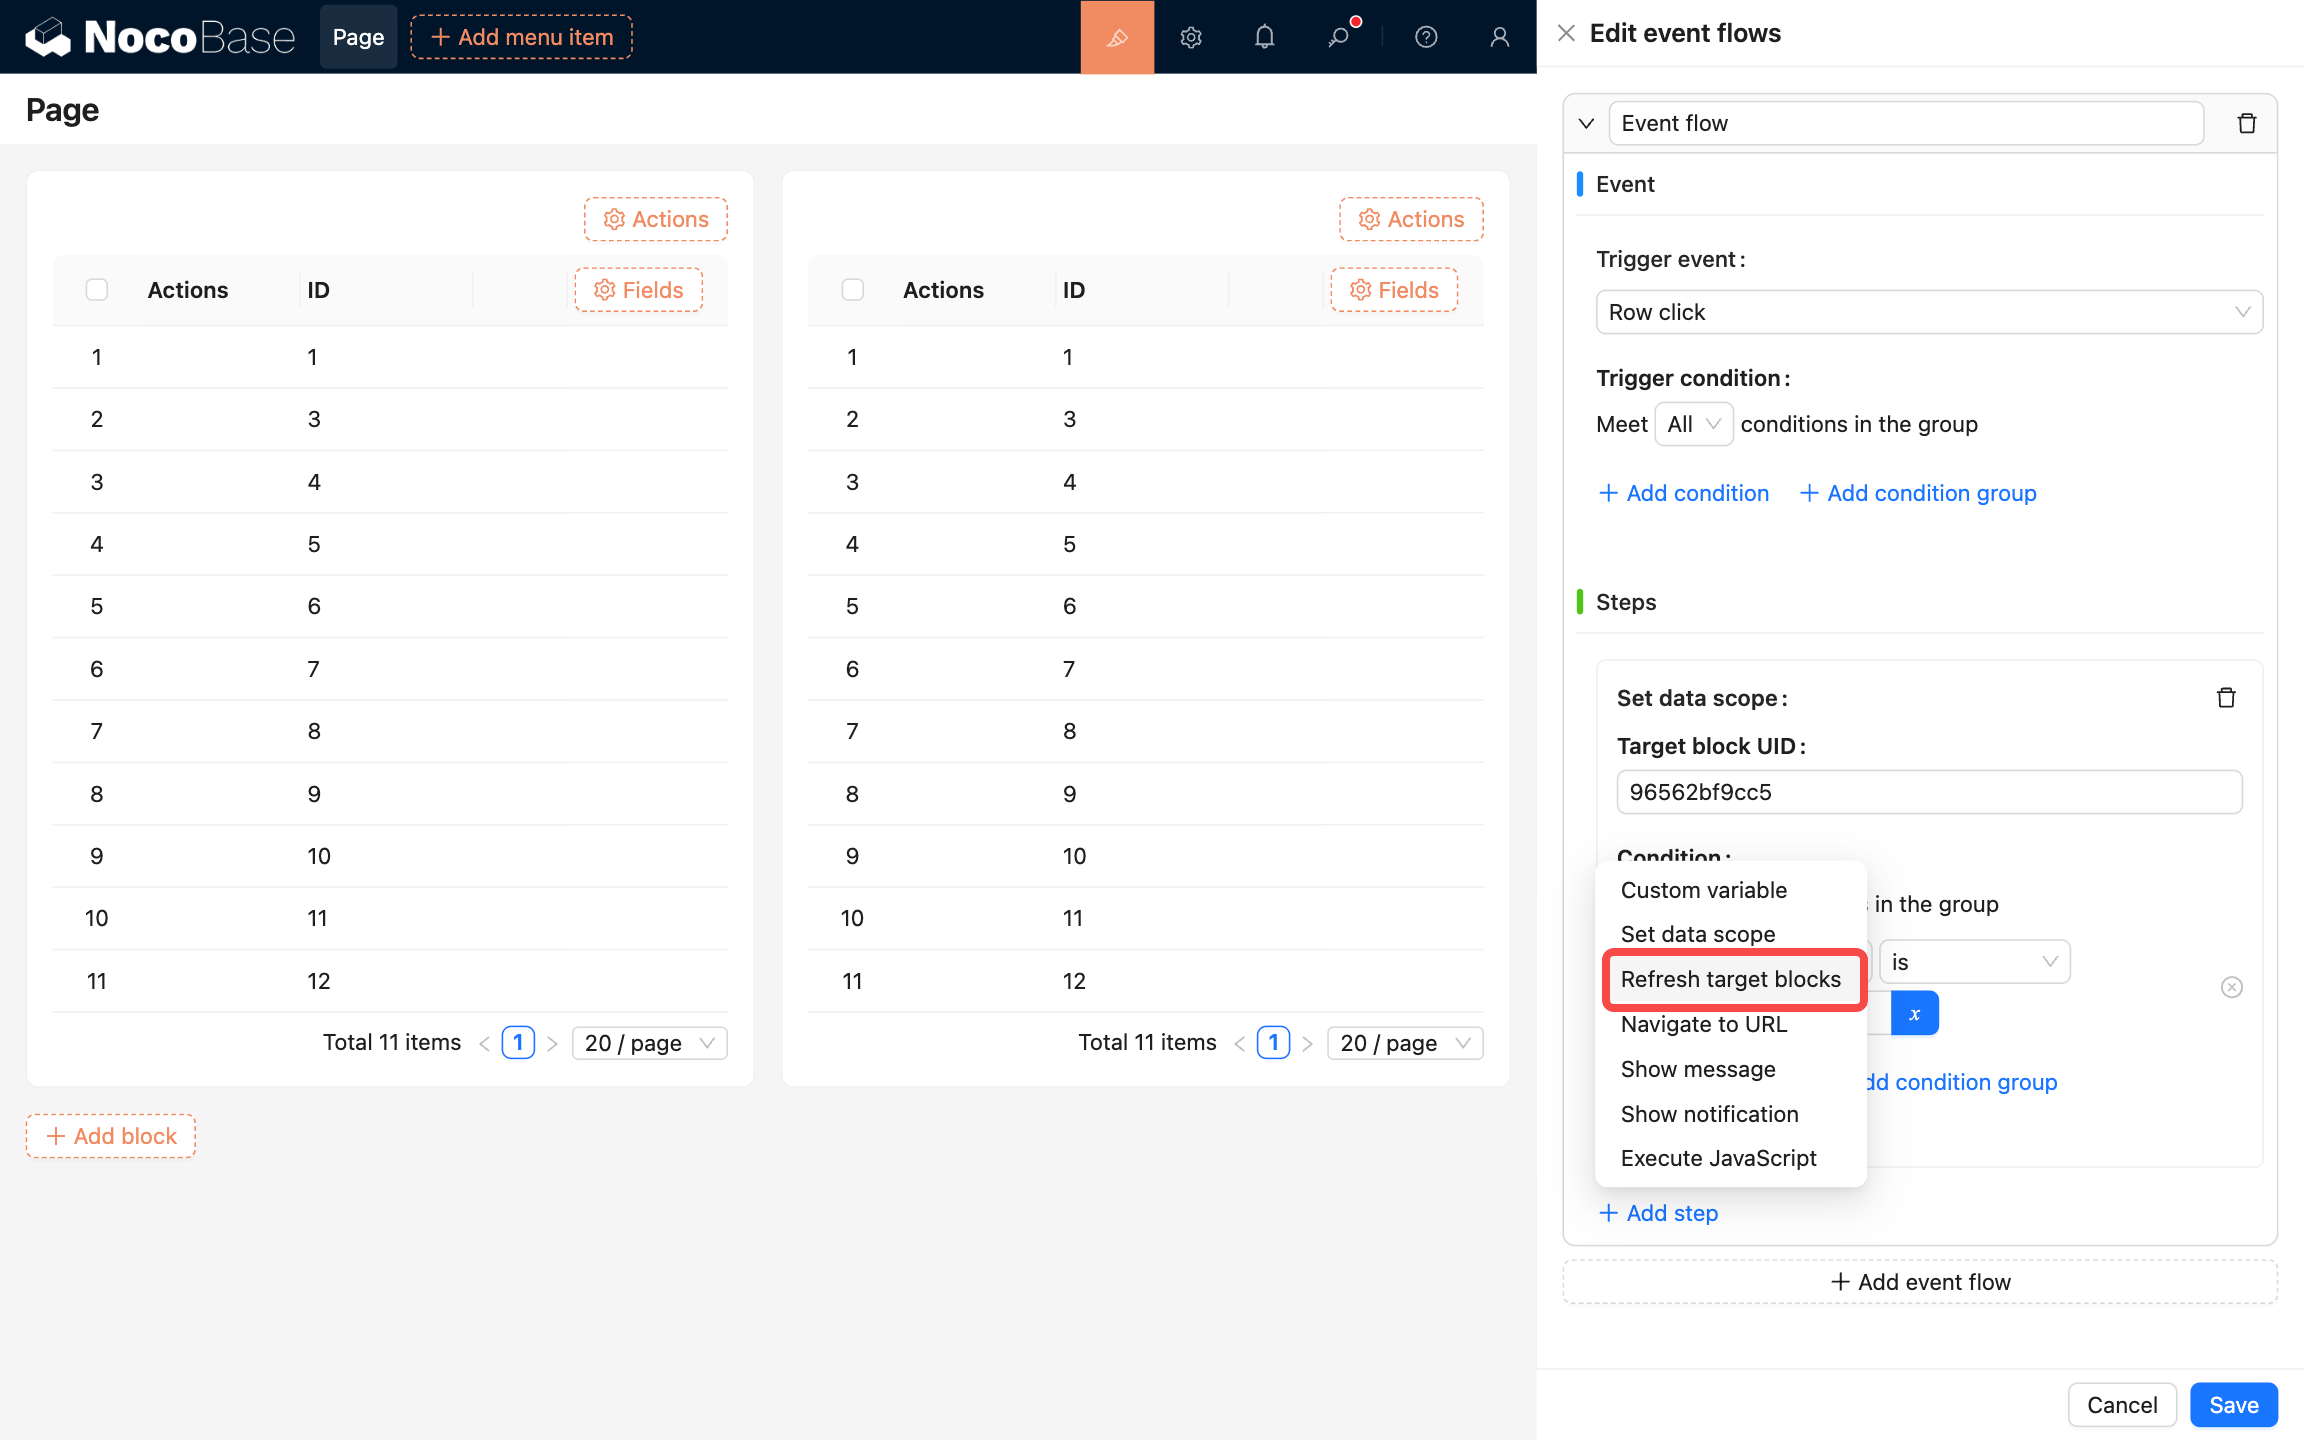
- Finally, click the save button in the bottom-right corner to complete the configuration.
Event types
Before render
A universal event that can be used in pages, blocks, buttons, or fields. Use this event for initialization tasks, such as configuring different data scopes based on different conditions.
Row click
A table block-specific event. Triggers when a table row is clicked. When triggered, it adds a "Clicked row record" to the context, which can be used as a variable in conditions and steps.
Form values change
A form block-specific event. Triggers when form field values change. You can access form values through the "Current form" variable in conditions and steps.
Click
A button-specific event. Triggers when the button is clicked.
Execution timing
In event flow settings, two concepts are easy to mix up:
- Trigger event: when the flow starts (e.g., Before render / Row click / Click / Form values change).
- Execution timing: after the same trigger event happens, where your custom flow runs relative to the built-in flows.
What are “built-in flows / built-in steps”?
Many pages, blocks, and actions have built-in behavior (for example: submit, open a dialog, request data). When you add a custom event flow on the same event (such as “Click”), “Execution timing” decides:
- whether your flow runs before or after the built-in logic, or
- whether it runs around a specific built-in flow/step.
How to choose an option in the UI
- Before all flows (default): runs first. Good for preparation/guarding (validation, confirmation, initializing variables, etc.).
- After all flows: runs after the built-in logic completes. Good for cleanup/feedback (messages, refreshing other blocks, navigation, etc.).
- Before/After built-in flow: a more specific insertion point. You’ll need to pick a “Built-in flow”.
- Before/After built-in flow step: the most specific insertion point. You’ll need to pick both a “Built-in flow” and a “Built-in flow step”.
Tip: if you’re not sure which built-in flow/step to pick, the first two options are usually enough.
Step types
Custom variable
Create a custom variable to use within the context.
Scope
Custom variables have scope. For example, a variable defined in a block's event flow can only be used within that block. To make a variable available across all blocks on the current page, configure it in the page's event flow.
Form variable
Use values from a form block as a variable. Configuration:
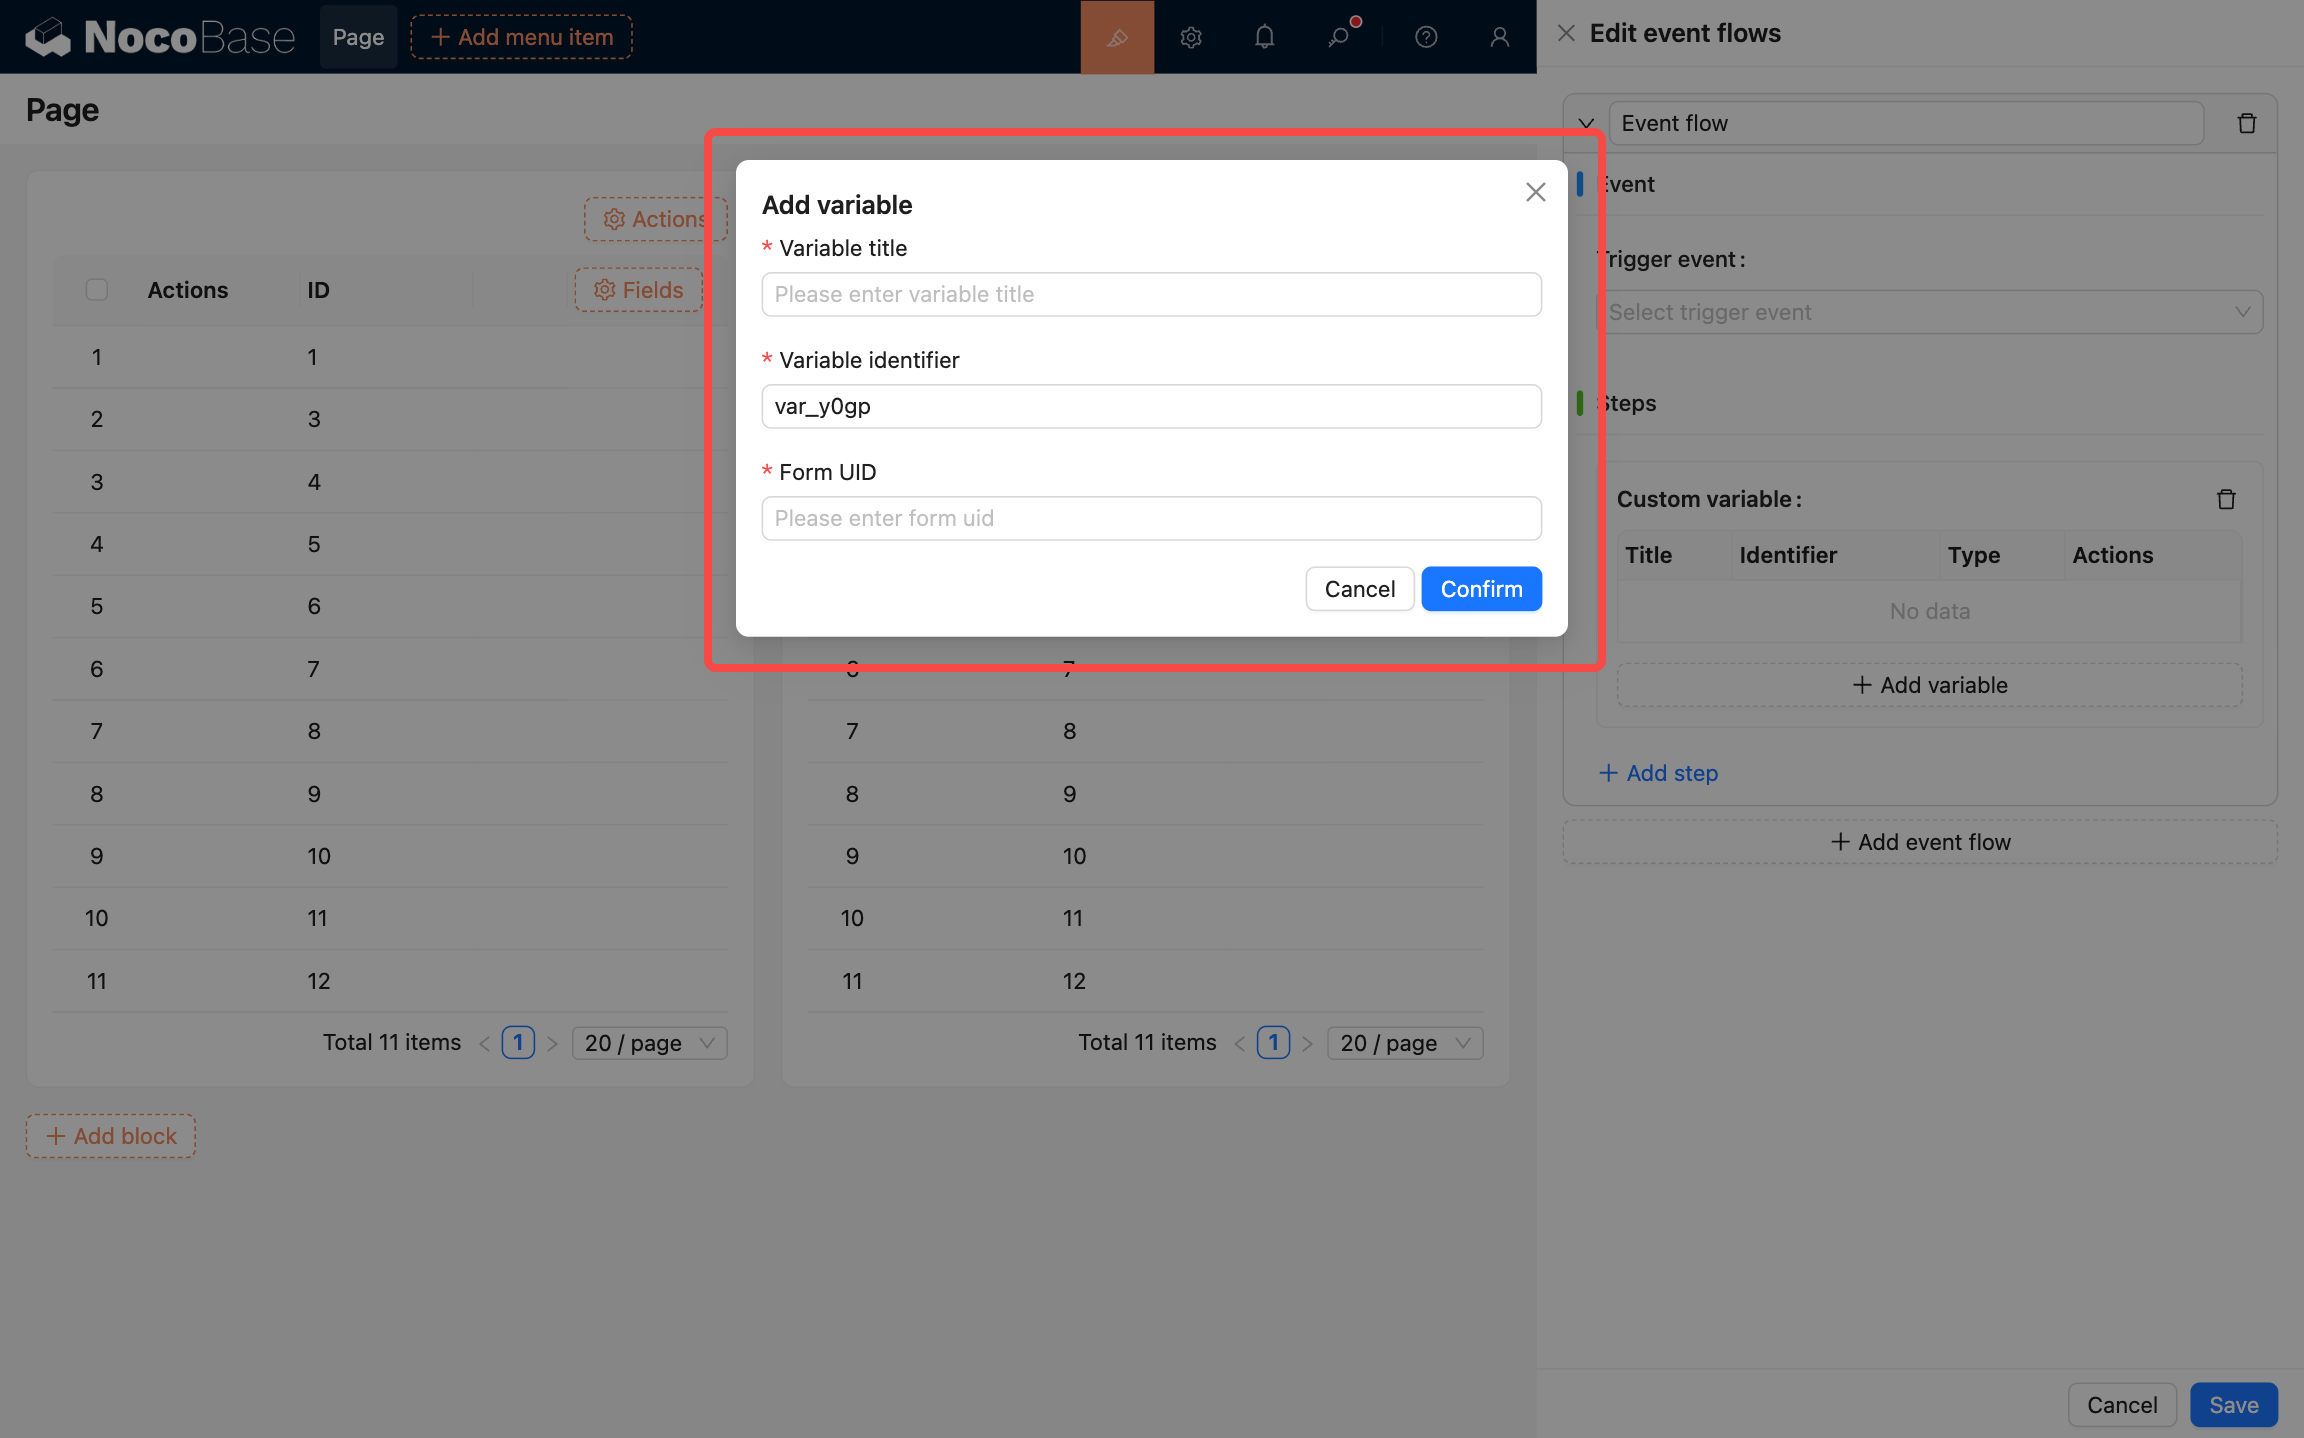
- Variable title: Variable title
- Variable identifier: Variable identifier
- Form UID: Form UID
Other variables
More variable types will be supported in the future.
Set data scope
Set the data scope for a target block. Configuration:
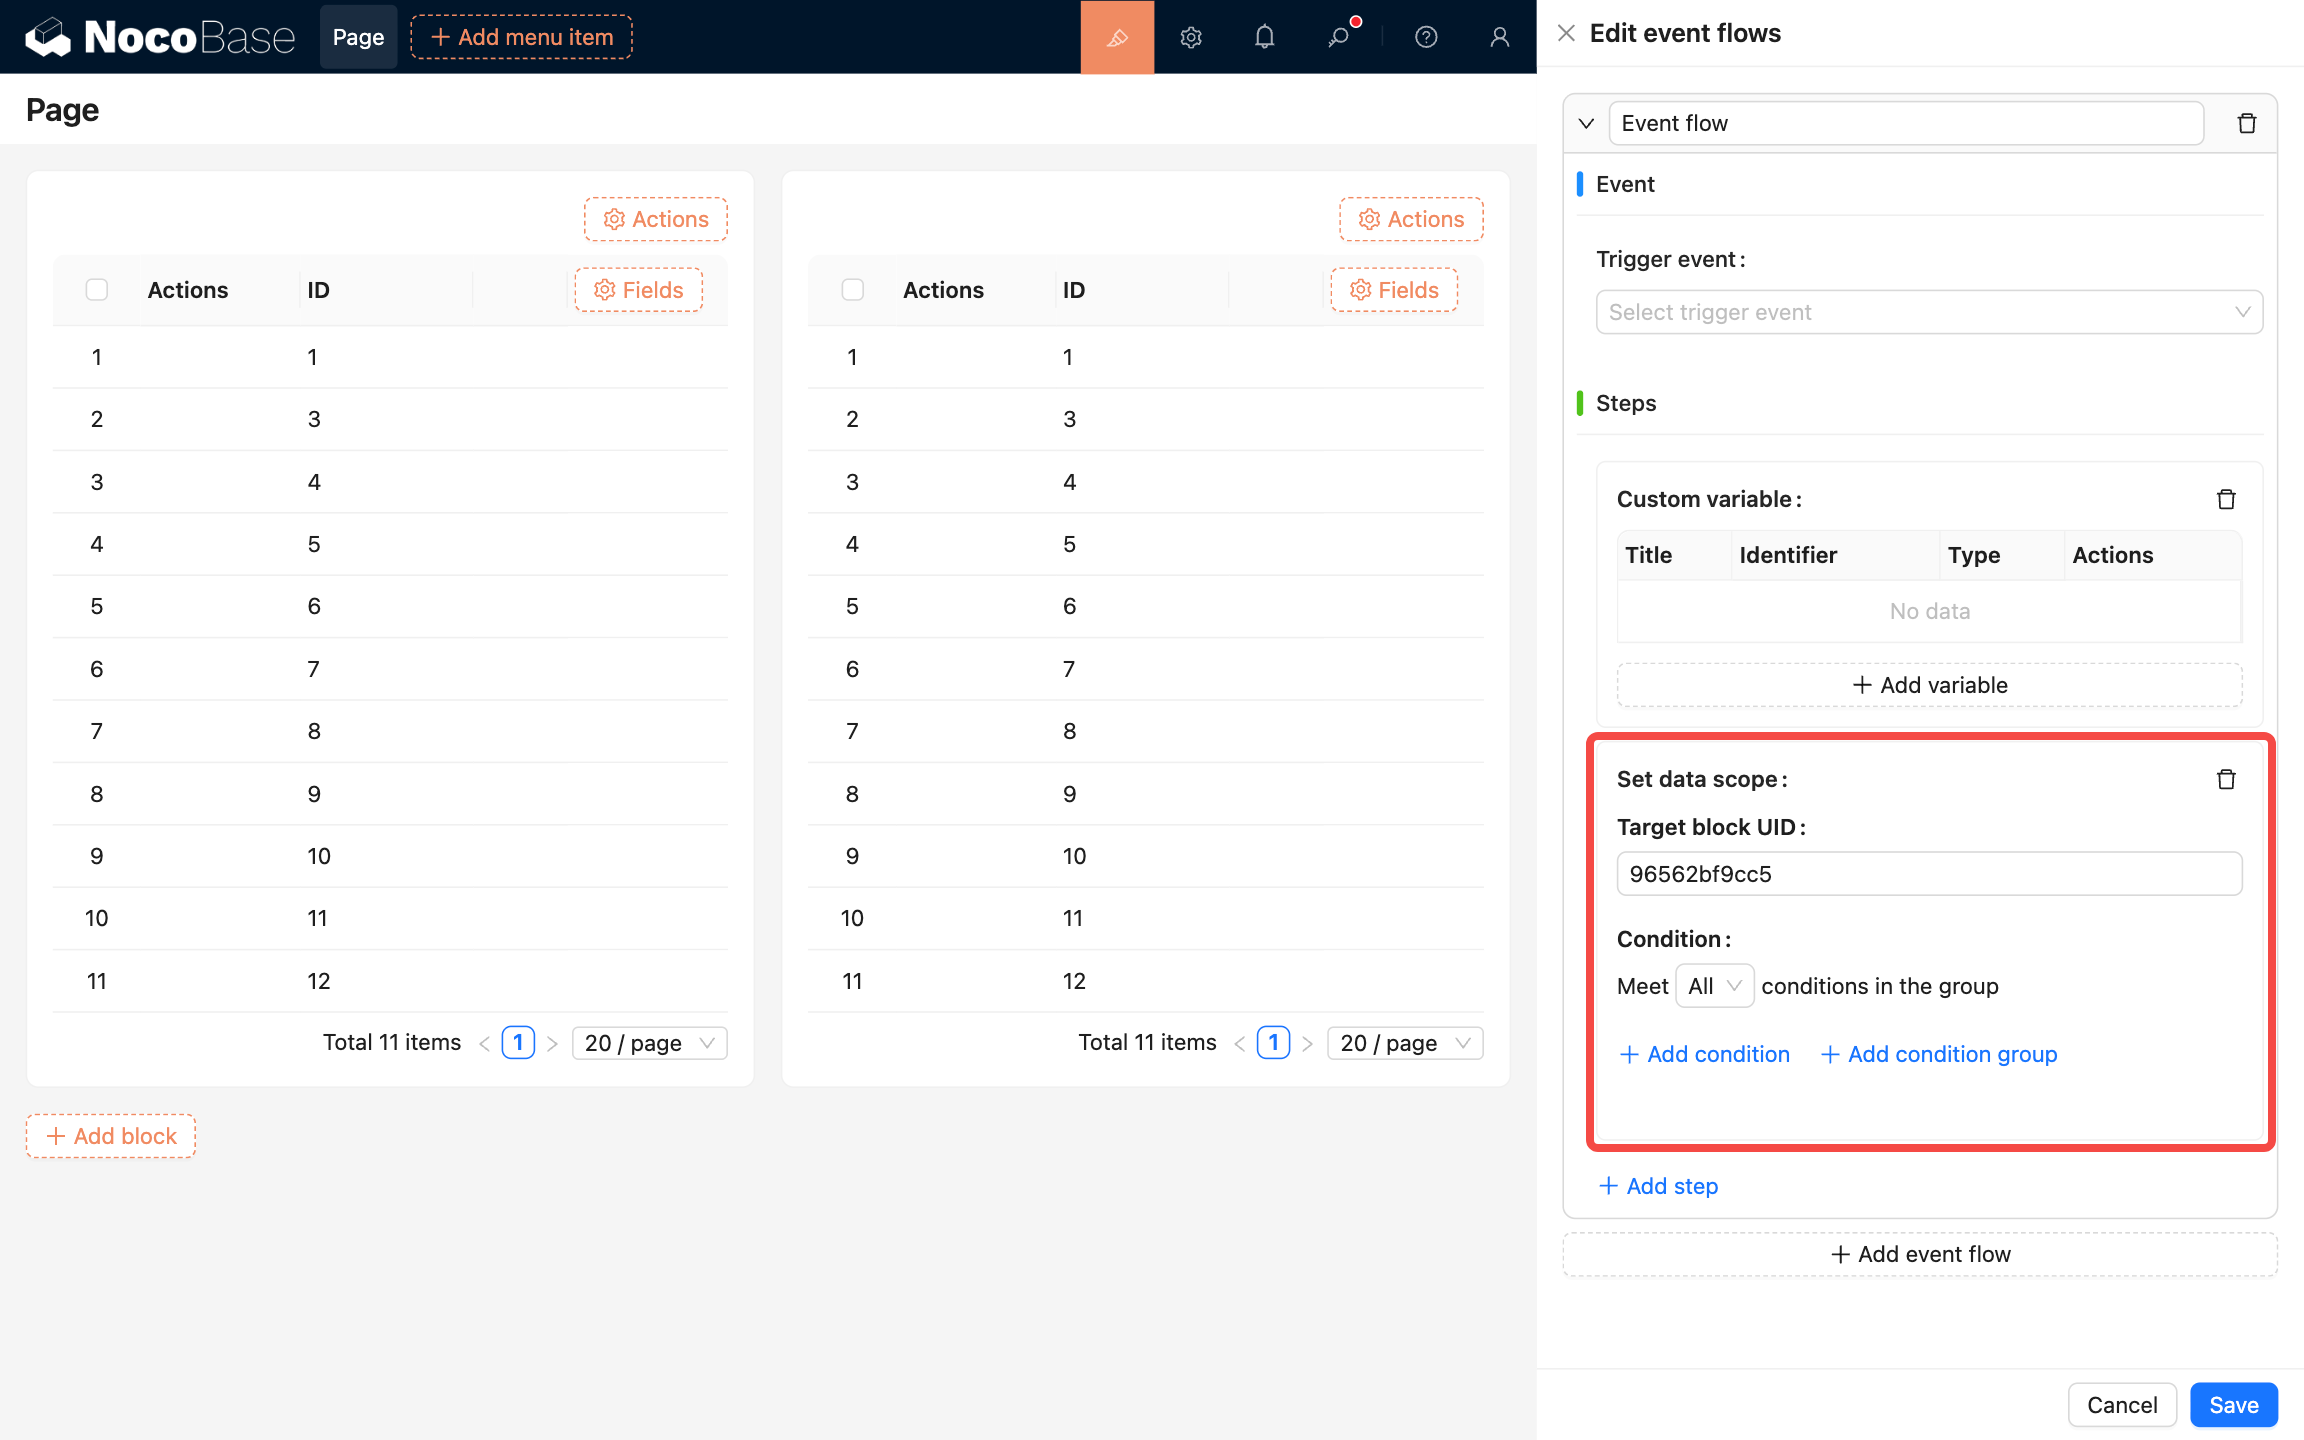
- Target block UID: Target block UID
- Condition: Filter condition
Refresh target blocks
Refresh target blocks. Multiple blocks can be configured. Configuration:

- Target block UID: Target block UID
Navigate to URL
Navigate to a URL. Configuration:
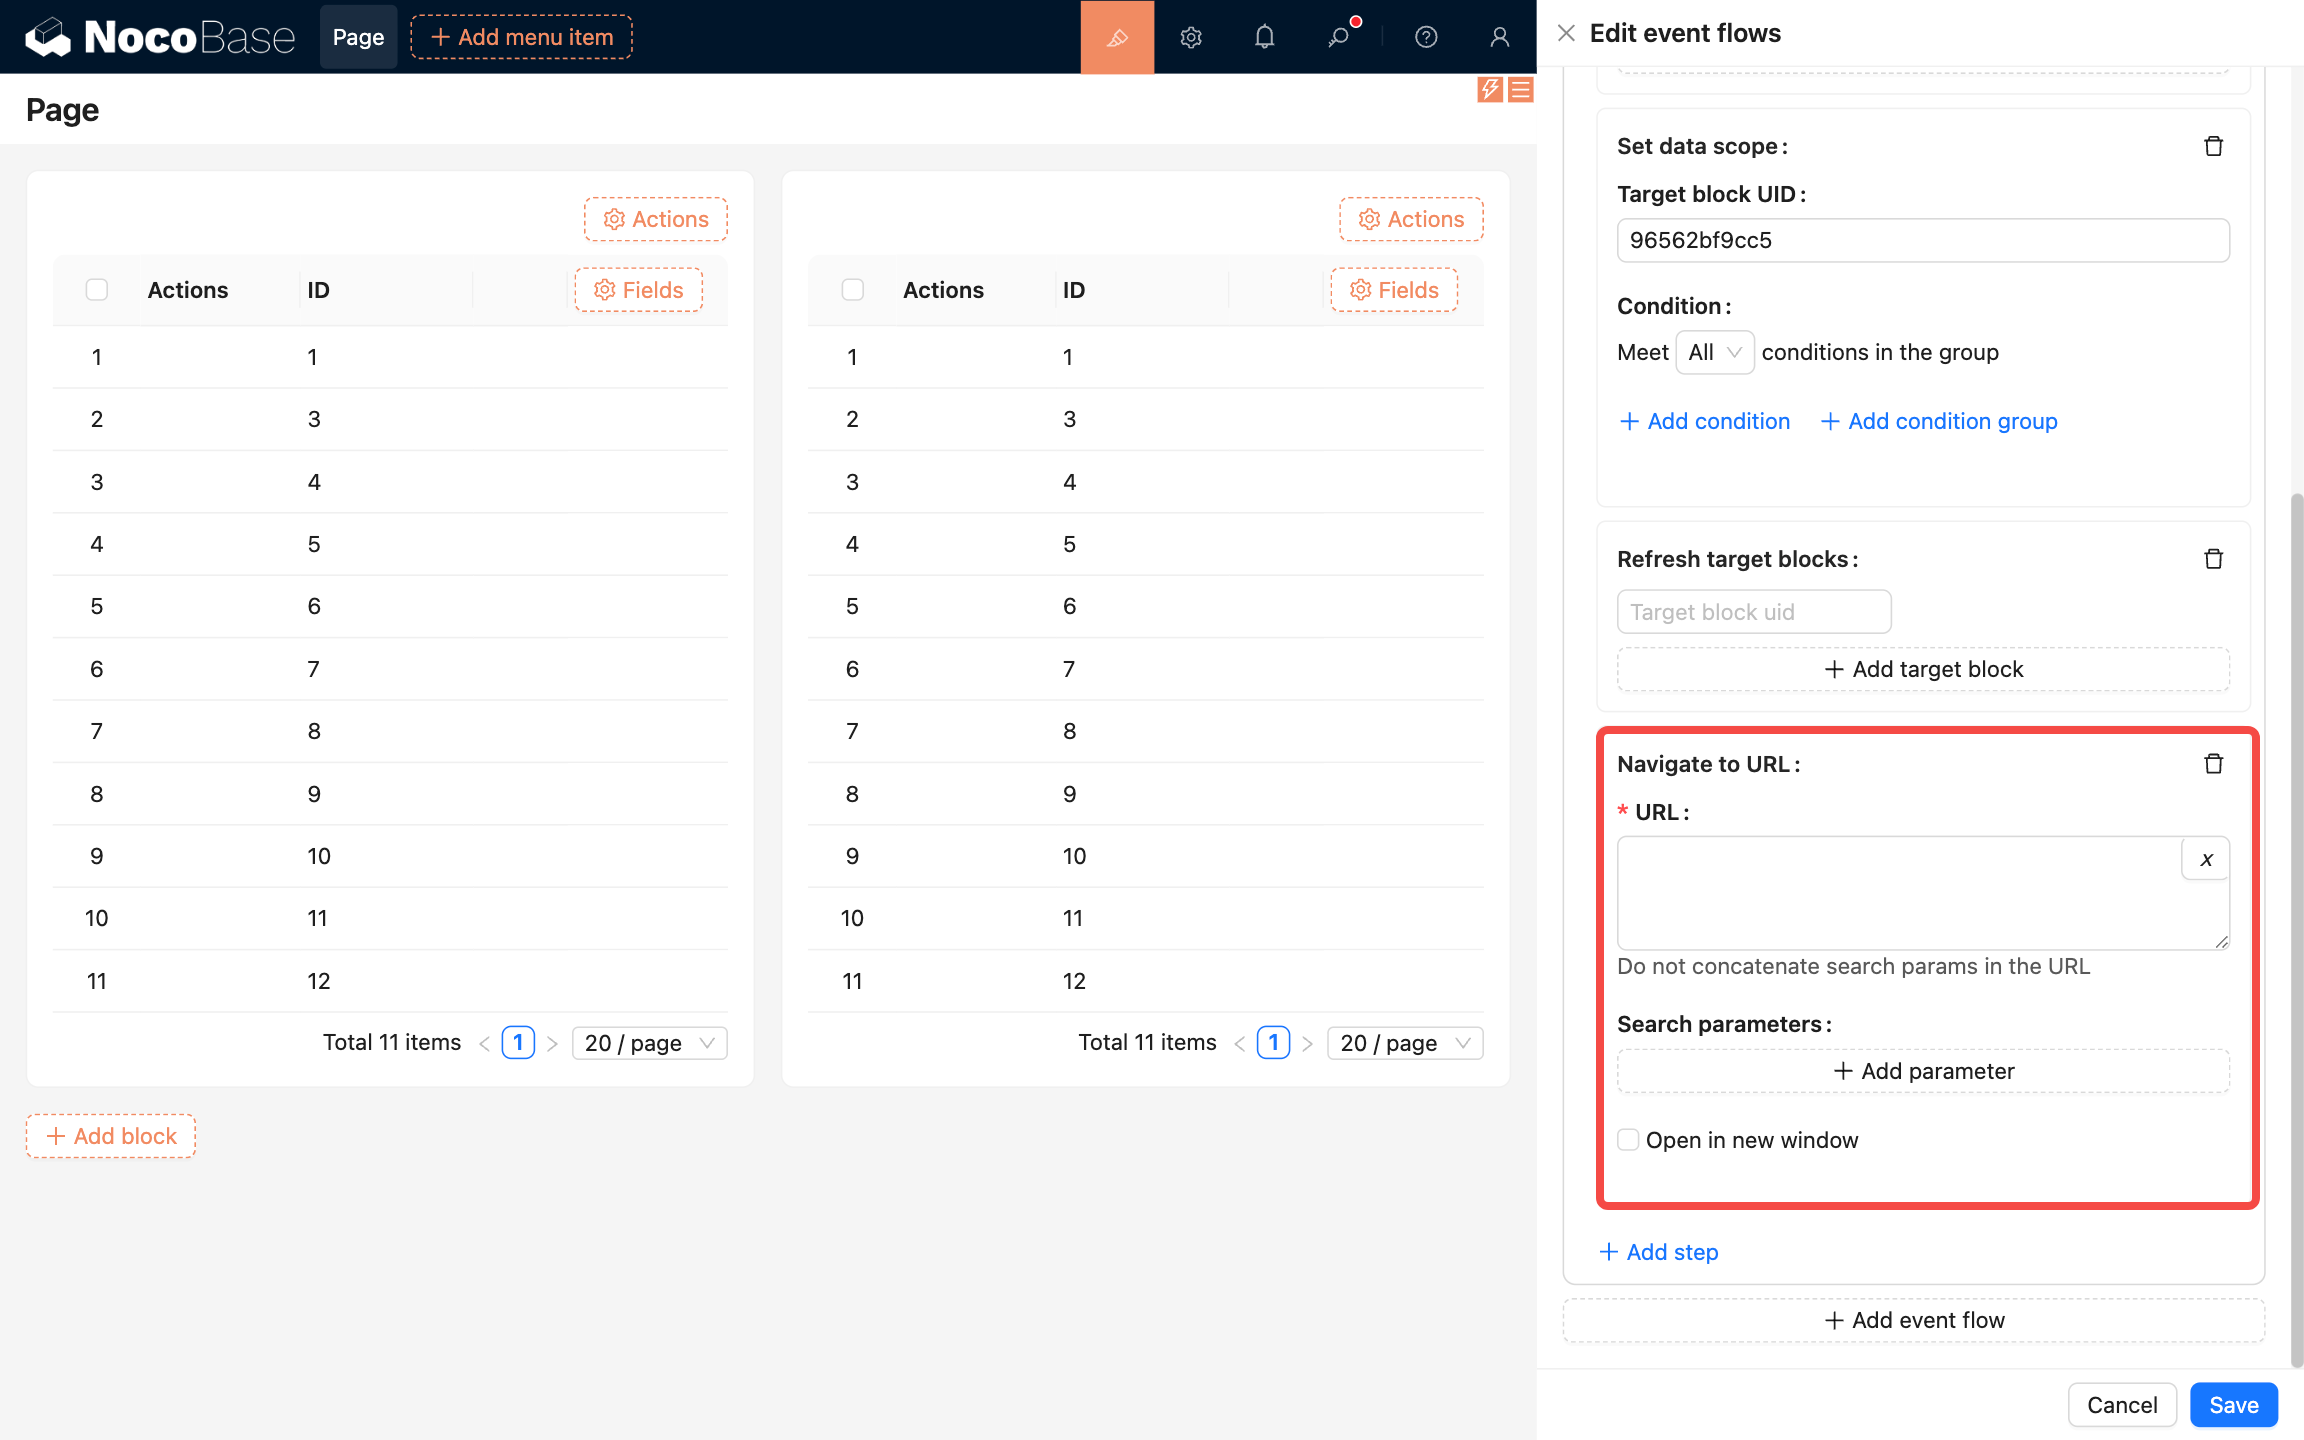
- URL: Target URL, supports variables
- Search parameters: Query parameters in the URL
- Open in new window: If checked, opens the URL in a new browser tab
Show message
Display global feedback messages.
When to use
- Provide success, warning, and error feedback.
- Display centered at the top and auto-dismiss, providing lightweight feedback without interrupting user operations.
Configuration
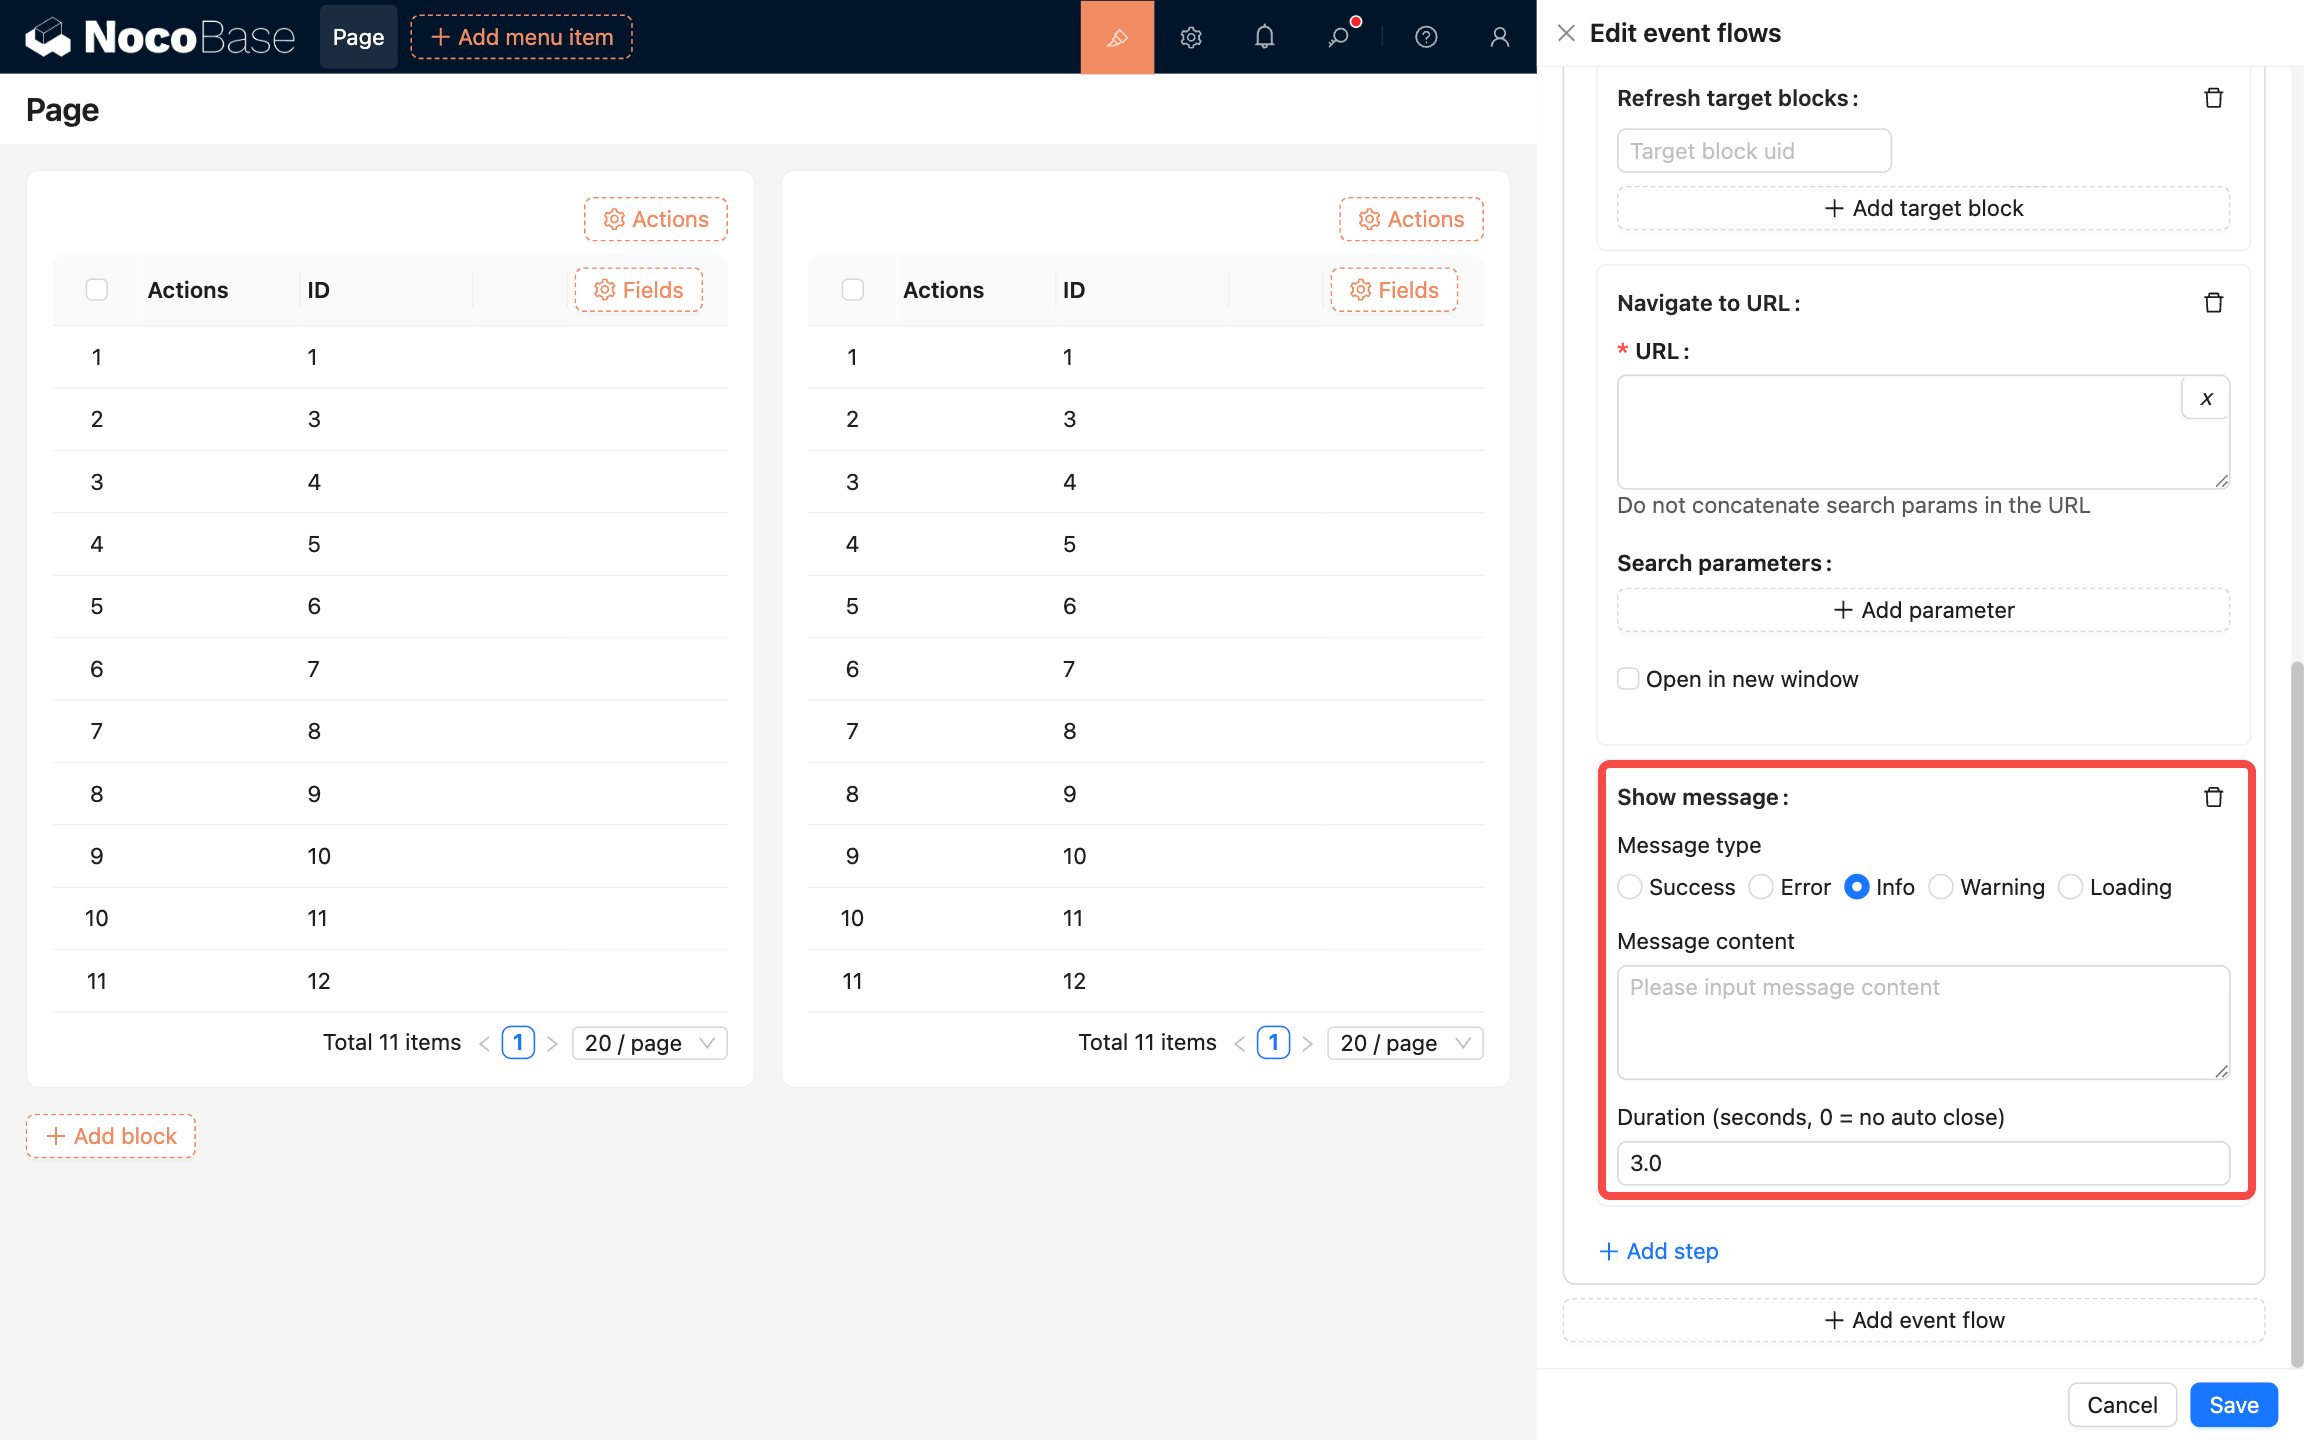
- Message type: Message type
- Message content: Message content
- Duration: How long to display (in seconds)
Show notification
Display global notification alerts.
When to use
Display notification alerts in the four corners of the system. Commonly used for:
- Complex notification content.
- Interactive notifications that provide users with next steps.
- System-initiated notifications.
Configuration

- Notification type: Notification type
- Notification title: Notification title
- Notification description: Notification description
- Placement: Position, options: top-left, top-right, bottom-left, bottom-right
Execute JavaScript
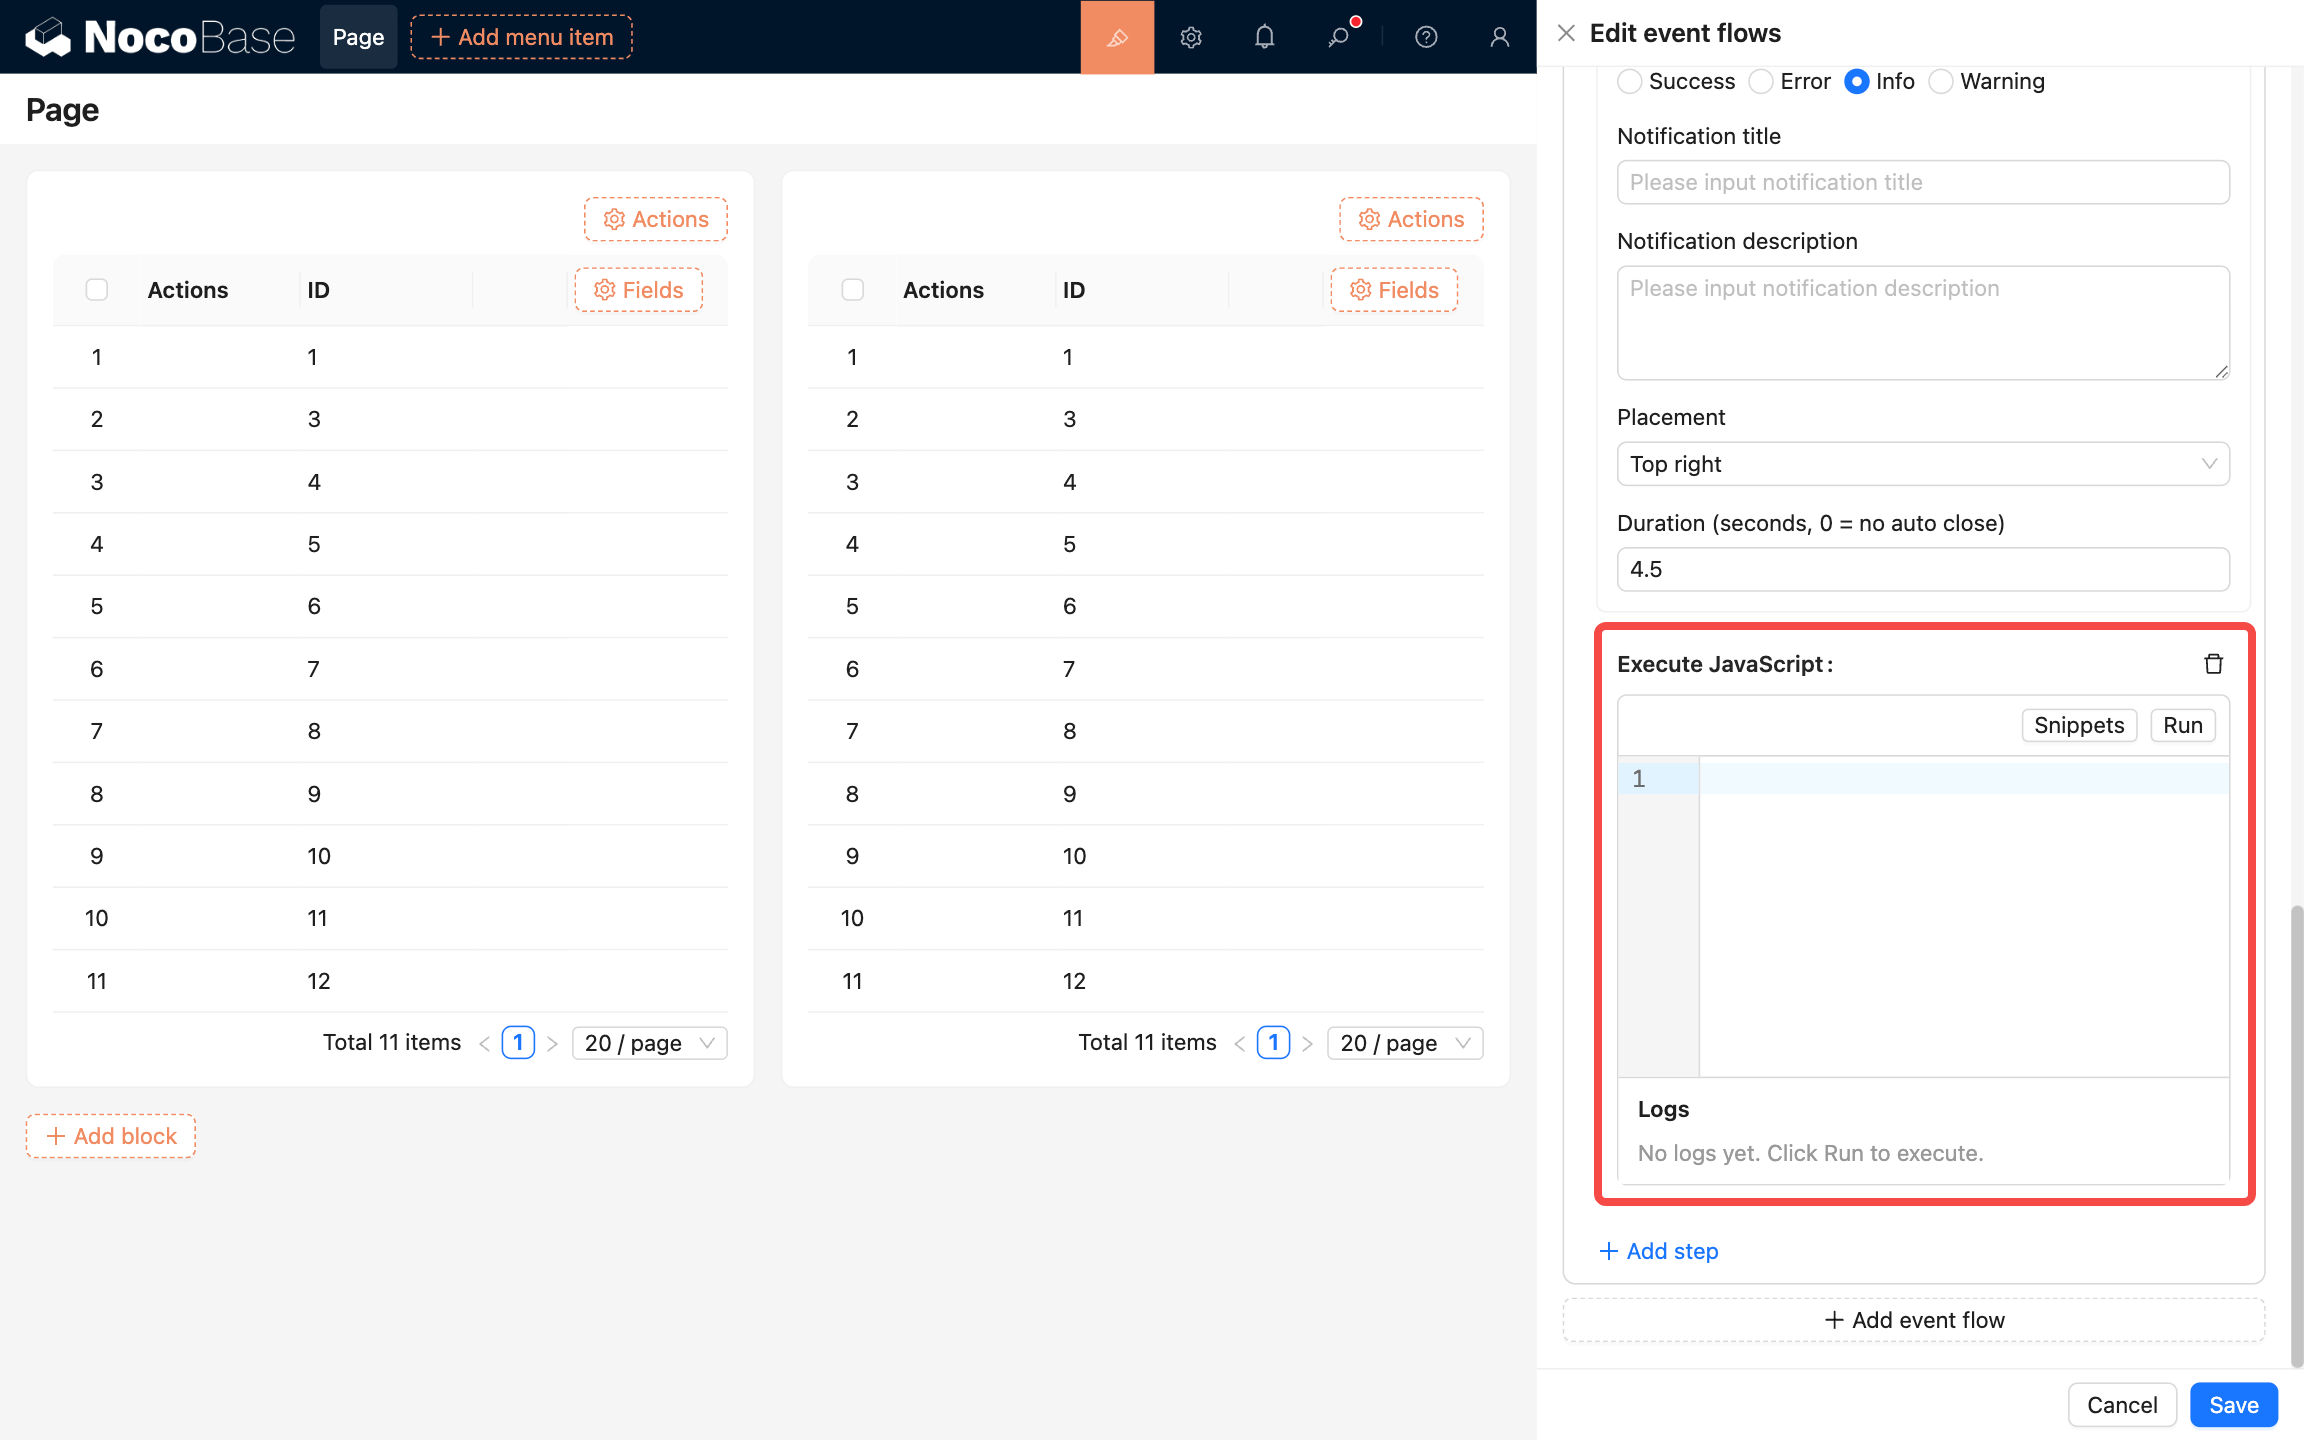
Execute JavaScript code.
Custom request
When to use
When you need to call an external API or third-party service within a flow, you can use Custom request to trigger a custom HTTP request. Common scenarios include:
- Calling external system APIs, such as CRM or AI services
- Fetching remote data for use in later flow steps
- Pushing data to third-party systems, such as webhooks or message notifications
- Triggering automated processes in internal or external services
After the request completes, its response data can continue to be used in subsequent steps for data processing, conditional checks, storage, and more.
Configuration
.png)
- HTTP method: The HTTP request method, such as
GET,POST,PUT, orDELETE. - URL: The target address of the request. You can enter a full endpoint URL or build it dynamically with variables.
- Headers: Request headers used to pass authentication information or API configuration, such as
AuthorizationandContent-Type. - Parameters: URL query parameters, typically used in
GETrequests. - Body: The request body, typically used in
POST,PUT, and similar requests. You can provide JSON, form data, and more. - Timeout config: The request timeout setting, used to limit the maximum waiting time and avoid blocking the flow for too long.
- Response type: The data type of the response.
- JSON: The API returns JSON data. The result is injected into the flow context and can be accessed in later steps through
ctx.steps. - Stream: The API returns a data stream. A successful request automatically triggers a file download.
- JSON: The API returns JSON data. The result is injected into the flow context and can be accessed in later steps through
- Access control: Used to restrict which roles can trigger this request step, helping ensure the security of the API call.
Examples
Form: call a third-party API and fill fields
Scenario: trigger an event flow in a form, call a third-party API, and fill a form field with the response.
Example setup:
- Open event flow settings on the form block and add an event flow;
- Choose “Before render” as the trigger event;
- Set “Execution timing” to “After all flows”;
- Add an “Execute JavaScript” step and paste/edit the code below: